> ## Documentation Index
> Fetch the complete documentation index at: https://docs.edgeimpulse.com/llms.txt
> Use this file to discover all available pages before exploring further.
# Run Arm Keil MDK CMSIS-Pack
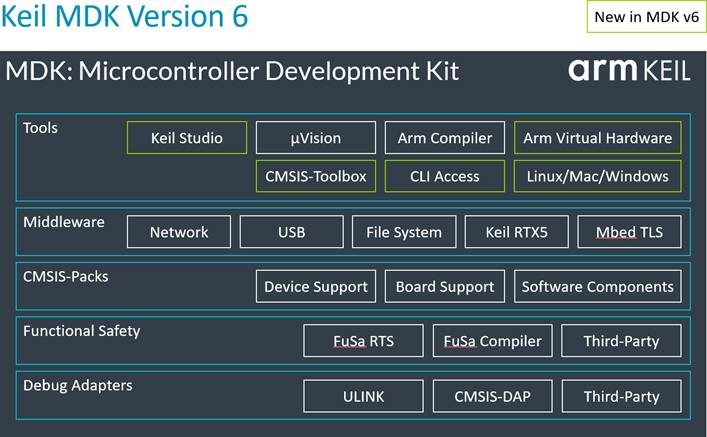 [Arm Keil Microcontroller Development Kit (MDK)](https://www.keil.com/) is created by Arm and is a complete C/C++ development tool suite for Arm processors. The Keil MDK offers device support for most of the ARM silicon and development boards and includes a rich set of build and debugging tools. In Edge Impulse studio you can deploy your model to the open standard CMSIS library format that can be imported into any Arm Keil MDK project with ease.
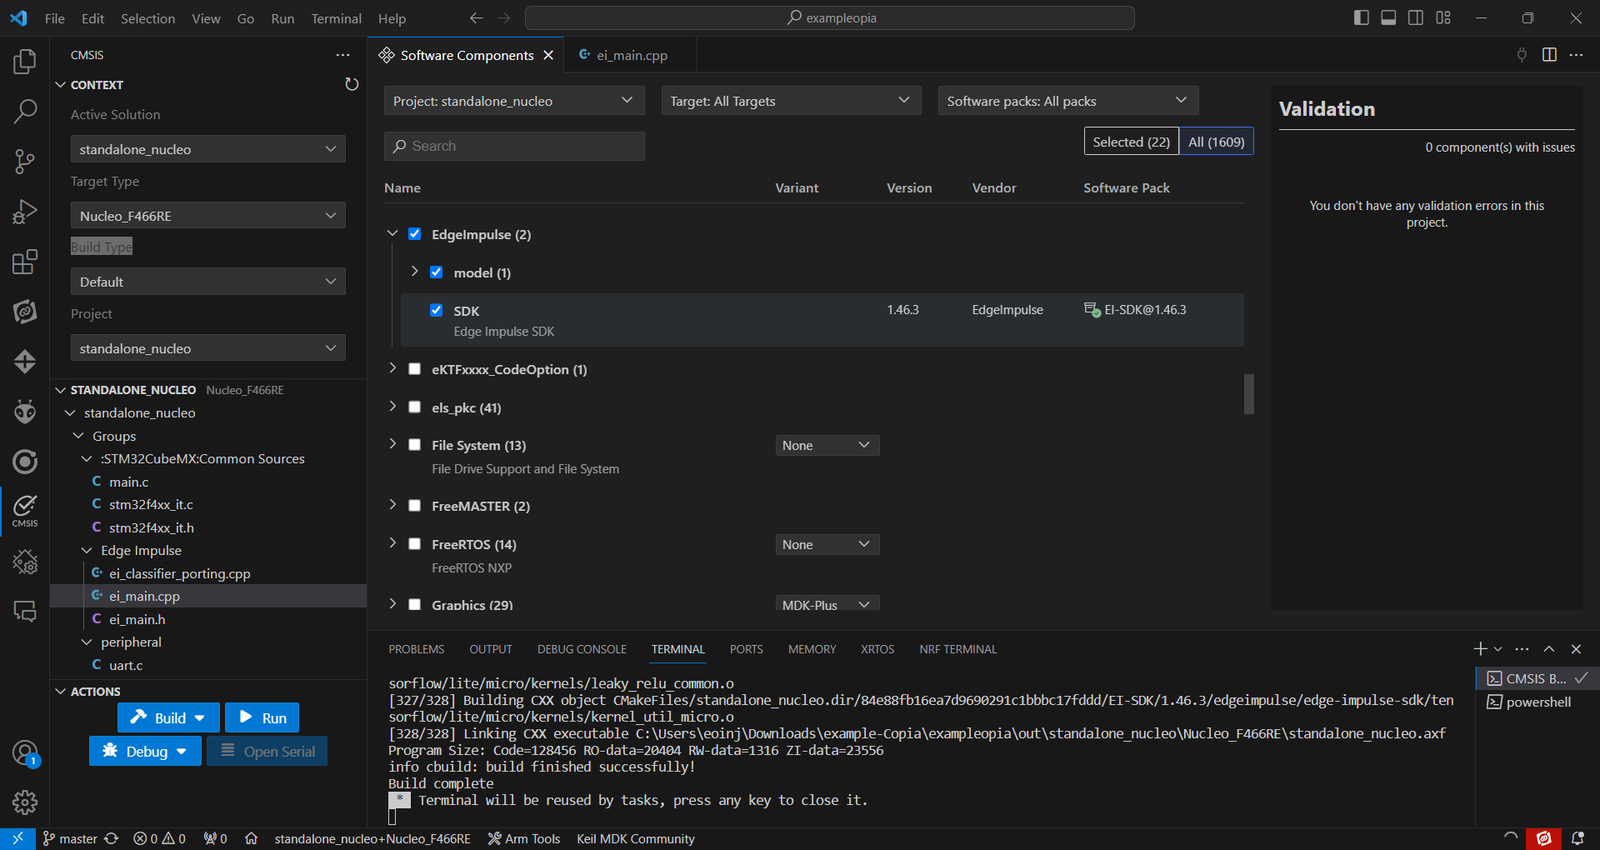 The Edge Impulse pack repository plays a crucial role in this process. It is continuously updated, ensuring that the .pack files, are automatically refreshed. This automation extends to PDSC (Pack Description) files, which are updated through the Keil MDK pack for our Edge Impulse SDK, providing a seamless integration experience.
 To read more about the CMSIS standard, and our other CMSIS integrations, please visit our [CMSIS documentation](/hardware/deployments/run-open-cmsis-pack).
## Performance Benchmark: Arm Clang v16.9 vs. GCC 10.3
It is worth noting that when comparing the performance of the Arm Clang v16.9 and GCC 10.c compilers, the Arm Clang v16.9 compiler outperforms the GCC 10.c compiler in terms of DSP processing time and classification time. The Arm Clang v16.9 compiler is 24.25% faster in DSP processing time and 20.58% faster in classification time. This is a significant improvement in performance when using the Arm Clang v16.9 compiler.
| Metric | Improvement using Arm Clang v16.9 compiler |
| ------------------- | ------------------------------------------ |
| DSP Processing Time | 24.25% |
| Classification Time | 20.58% |
Arm Clang v16.9 (Renesas EK-RA8D1)
* DSP Time: 709 microseconds
* Classification Time: 18908 microseconds
* Anomaly Detection Time: 0 microseconds
Detected Faces:
* Face 1: Confidence 98.437% at \[x: 80, y: 16, width: 8, height: 8]
* Face 2: Confidence 85.156% at \[x: 0, y: 32, width: 16, height: 16]
GCC 10.3 (Renesas EK-RA8D1)
* DSP Time: 936 microseconds
* Classification Time: 23807 microseconds
* Anomaly Detection Time: 0 microseconds
Detected Faces:
* Face 1: Confidence 98.437% at \[x: 80, y: 16, width: 8, height: 8]
* Face 2: Confidence 85.156% at \[x: 0, y: 32, width: 16, height: 16]
## Prerequisites
To get started with Arm Keil MDK, you will need to install one of the following tools:
* [Keil Studio for VS Code](https://marketplace.visualstudio.com/items?itemName=Arm.keil-studio-pack)
* [Keil Studio Cloud](https://studio.keil.arm.com/cmsis)
* [Keil µVision](https://www2.keil.com/mdk5/editions/community)
* [Arm Compiler for Embedded](https://www.keil.arm.com/artifacts/)
* [Arm CMSIS-Toolbox](https://www.keil.arm.com/artifacts/)
## Getting started
First we will need the Edge Impulse SDK pack and an Edge Impulse project CMSIS-packs. You can download these from the deployment section of the Edge Impulse Studio.
### Deploy your project to an Open CMSIS pack
To read more about the CMSIS standard, and our other CMSIS integrations, please visit our [CMSIS documentation](/hardware/deployments/run-open-cmsis-pack).
## Performance Benchmark: Arm Clang v16.9 vs. GCC 10.3
It is worth noting that when comparing the performance of the Arm Clang v16.9 and GCC 10.c compilers, the Arm Clang v16.9 compiler outperforms the GCC 10.c compiler in terms of DSP processing time and classification time. The Arm Clang v16.9 compiler is 24.25% faster in DSP processing time and 20.58% faster in classification time. This is a significant improvement in performance when using the Arm Clang v16.9 compiler.
| Metric | Improvement using Arm Clang v16.9 compiler |
| ------------------- | ------------------------------------------ |
| DSP Processing Time | 24.25% |
| Classification Time | 20.58% |
Arm Clang v16.9 (Renesas EK-RA8D1)
* DSP Time: 709 microseconds
* Classification Time: 18908 microseconds
* Anomaly Detection Time: 0 microseconds
Detected Faces:
* Face 1: Confidence 98.437% at \[x: 80, y: 16, width: 8, height: 8]
* Face 2: Confidence 85.156% at \[x: 0, y: 32, width: 16, height: 16]
GCC 10.3 (Renesas EK-RA8D1)
* DSP Time: 936 microseconds
* Classification Time: 23807 microseconds
* Anomaly Detection Time: 0 microseconds
Detected Faces:
* Face 1: Confidence 98.437% at \[x: 80, y: 16, width: 8, height: 8]
* Face 2: Confidence 85.156% at \[x: 0, y: 32, width: 16, height: 16]
## Prerequisites
To get started with Arm Keil MDK, you will need to install one of the following tools:
* [Keil Studio for VS Code](https://marketplace.visualstudio.com/items?itemName=Arm.keil-studio-pack)
* [Keil Studio Cloud](https://studio.keil.arm.com/cmsis)
* [Keil µVision](https://www2.keil.com/mdk5/editions/community)
* [Arm Compiler for Embedded](https://www.keil.arm.com/artifacts/)
* [Arm CMSIS-Toolbox](https://www.keil.arm.com/artifacts/)
## Getting started
First we will need the Edge Impulse SDK pack and an Edge Impulse project CMSIS-packs. You can download these from the deployment section of the Edge Impulse Studio.
### Deploy your project to an Open CMSIS pack
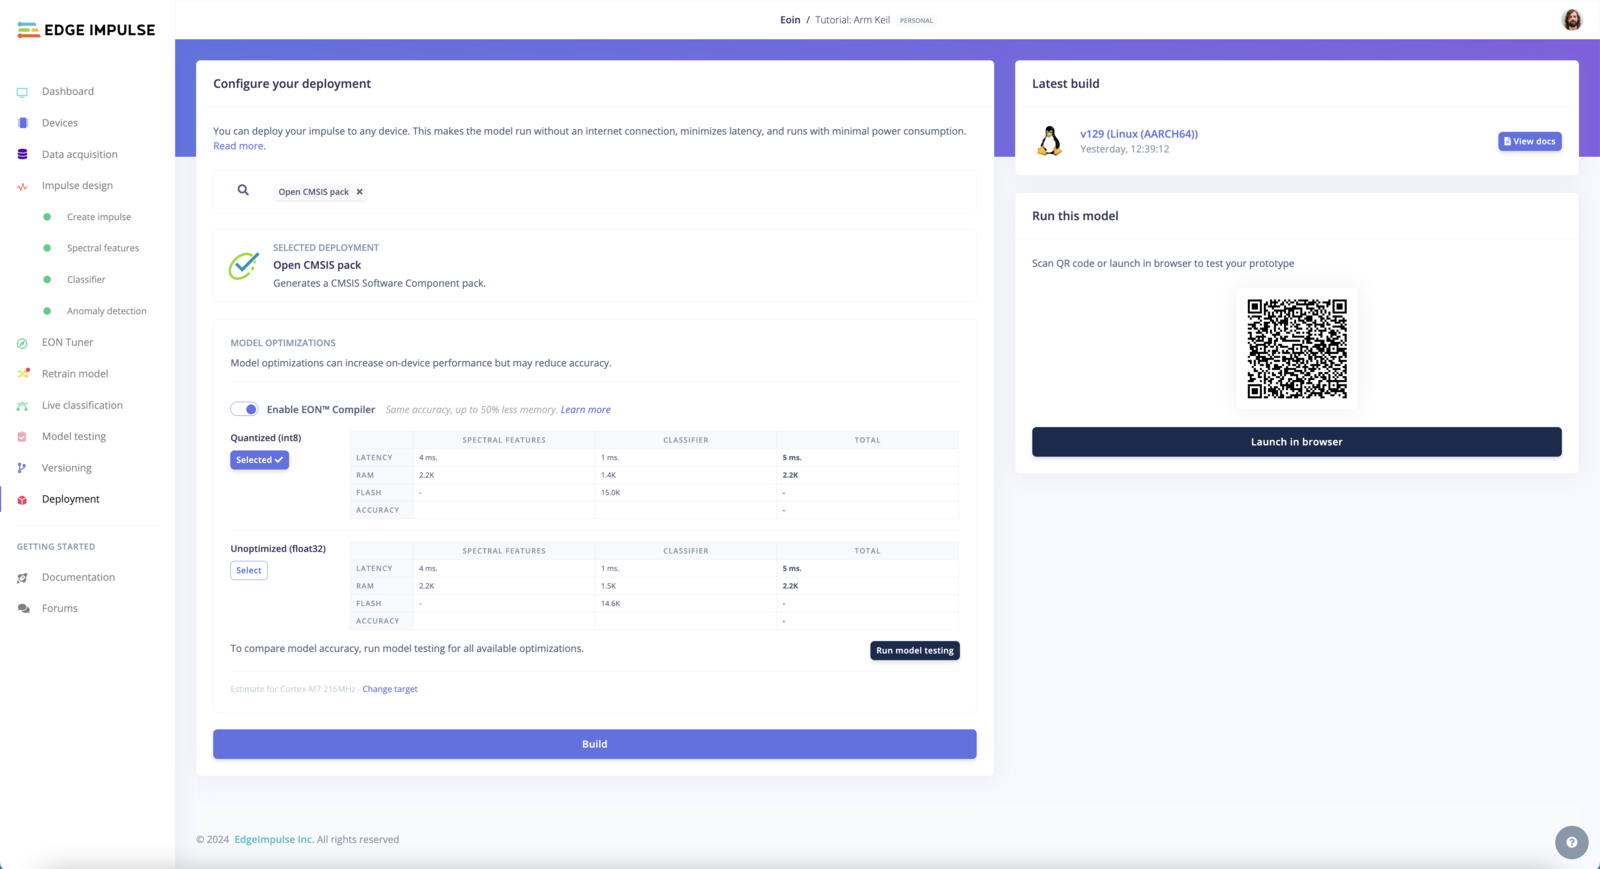 In the deployment section of Edge Impulse Studio select the **Open CMSIS pack** option. Depending on your model optimization preferences you can enable the EON compiler and choose between Quantized and Unoptimized data format. Clicking **Build** will initiate the build process and, when finished, downloads a zip file containing the generated CMSIS Software Component packs. Two files are included in the zip file:
* EdgeImpulse.EI-SDK.x.y.z.pack
* EdgeImpulse.project\_name.x.y.z.pack
The first file is the Edge Impulse SDK pack, which contains the Edge Impulse library and the required dependencies. The second file is the project pack, which contains the project specific configuration and the trained model.
### Edge Impulse SDK Pack
The Edge Impulse SDK pack contains the Edge Impulse library and the required dependencies. The pack will be listed under the `EdgeImpulse::EI-SDK` category, and is now available from the [Arm Keil Pack Installer](https://www.keil.arm.com/packs/ei-sdk-edgeimpulse/versions/).
In the deployment section of Edge Impulse Studio select the **Open CMSIS pack** option. Depending on your model optimization preferences you can enable the EON compiler and choose between Quantized and Unoptimized data format. Clicking **Build** will initiate the build process and, when finished, downloads a zip file containing the generated CMSIS Software Component packs. Two files are included in the zip file:
* EdgeImpulse.EI-SDK.x.y.z.pack
* EdgeImpulse.project\_name.x.y.z.pack
The first file is the Edge Impulse SDK pack, which contains the Edge Impulse library and the required dependencies. The second file is the project pack, which contains the project specific configuration and the trained model.
### Edge Impulse SDK Pack
The Edge Impulse SDK pack contains the Edge Impulse library and the required dependencies. The pack will be listed under the `EdgeImpulse::EI-SDK` category, and is now available from the [Arm Keil Pack Installer](https://www.keil.arm.com/packs/ei-sdk-edgeimpulse/versions/).
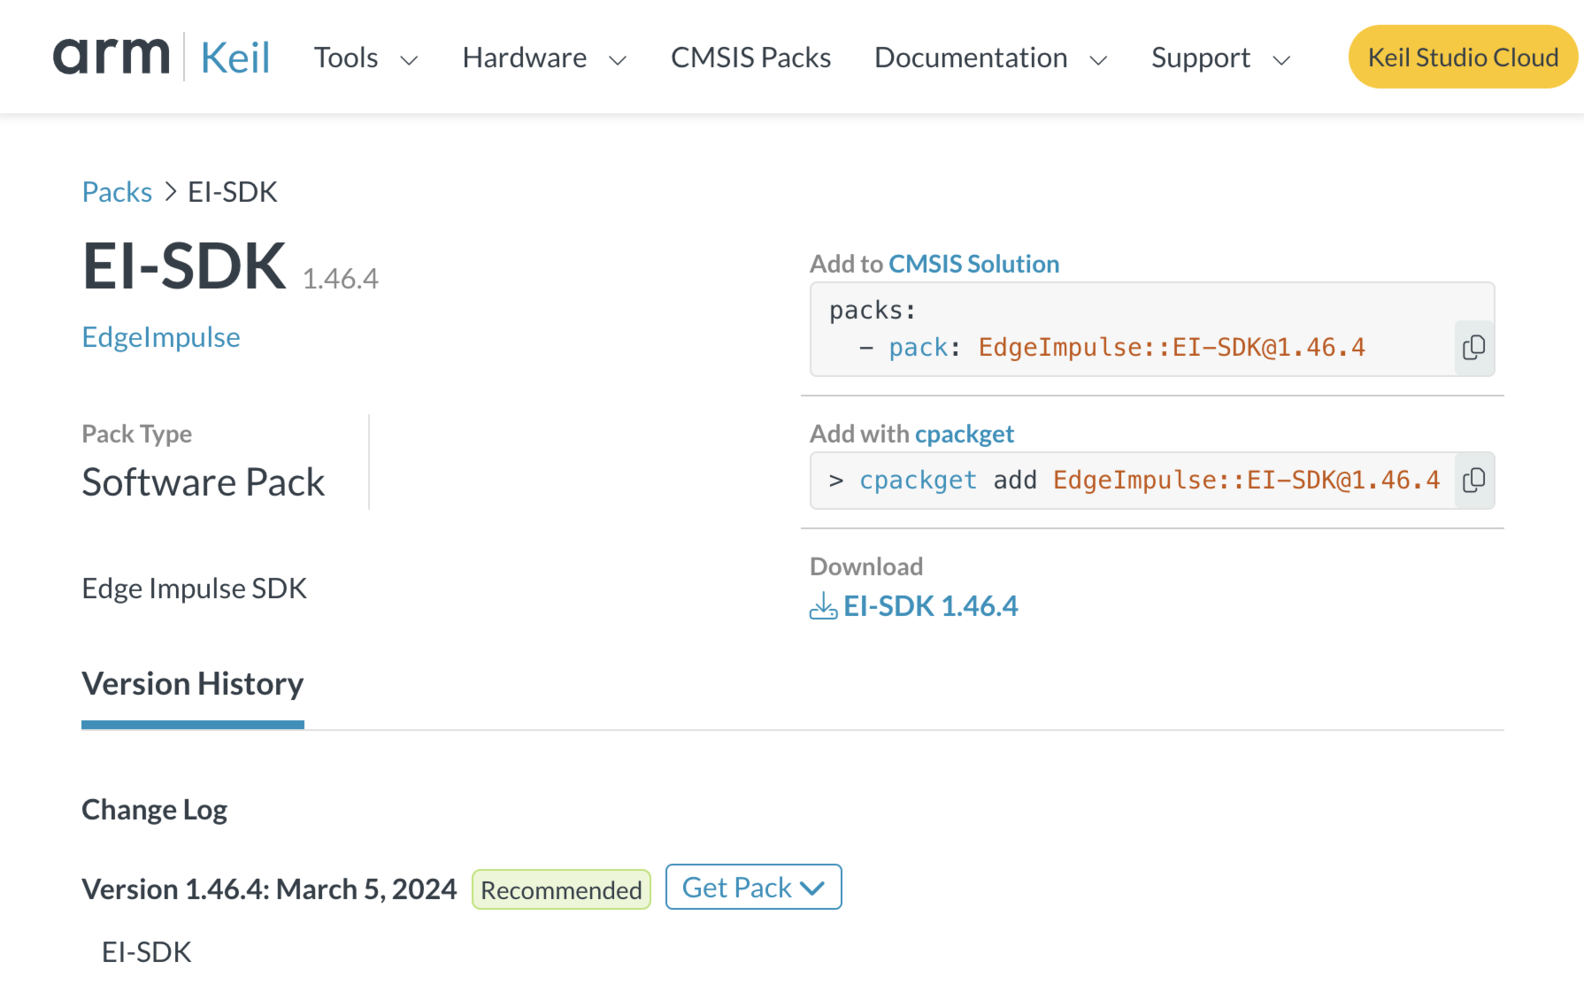 * [Edge Impulse EI-SDK pack](https://www.keil.arm.com/packs/ei-sdk-edgeimpulse/versions/)
### CMSIS-Pack Requirements
The Edge Impulse SDK pack requires the following CMSIS packs:
* [CMSIS-NN 4.0.0](https://www.keil.arm.com/packs/cmsis-nn-arm/versions/) Focuses on optimizing ML operators for Cortex-M, targeting Edge AI applications.
* [CMSIS-DSP 1.15.0](https://www.keil.arm.com/packs/cmsis-dsp-arm/versions/) A collection of DSP functions optimized for Cortex-M processors, suitable for DSP applications.
### Standalone Inference Example
If you want to test the model on your target device, you can clone one of the example projects.
We have created standalone examples for the following boards:
* [Example standalone for ST Nucleo F466RE](https://github.com/edgeimpulse/example-standalone-inferencing-st-nucleo-f466re)
* [Example-standalone-inferencing-stm32h747i-disco](https://github.com/edgeimpulse/example-standalone-inferencing-stm32h747i-disco)
* [Edge Impulse EI-SDK pack](https://www.keil.arm.com/packs/ei-sdk-edgeimpulse/versions/)
### CMSIS-Pack Requirements
The Edge Impulse SDK pack requires the following CMSIS packs:
* [CMSIS-NN 4.0.0](https://www.keil.arm.com/packs/cmsis-nn-arm/versions/) Focuses on optimizing ML operators for Cortex-M, targeting Edge AI applications.
* [CMSIS-DSP 1.15.0](https://www.keil.arm.com/packs/cmsis-dsp-arm/versions/) A collection of DSP functions optimized for Cortex-M processors, suitable for DSP applications.
### Standalone Inference Example
If you want to test the model on your target device, you can clone one of the example projects.
We have created standalone examples for the following boards:
* [Example standalone for ST Nucleo F466RE](https://github.com/edgeimpulse/example-standalone-inferencing-st-nucleo-f466re)
* [Example-standalone-inferencing-stm32h747i-disco](https://github.com/edgeimpulse/example-standalone-inferencing-stm32h747i-disco)
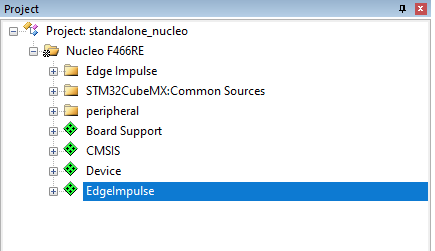 These standalone example projects contains minimal code required to run the imported impulse on a STMicroelectronics MCU. This code is located in `ei_main.cpp`. In this minimal code example, inference is run from a static buffer of input feature data. To verify that our embedded model achieves the exact same results as the model trained in Studio, we want to copy the same input features from Studio into the static buffer in `ei_main.cpp`.
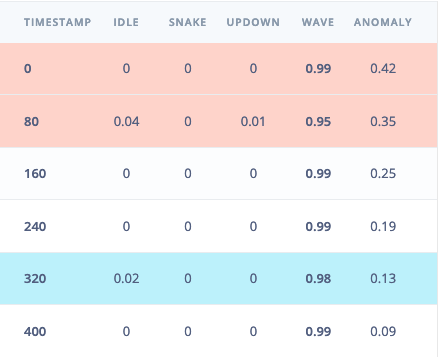
To do this, first head back to the studio and click on the **Live classification** tab. Then load a validation sample, and click on a row under 'Detailed result'.
These standalone example projects contains minimal code required to run the imported impulse on a STMicroelectronics MCU. This code is located in `ei_main.cpp`. In this minimal code example, inference is run from a static buffer of input feature data. To verify that our embedded model achieves the exact same results as the model trained in Studio, we want to copy the same input features from Studio into the static buffer in `ei_main.cpp`.
To do this, first head back to the studio and click on the **Live classification** tab. Then load a validation sample, and click on a row under 'Detailed result'.
 To verify that the local application classifies the same result, we need the raw features for this timestamp. To do so click on the 'Copy to clipboard' button next to 'Raw features'. This will copy the raw input values from this validation file, before any signal processing or inferencing happened.
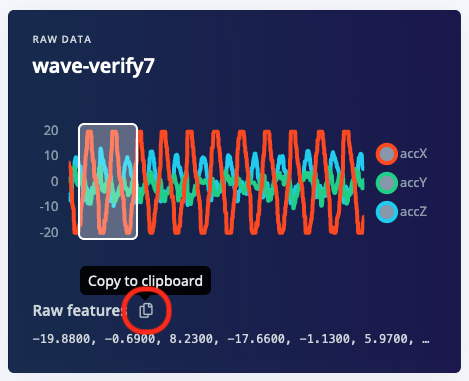 In `ei_main.cpp` paste the raw features inside the `static const float features[]` definition, for example:
```cpp theme={"system"}
static const float features[] = {
-19.8800, -0.6900, 8.2300, -17.6600, -1.1300, 5.9700, ...
};
```
The project once configured in the subsequent steps will repeatedly run inference on this buffer of raw features once built. This will show that the inference result is identical to the **Live classification** tab in Studio. From this starting point, the example project is fully compatible with existing SimpleLink SDK plugins, drivers or custom firmware. Use new sensor data collected in real time on the device to fill a buffer. From there, follow the same code used in `ei_standalone.cpp` to run classification on live data.
In `ei_main.cpp` paste the raw features inside the `static const float features[]` definition, for example:
```cpp theme={"system"}
static const float features[] = {
-19.8800, -0.6900, 8.2300, -17.6600, -1.1300, 5.9700, ...
};
```
The project once configured in the subsequent steps will repeatedly run inference on this buffer of raw features once built. This will show that the inference result is identical to the **Live classification** tab in Studio. From this starting point, the example project is fully compatible with existing SimpleLink SDK plugins, drivers or custom firmware. Use new sensor data collected in real time on the device to fill a buffer. From there, follow the same code used in `ei_standalone.cpp` to run classification on live data.
 ## Arm Keil µVision - Steps
We will now go through each of these steps in detail for µVision and finish with a brief overview of the VS Code integration, and demonstrate how to import the µVision project to VS Code.
To run the standalone example, follow these steps:
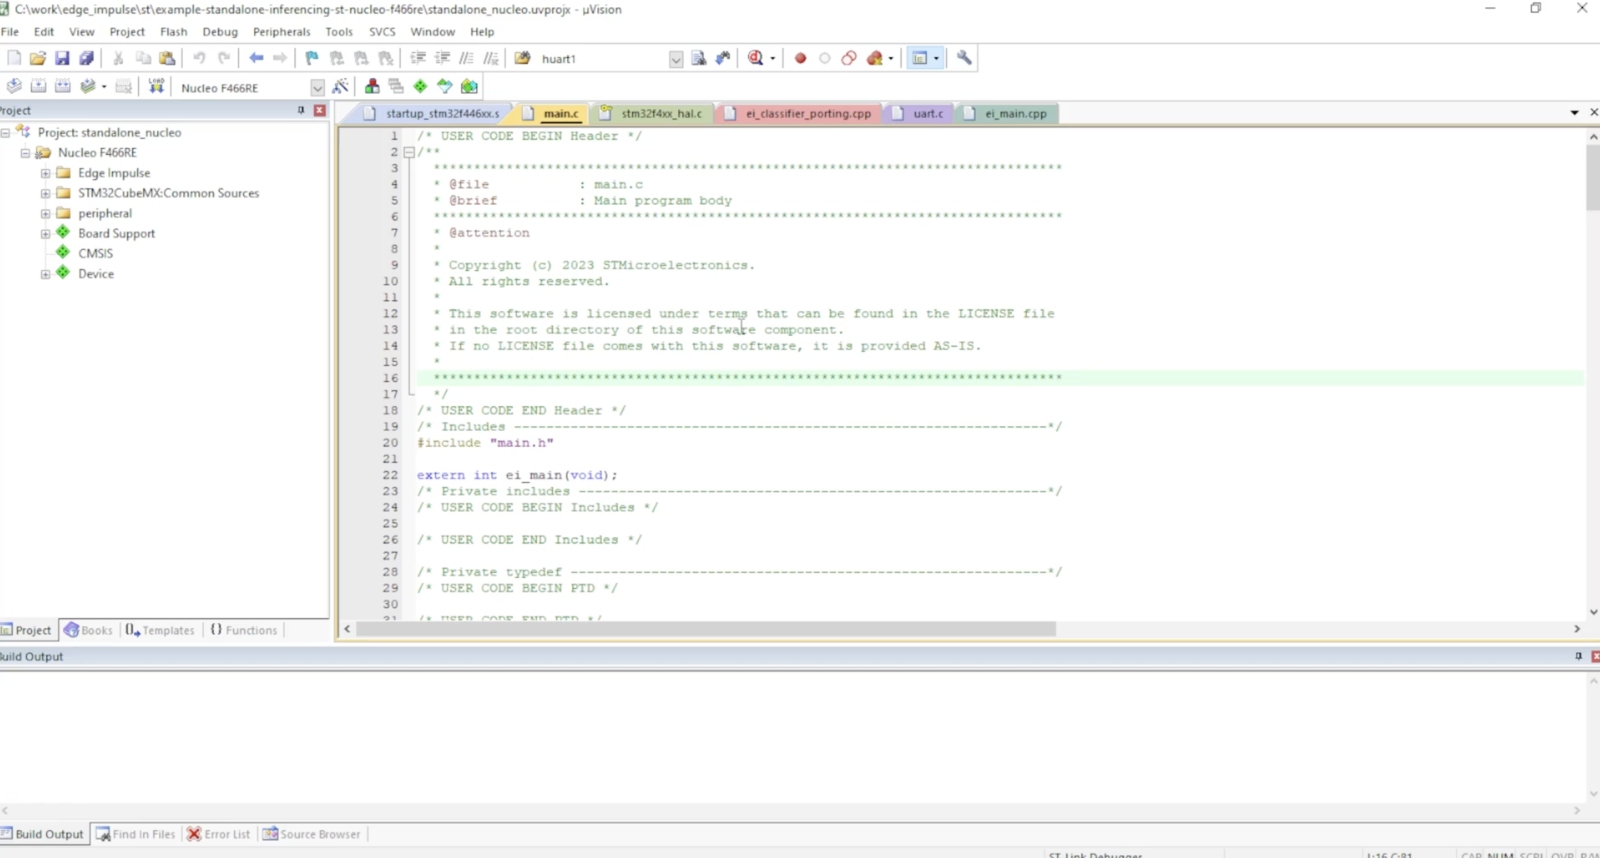
### Open the standalone example project in Arm Keil µVision
The file extension is \*.UVPROJ for MDK version 4, or \*.UVPROJX for later versions.
First open the standalone example project in Arm Keil µVision and follow the steps below to import the Edge Impulse SDK pack into your project.
**standalone\_nucleo.uvguix.projx**
**example-standalone-inferencing-stm32h747i-disco-CM7.uvprojx**
### Import the Edge Impulse SDK pack into Arm Keil µVision
The EI-SDK pack contains the Edge Impulse library and the required dependencies. The pack will be listed under the `EdgeImpulse::EI-SDK` category, and is now available from the [Arm Keil Pack Installer](https://www.keil.arm.com/packs/ei-sdk-edgeimpulse/versions/)
To import the Edge Impulse SDK pack into Arm Keil µVision, from our examples, follow these steps:
1. Open Arm µVision project.
2. Select File->Import from Folder.
3. Select the EdgeImpulse.EI-SDK.x.y.z.pack file from the downloaded zip file.
4. Click **Next** and then **Finish**.
5. The Edge Impulse SDK pack is now imported into your project.
## Arm Keil µVision - Steps
We will now go through each of these steps in detail for µVision and finish with a brief overview of the VS Code integration, and demonstrate how to import the µVision project to VS Code.
To run the standalone example, follow these steps:
### Open the standalone example project in Arm Keil µVision
The file extension is \*.UVPROJ for MDK version 4, or \*.UVPROJX for later versions.
First open the standalone example project in Arm Keil µVision and follow the steps below to import the Edge Impulse SDK pack into your project.
**standalone\_nucleo.uvguix.projx**
**example-standalone-inferencing-stm32h747i-disco-CM7.uvprojx**
### Import the Edge Impulse SDK pack into Arm Keil µVision
The EI-SDK pack contains the Edge Impulse library and the required dependencies. The pack will be listed under the `EdgeImpulse::EI-SDK` category, and is now available from the [Arm Keil Pack Installer](https://www.keil.arm.com/packs/ei-sdk-edgeimpulse/versions/)
To import the Edge Impulse SDK pack into Arm Keil µVision, from our examples, follow these steps:
1. Open Arm µVision project.
2. Select File->Import from Folder.
3. Select the EdgeImpulse.EI-SDK.x.y.z.pack file from the downloaded zip file.
4. Click **Next** and then **Finish**.
5. The Edge Impulse SDK pack is now imported into your project.
 ### Import the Edge Impulse project pack into Arm keil µVision
To import the Edge Impulse project pack into Arm Keil µVision, follow these steps:
1. Open Arm Keil µVision and select the project you want to import the Edge Impulse project pack into.
2. Select File->Import.
3. Select the EdgeImpulse.project\_name.x.y.z.pack file from the downloaded zip file.
4. Accept the terms and conditions and click **Next**.
5. Click **Finish** to import the Edge Impulse project pack into your project.
### Import the Project Model Software Pack into Arm Keil µVision
To import the ML model and inference SDK follow these steps:
1. Place and unzip the downloaded library in the root folder of your project.
2. Open your project in Arm Keil µVision.
3. File->Import from Folder->Select the model pack from the downloaded folder.
4. If the import is successful, the library will be added to the project. You may see "Software Packs folder has been updated" in the console.
5. Reload Packs by selecting `Project->Reload Software Packs`.
6. Select software packs and ensure that the model pack is listed under the `EdgeImpulse::Motion_recognition` category and is set to latest version.
### Import the Edge Impulse project pack into Arm keil µVision
To import the Edge Impulse project pack into Arm Keil µVision, follow these steps:
1. Open Arm Keil µVision and select the project you want to import the Edge Impulse project pack into.
2. Select File->Import.
3. Select the EdgeImpulse.project\_name.x.y.z.pack file from the downloaded zip file.
4. Accept the terms and conditions and click **Next**.
5. Click **Finish** to import the Edge Impulse project pack into your project.
### Import the Project Model Software Pack into Arm Keil µVision
To import the ML model and inference SDK follow these steps:
1. Place and unzip the downloaded library in the root folder of your project.
2. Open your project in Arm Keil µVision.
3. File->Import from Folder->Select the model pack from the downloaded folder.
4. If the import is successful, the library will be added to the project. You may see "Software Packs folder has been updated" in the console.
5. Reload Packs by selecting `Project->Reload Software Packs`.
6. Select software packs and ensure that the model pack is listed under the `EdgeImpulse::Motion_recognition` category and is set to latest version.
 ### Configure the target
To configure the project to use the Edge Impulse SDK, follow these steps:
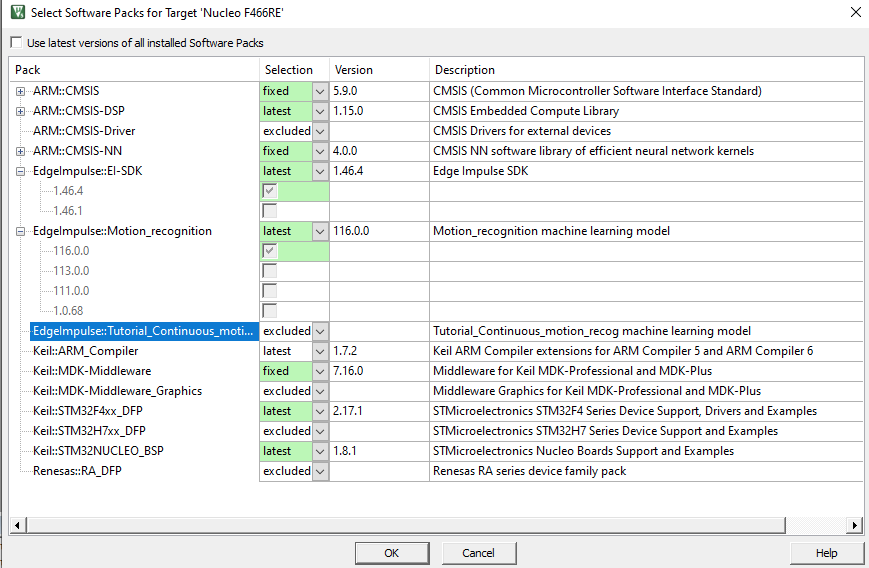
1. Open the project settings by selecting `Project->Select Software Packs for the target`.
2. Select the Edge Impulse SDK pack from the list of available software packs. The pack will be listed under the `EdgeImpulse::EI-SDK` category. Update **Selection** to **latest** version.
3. Select the Edge Impulse SDK pack from the list of available software packs. The pack will be listed under the `EdgeImpulse::Motion_recognition` category. Update **Selection** to **latest** version.
### Configure the Run-Time Environment
To configure the Run-Time Environment to use the Edge Impulse SDK, follow these steps:
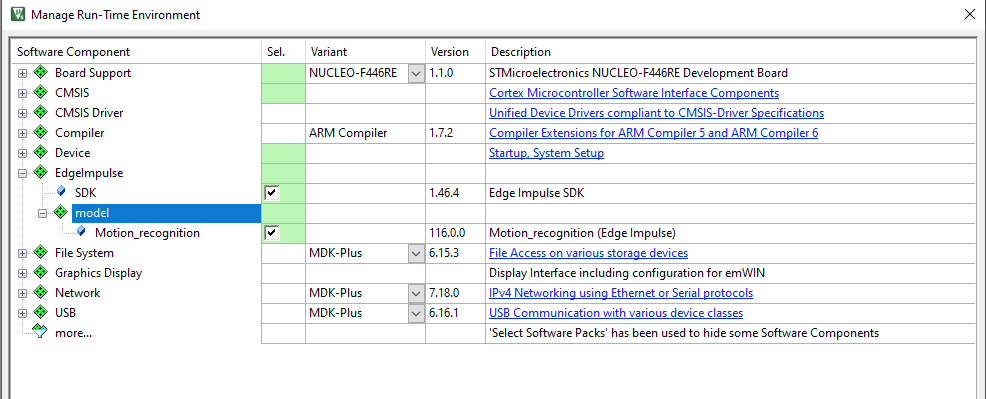
1. Open the project settings by selecting `Project->Manage Run-Time Environment`.
2. Select the EdgeImpulse from the list of software components. Mark the checkbox to include the software component in the project.
3. Select **model** and **Motion\_recognition** mark the checkbox to include the software component in the project.
4. Click **OK** to close the dialog.
### Configure the target
To configure the project to use the Edge Impulse SDK, follow these steps:
1. Open the project settings by selecting `Project->Select Software Packs for the target`.
2. Select the Edge Impulse SDK pack from the list of available software packs. The pack will be listed under the `EdgeImpulse::EI-SDK` category. Update **Selection** to **latest** version.
3. Select the Edge Impulse SDK pack from the list of available software packs. The pack will be listed under the `EdgeImpulse::Motion_recognition` category. Update **Selection** to **latest** version.
### Configure the Run-Time Environment
To configure the Run-Time Environment to use the Edge Impulse SDK, follow these steps:
1. Open the project settings by selecting `Project->Manage Run-Time Environment`.
2. Select the EdgeImpulse from the list of software components. Mark the checkbox to include the software component in the project.
3. Select **model** and **Motion\_recognition** mark the checkbox to include the software component in the project.
4. Click **OK** to close the dialog.
 ### Build the project
To build the project, follow these steps:
1. Select `Project->Build Target`.
2. The project will be built and the output will be displayed in the console.
### Run the project
To run the project, follow these steps:
1. Select `Debug->Start/Stop Debug Session`.
2. The project will be built and the debugger will be started.
### VS Code Integration - Steps
Once completed, the project will be configured to use the Edge Impulse SDK. You can now import the Edge Impulse µVision project to VS Code.
## VS Code Extension - Installation
Adapting the procedure from the [Arm Keil](http://keil.arm.com) extension documentation.
### Using Arm Keil Studio for VS Code
These steps will install the VS Code extension:
#### 1. Install Arm Keil Studio Extension and CMSIS extension for VS Code
* Search for "Keil Studio" in the VS Code extensions marketplace and install it. [vslink](https://marketplace.visualstudio.com/items?itemName=Arm.keil-studio-pack)
* Search for "CMSIS csolution" in the VS Code extensions marketplace and install it. [vslink](https://marketplace.visualstudio.com/items?itemName=Arm.cmsis-csolution)
#### 2. Import Project Packs
* Open VS Code and navigate to the >CMSIS: Packs view.
* Choose to import an existing µVision project or start a new one.
* Import the Edge Impulse SDK and project packs you've downloaded earlier.
#### 3. Configure Project for Target Hardware
* Access the project settings.
* Set the target device and adjust settings specific to your hardware.
#### 4. Add Edge Impulse SDK Pack to Project
* Open VS Code and navigate to the ctl+shift+p >CMSIS: Manage Software Components.
* Search for and install the EdgeImpulse SDK, accept the CMSIS-NN and CMSIS-DSP packs install the required packages.
* Import the Edge Impulse project pack you've downloaded earlier.
## Keil Studio - µVision Project import
Fist, you need to install the Keil Studio VS Code extension. You can find the extension in the [VS Code Marketplace](https://marketplace.visualstudio.com/items?itemName=Arm.keil-studio-pack).
Now open your existing µVision project in VS Code and follow the steps below to import the Edge Impulse SDK pack into your project.
1. Open Arm Keil Studio and select the **CMSIS Pack Installer** extension.
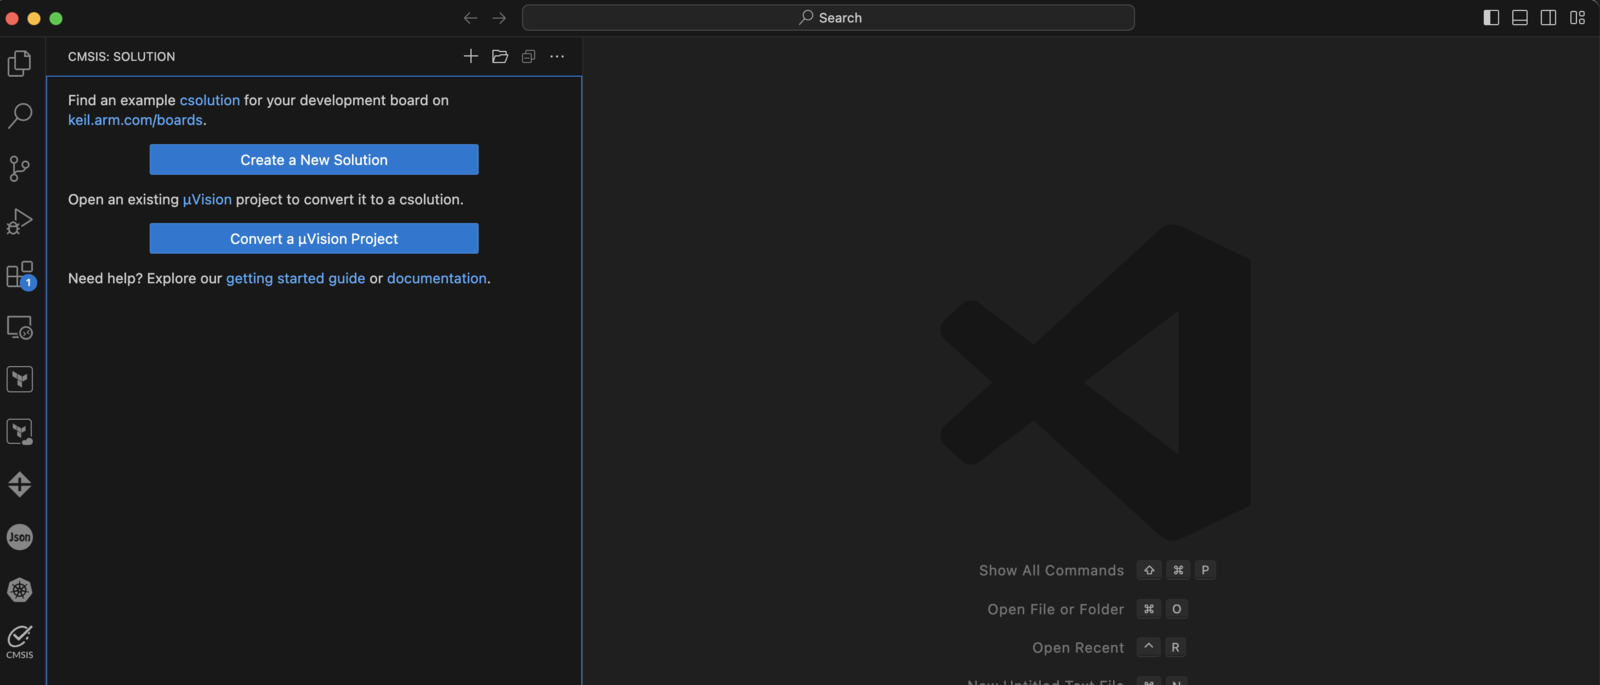
2. Select the **import existing µVision project** option.
3. Select your existing µVision project.
### Build the project
To build the project, follow these steps:
1. Select `Project->Build Target`.
2. The project will be built and the output will be displayed in the console.
### Run the project
To run the project, follow these steps:
1. Select `Debug->Start/Stop Debug Session`.
2. The project will be built and the debugger will be started.
### VS Code Integration - Steps
Once completed, the project will be configured to use the Edge Impulse SDK. You can now import the Edge Impulse µVision project to VS Code.
## VS Code Extension - Installation
Adapting the procedure from the [Arm Keil](http://keil.arm.com) extension documentation.
### Using Arm Keil Studio for VS Code
These steps will install the VS Code extension:
#### 1. Install Arm Keil Studio Extension and CMSIS extension for VS Code
* Search for "Keil Studio" in the VS Code extensions marketplace and install it. [vslink](https://marketplace.visualstudio.com/items?itemName=Arm.keil-studio-pack)
* Search for "CMSIS csolution" in the VS Code extensions marketplace and install it. [vslink](https://marketplace.visualstudio.com/items?itemName=Arm.cmsis-csolution)
#### 2. Import Project Packs
* Open VS Code and navigate to the >CMSIS: Packs view.
* Choose to import an existing µVision project or start a new one.
* Import the Edge Impulse SDK and project packs you've downloaded earlier.
#### 3. Configure Project for Target Hardware
* Access the project settings.
* Set the target device and adjust settings specific to your hardware.
#### 4. Add Edge Impulse SDK Pack to Project
* Open VS Code and navigate to the ctl+shift+p >CMSIS: Manage Software Components.
* Search for and install the EdgeImpulse SDK, accept the CMSIS-NN and CMSIS-DSP packs install the required packages.
* Import the Edge Impulse project pack you've downloaded earlier.
## Keil Studio - µVision Project import
Fist, you need to install the Keil Studio VS Code extension. You can find the extension in the [VS Code Marketplace](https://marketplace.visualstudio.com/items?itemName=Arm.keil-studio-pack).
Now open your existing µVision project in VS Code and follow the steps below to import the Edge Impulse SDK pack into your project.
1. Open Arm Keil Studio and select the **CMSIS Pack Installer** extension.
2. Select the **import existing µVision project** option.
3. Select your existing µVision project.
 Now install the Edge Impulse SDK pack into your project.
1. Open Arm Keil Studio and select the **CMSIS Pack Installer** extension.
2. Cmsis->Manage Software Components.->Software Packs:all packs->Search for EdgeImpulse SDK
Now install the Edge Impulse SDK pack into your project.
1. Open Arm Keil Studio and select the **CMSIS Pack Installer** extension.
2. Cmsis->Manage Software Components.->Software Packs:all packs->Search for EdgeImpulse SDK
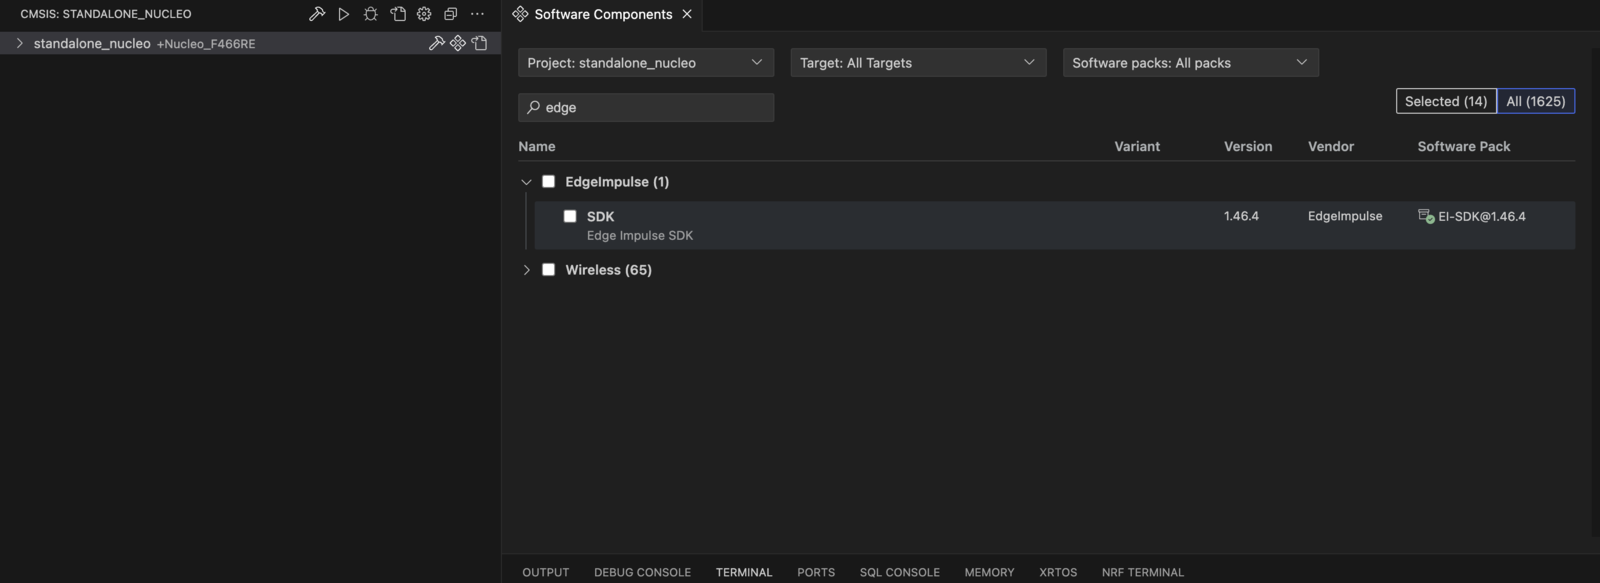 Validate the installation of the Edge Impulse SDK pack.
1. Open Arm Keil Studio and select the **CMSIS Pack Installer** extension.
2. Cmsis->Manage Software Components.->Software Packs:all packs->Search for any pack and validate the installation of the EdgeImpulse SDK pack.
3. Accept the packages required for the project.
Validate the installation of the Edge Impulse SDK pack.
1. Open Arm Keil Studio and select the **CMSIS Pack Installer** extension.
2. Cmsis->Manage Software Components.->Software Packs:all packs->Search for any pack and validate the installation of the EdgeImpulse SDK pack.
3. Accept the packages required for the project.
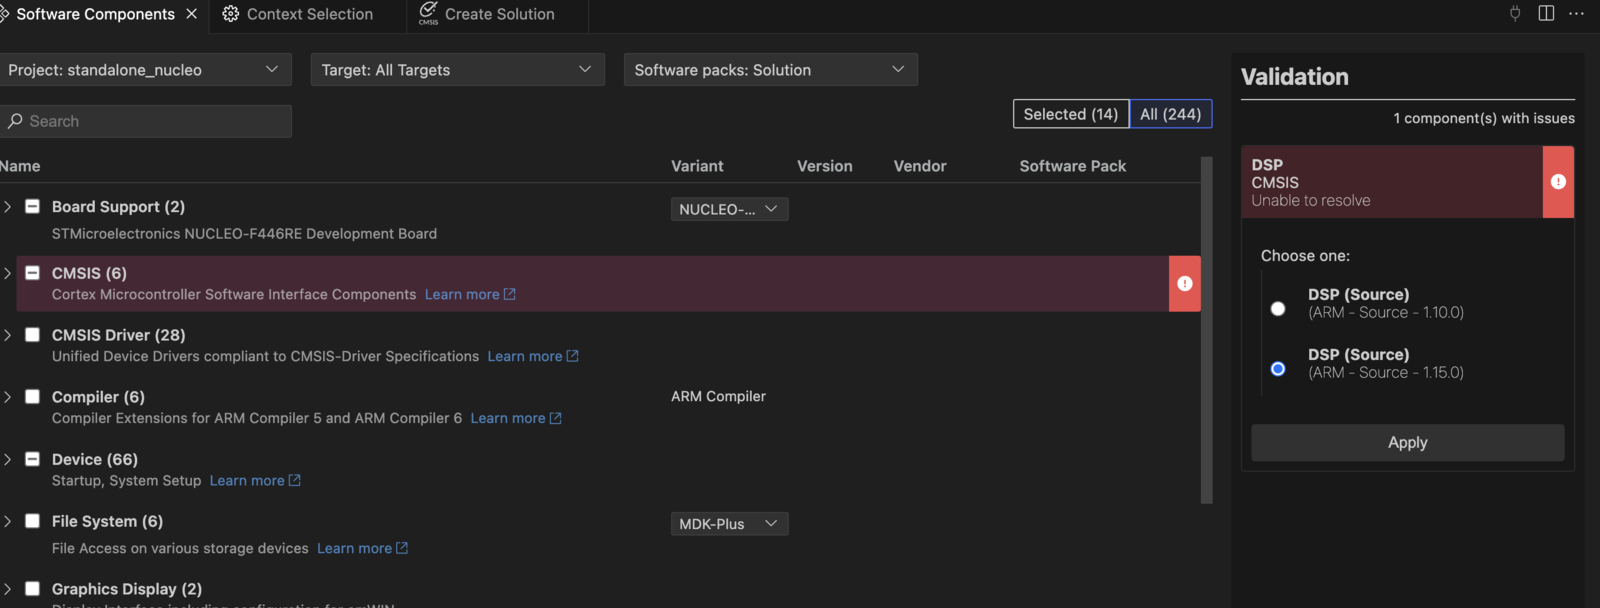
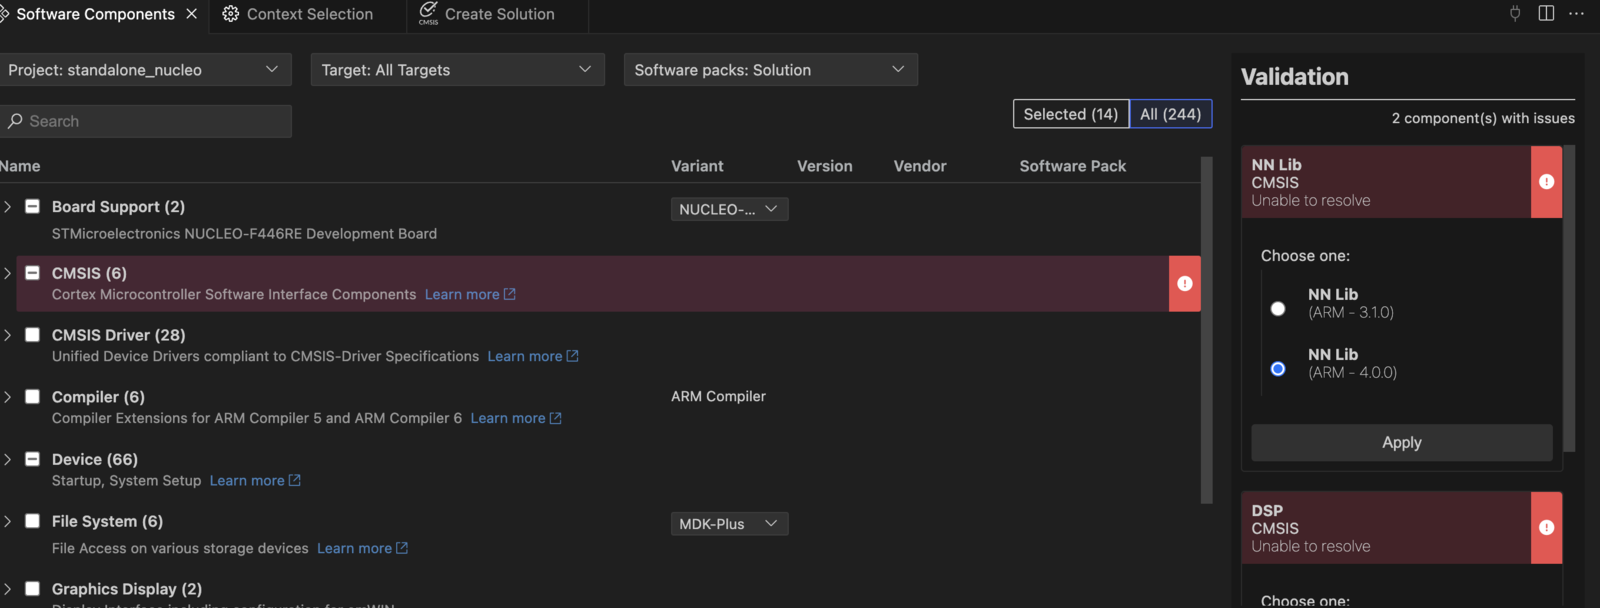 Congratulations! You have now successfully imported the Edge Impulse SDK and project pack into Arm Keil Studio IDE and configured the project to use the Edge Impulse SDK. You can now build and run the project to test the model on your target device.
## Conclusion
You have now successfully imported the Edge Impulse SDK and project pack into Arm Keil Studio IDE and configured the project to use the Edge Impulse SDK. You can now build and run the project to test the model on your target device.
If you have any questions or need help, please visit our [forum](https://forum.edgeimpulse.com/).
Congratulations! You have now successfully imported the Edge Impulse SDK and project pack into Arm Keil Studio IDE and configured the project to use the Edge Impulse SDK. You can now build and run the project to test the model on your target device.
## Conclusion
You have now successfully imported the Edge Impulse SDK and project pack into Arm Keil Studio IDE and configured the project to use the Edge Impulse SDK. You can now build and run the project to test the model on your target device.
If you have any questions or need help, please visit our [forum](https://forum.edgeimpulse.com/).