> ## Documentation Index
> Fetch the complete documentation index at: https://docs.edgeimpulse.com/llms.txt
> Use this file to discover all available pages before exploring further.
# Tria Vision AI-KIT 6490
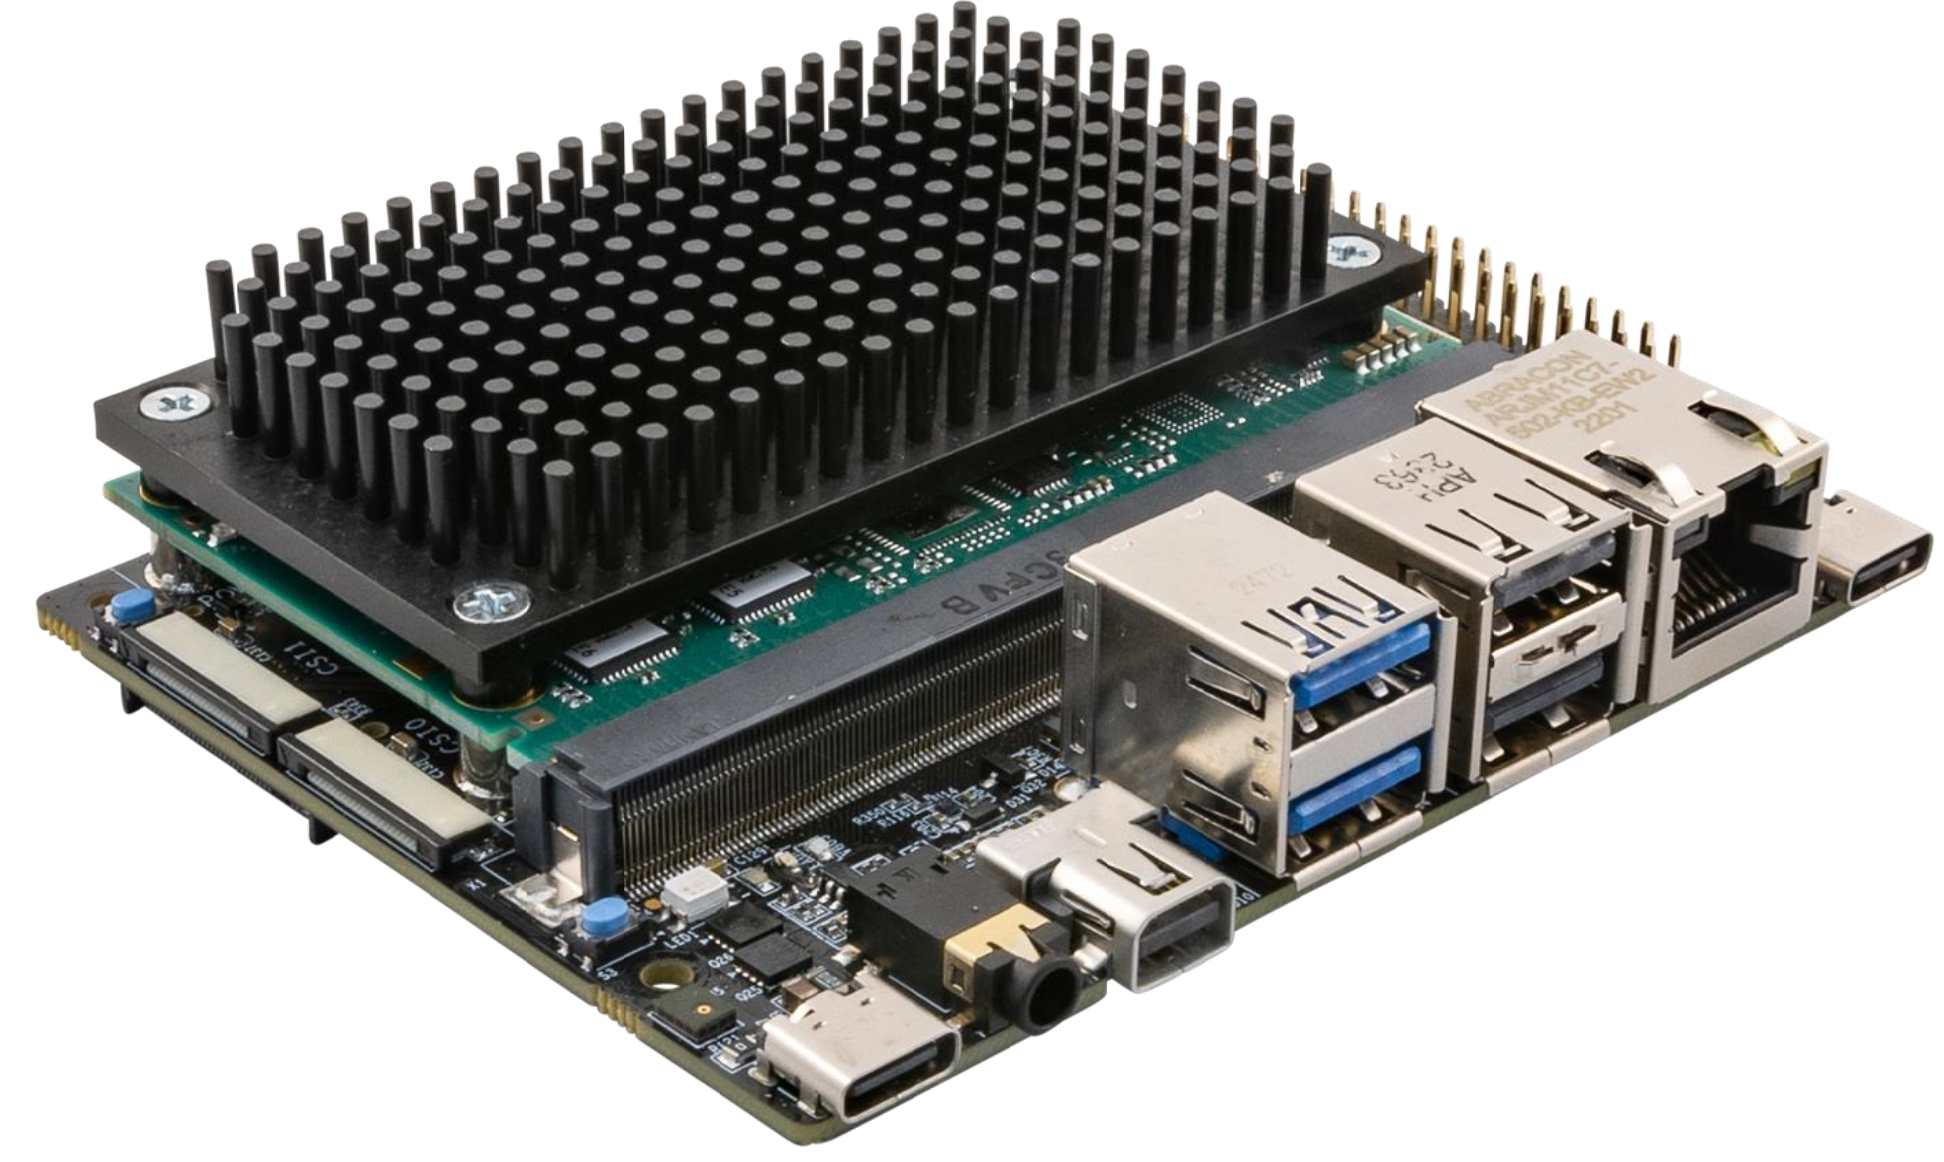
Tria's [Vision AI-KIT 6490](https://www.tria-technologies.com/product/vision-ai-kit-6490/) features an energy-efficient, multi-camera, SMARC 2.2 compute module, based on the Qualcomm QCS6490 SOC device.
High performance cores on the Vision AI-KIT 6490 (Qualcomm Dragonwing™ QCS6490 Development Kit) include an 8-core Kryo™ 670 CPU, Adreno 643 GPU, Hexagon DSP and 6th gen AI Engine (12 TOPS), Spectra 570L ISP (64MP/30fps capability) and Adreno 633 VPU (4K30/4K60 enc/dec rates), ensure that exceptional concurrent video I/O processing performance is delivered. It's fully supported by Edge Impulse - you'll be able to sample raw data, build models, and deploy trained machine learning models directly from the Studio.
 ## Key Features
**SM2S-QCS6490 SMARC Compute Module**
* 4x Arm Cortex-A78 (@ up to 2.7 GHz)
* 4x Arm Cortex-A55 (@ 1.9 GHz)
* GPU: Adreno 643 (@ 812 MHz)
* DSP/NPU: 6th gen Qualcomm AI Engine (12 TOPS)
* ISP: Spectra 570L (up to 5 concurrent cameras)
* VPU: Adreno 633, video enc/dec to 4k30 / 4K60
* 8GB LPDDR5 SDRAM, 64GB UFS Flash Memory
* 2x USB 3.1 (2L), 3x USB 2.0 interfaces
* 2x PCIe Gen3 (1L), 1x PCIe Gen3 (2L) interface
* 1x DisplayPort 1.4 (2L) interface
* 1x MIPI-DSI (4L), 1x eDP (4L) display interfaces
* 2x MIPI-CSI (4L) camera 22-pin connectors
* 2x MIPI-CSI (4L, 2L) via SMARC edge connector
* 2x 1 Gigabit Ethernet interfaces
* Wi-Fi 5 / BT 5 (SMARC module assembly option)
* TPM module (SMARC module assembly option)
* UART, SPI, I2C, I2S, GPIO interfaces
* HW Key manager, ECC, Secure boot, Crypto
**Vision-AI IO Carrier Board**
* \[Supported subset of the SMARC interfaces]
* SMARC 2.2 edge connector (314 pin)
* M.2 key-M slot (NVME storage accessory option)
* M.2 key-E slot (Wi-Fi 6E/BT 5.4 accessory option)
* 1x 1 Gigabit Ethernet RJ45 connector
* 2x USB 3.0, 2x USB 2.0, 1x USB2.0 type-C OTG
* 1x miniDP and 1x MIPI-DSI display connectors
* 1x 4L and 1x 2L MIPI-CSI 22pin connectors
* 2x PDM Mics, Audio Codec, Stereo HP jack
* 4x button switches and RGB User LED
* 40-Pin Pi-HAT header
* 6-pin CAN-FD, SAI Audio and custom IO header
* 2-pin RTC battery header
* DC Power supply: USB-C PD (12V 3A)
* Operating Temperature: -25°C \~ +85°C
* Dimensions: 100mm x 79mm
## Application Use-cases for VisionAI-KIT 6490
* Ruggedized Handheld Industrial Scanners and Tablets
* Drone/UAV/other mobile Vision-AI Edge Compute Applications
* Info kiosks, Vending Machines and Interactive HMI Systems
* Multi-camera Security Systems with Recognition
* Inventory and Asset Monitoring
* Smart City, Smart Camera Systems
* Food Services POS Equipment
* Service & Industrial Robots
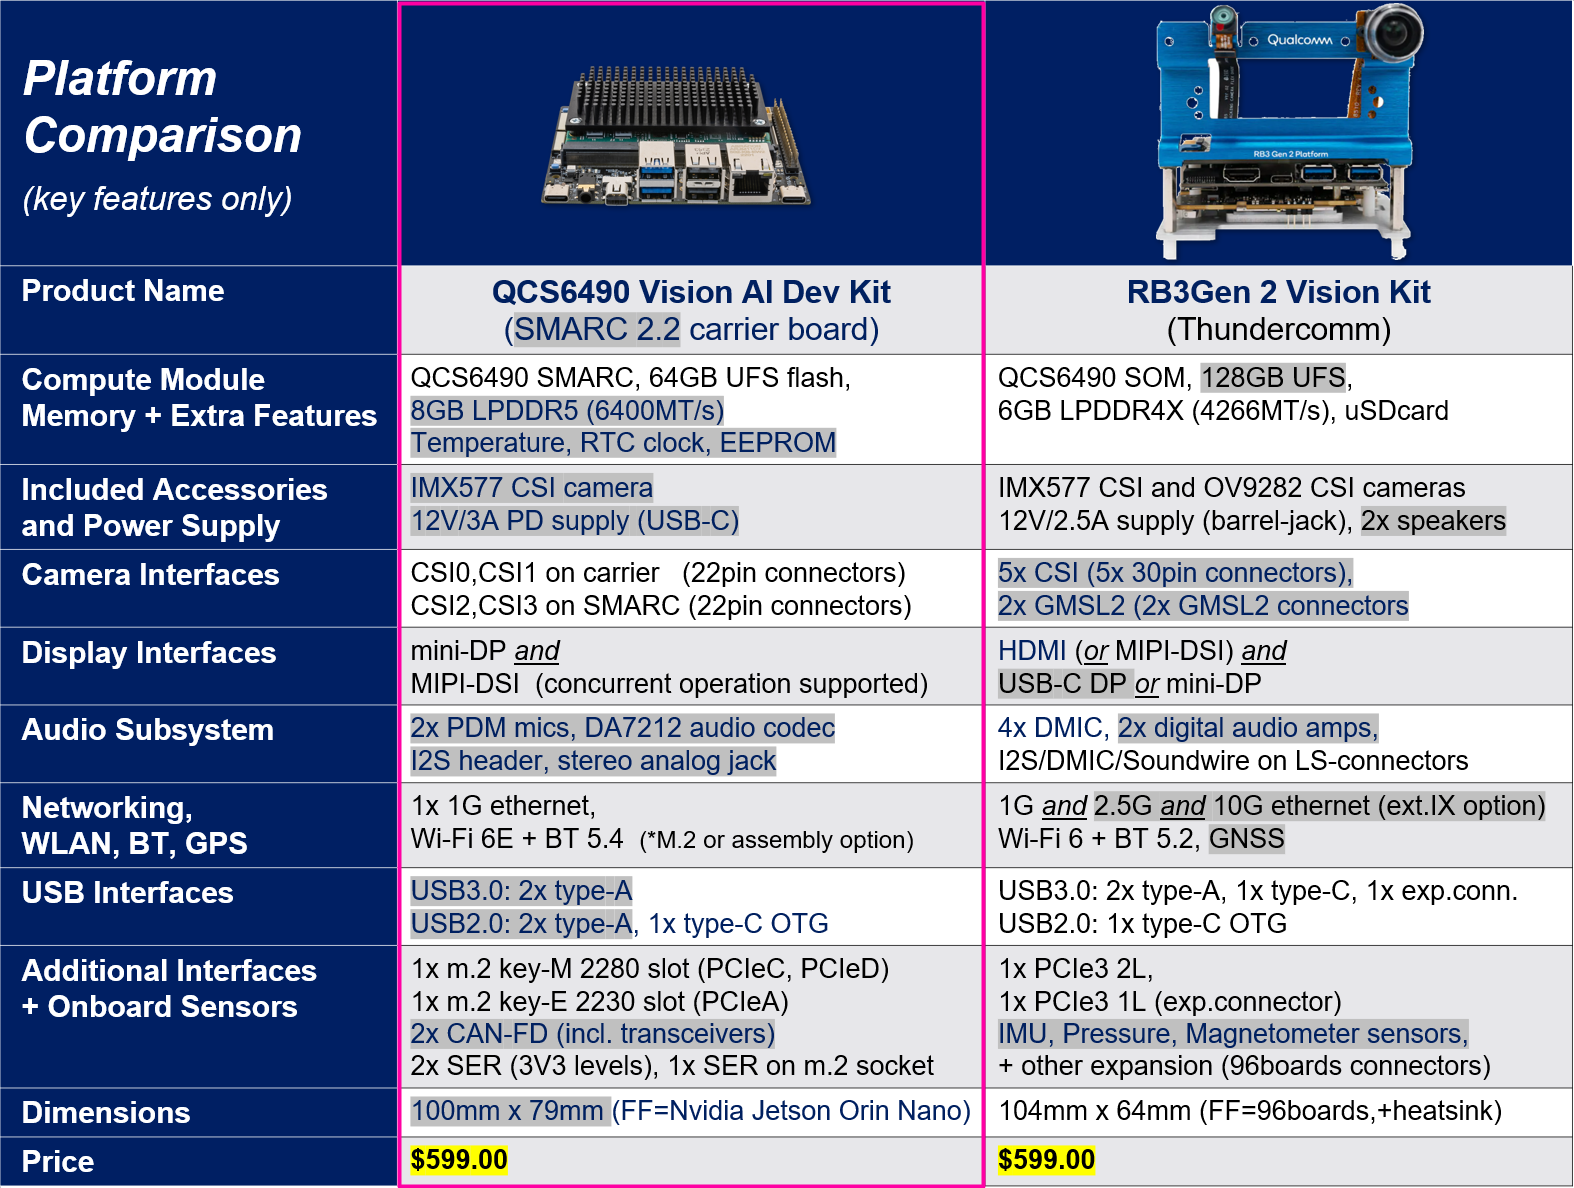
## Comparison to RG3 Gen2
## Key Features
**SM2S-QCS6490 SMARC Compute Module**
* 4x Arm Cortex-A78 (@ up to 2.7 GHz)
* 4x Arm Cortex-A55 (@ 1.9 GHz)
* GPU: Adreno 643 (@ 812 MHz)
* DSP/NPU: 6th gen Qualcomm AI Engine (12 TOPS)
* ISP: Spectra 570L (up to 5 concurrent cameras)
* VPU: Adreno 633, video enc/dec to 4k30 / 4K60
* 8GB LPDDR5 SDRAM, 64GB UFS Flash Memory
* 2x USB 3.1 (2L), 3x USB 2.0 interfaces
* 2x PCIe Gen3 (1L), 1x PCIe Gen3 (2L) interface
* 1x DisplayPort 1.4 (2L) interface
* 1x MIPI-DSI (4L), 1x eDP (4L) display interfaces
* 2x MIPI-CSI (4L) camera 22-pin connectors
* 2x MIPI-CSI (4L, 2L) via SMARC edge connector
* 2x 1 Gigabit Ethernet interfaces
* Wi-Fi 5 / BT 5 (SMARC module assembly option)
* TPM module (SMARC module assembly option)
* UART, SPI, I2C, I2S, GPIO interfaces
* HW Key manager, ECC, Secure boot, Crypto
**Vision-AI IO Carrier Board**
* \[Supported subset of the SMARC interfaces]
* SMARC 2.2 edge connector (314 pin)
* M.2 key-M slot (NVME storage accessory option)
* M.2 key-E slot (Wi-Fi 6E/BT 5.4 accessory option)
* 1x 1 Gigabit Ethernet RJ45 connector
* 2x USB 3.0, 2x USB 2.0, 1x USB2.0 type-C OTG
* 1x miniDP and 1x MIPI-DSI display connectors
* 1x 4L and 1x 2L MIPI-CSI 22pin connectors
* 2x PDM Mics, Audio Codec, Stereo HP jack
* 4x button switches and RGB User LED
* 40-Pin Pi-HAT header
* 6-pin CAN-FD, SAI Audio and custom IO header
* 2-pin RTC battery header
* DC Power supply: USB-C PD (12V 3A)
* Operating Temperature: -25°C \~ +85°C
* Dimensions: 100mm x 79mm
## Application Use-cases for VisionAI-KIT 6490
* Ruggedized Handheld Industrial Scanners and Tablets
* Drone/UAV/other mobile Vision-AI Edge Compute Applications
* Info kiosks, Vending Machines and Interactive HMI Systems
* Multi-camera Security Systems with Recognition
* Inventory and Asset Monitoring
* Smart City, Smart Camera Systems
* Food Services POS Equipment
* Service & Industrial Robots
## Comparison to RG3 Gen2
 ## Setting Up Your Tria Vision AI-KIT 6490
### 1. Board Setup, Flashing & Connecting to Edge Impulse
See the [Tria Vision AI-KIT 6490 Startup Guide](https://avnet.com/wcm/connect/137a97f1-eb6e-48ba-89a4-40b024558593/Vision+AI-KIT+6490+Startup+Guide+v1.5.pdf?MOD=AJPERES\&attachment=true\&id=1770748583066) for a comprehensive reference for setting up the kit.
### Edge Impulse Connection
1. Install the [Edge Impulse CLI](/tools/clis/edge-impulse-cli) on your computer.
2. Connect power to the Vision AI-KIT 6490 on port 6 as noted in the kit startup guide.
This will **NOT** work with 5V, only 9V.
3. Connect the kit to your computer using a type-C USB cable on port 9.
4. Open a serial connection between your host computer and the board.
You can do this directly using the Edge Impulse CLI by running the following command from your command prompt or terminal:
```bash theme={"system"}
edge-impulse-run-impulse --raw
```
### 2. Installing the Edge Impulse Linux CLI & Connecting to Edge Impulse
On the kit install the Edge Impulse CLI and other dependencies via:
```bash theme={"system"}
wget https://cdn.edgeimpulse.com/firmware/linux/setup-edge-impulse-qc-linux.sh
sh setup-edge-impulse-qc-linux.sh
```
With all dependencies set up, run:
```bash theme={"system"}
edge-impulse-linux
```
This will start a wizard which asks you to log in and choose an Edge Impulse project. If you want to switch projects, or use a different camera (e.g. a USB camera) run the command with the `--clean` argument.
The Qualcomm [documentation](https://docs.qualcomm.com/bundle/publicresource/topics/80-70022-17/stream-cameras_RB4_VERSION.html#choose-the-stream-api) provides additional guidance on using cameras, but for our purposes if you want to use this kit with the camera on CSI0 then add the following at the end of your CLI command:
```
--gst-launch-args "qtiqmmfsrc name=camsrc camera=0 ! \
video/x-raw,format=NV12,width=1280,height=720,framerate=30/1,\
interlace-mode=progressive,colorimetry=bt601 ! \
videoconvert ! jpegenc"
```
Similarly, for a camera on CSI1 just increment the camera ID:
```
--gst-launch-args "qtiqmmfsrc name=camsrc camera=1 ! \
video/x-raw,format=NV12,width=1280,height=720,framerate=30/1,\
interlace-mode=progressive,colorimetry=bt601 ! \
videoconvert ! jpegenc"
```
And so on for interfaces CSI2 and CSI3. Otherwise not using `--gst-launch-args` will default to expecting a webcam on USB.
### 3. Verifying that your device is connected
That's all! Your device is now connected to Edge Impulse. To verify this, go to [your Edge Impulse project](https://studio.edgeimpulse.com/studio/profile/projects), and click **Devices**. The device will be listed here.
## Setting Up Your Tria Vision AI-KIT 6490
### 1. Board Setup, Flashing & Connecting to Edge Impulse
See the [Tria Vision AI-KIT 6490 Startup Guide](https://avnet.com/wcm/connect/137a97f1-eb6e-48ba-89a4-40b024558593/Vision+AI-KIT+6490+Startup+Guide+v1.5.pdf?MOD=AJPERES\&attachment=true\&id=1770748583066) for a comprehensive reference for setting up the kit.
### Edge Impulse Connection
1. Install the [Edge Impulse CLI](/tools/clis/edge-impulse-cli) on your computer.
2. Connect power to the Vision AI-KIT 6490 on port 6 as noted in the kit startup guide.
This will **NOT** work with 5V, only 9V.
3. Connect the kit to your computer using a type-C USB cable on port 9.
4. Open a serial connection between your host computer and the board.
You can do this directly using the Edge Impulse CLI by running the following command from your command prompt or terminal:
```bash theme={"system"}
edge-impulse-run-impulse --raw
```
### 2. Installing the Edge Impulse Linux CLI & Connecting to Edge Impulse
On the kit install the Edge Impulse CLI and other dependencies via:
```bash theme={"system"}
wget https://cdn.edgeimpulse.com/firmware/linux/setup-edge-impulse-qc-linux.sh
sh setup-edge-impulse-qc-linux.sh
```
With all dependencies set up, run:
```bash theme={"system"}
edge-impulse-linux
```
This will start a wizard which asks you to log in and choose an Edge Impulse project. If you want to switch projects, or use a different camera (e.g. a USB camera) run the command with the `--clean` argument.
The Qualcomm [documentation](https://docs.qualcomm.com/bundle/publicresource/topics/80-70022-17/stream-cameras_RB4_VERSION.html#choose-the-stream-api) provides additional guidance on using cameras, but for our purposes if you want to use this kit with the camera on CSI0 then add the following at the end of your CLI command:
```
--gst-launch-args "qtiqmmfsrc name=camsrc camera=0 ! \
video/x-raw,format=NV12,width=1280,height=720,framerate=30/1,\
interlace-mode=progressive,colorimetry=bt601 ! \
videoconvert ! jpegenc"
```
Similarly, for a camera on CSI1 just increment the camera ID:
```
--gst-launch-args "qtiqmmfsrc name=camsrc camera=1 ! \
video/x-raw,format=NV12,width=1280,height=720,framerate=30/1,\
interlace-mode=progressive,colorimetry=bt601 ! \
videoconvert ! jpegenc"
```
And so on for interfaces CSI2 and CSI3. Otherwise not using `--gst-launch-args` will default to expecting a webcam on USB.
### 3. Verifying that your device is connected
That's all! Your device is now connected to Edge Impulse. To verify this, go to [your Edge Impulse project](https://studio.edgeimpulse.com/studio/profile/projects), and click **Devices**. The device will be listed here.
 ## Next steps: building a machine learning model
With everything set up you can now build your first machine learning model with these tutorials:
* [Responding to your voice](/tutorials/end-to-end/keyword-spotting)
* [Recognize sounds from audio](/tutorials/end-to-end/sound-recognition)
* [Adding sight to your sensors](/tutorials/end-to-end/image-classification)
* [Object detection](/tutorials/end-to-end/object-detection-bounding-boxes)
* [Visual anomaly detection with FOMO-AD](/studio/projects/learning-blocks/blocks/visual-anomaly-detection-fomo-ad)
Looking to connect different sensors? Our [Linux SDKs](/tools/libraries/sdks/inference/linux) lets you easily send data from any sensor and any programming language (with examples in Node.js, Python, Go and C++) into Edge Impulse.
## Profiling your models
To profile your models for the Dragonwing QCS6490 device:
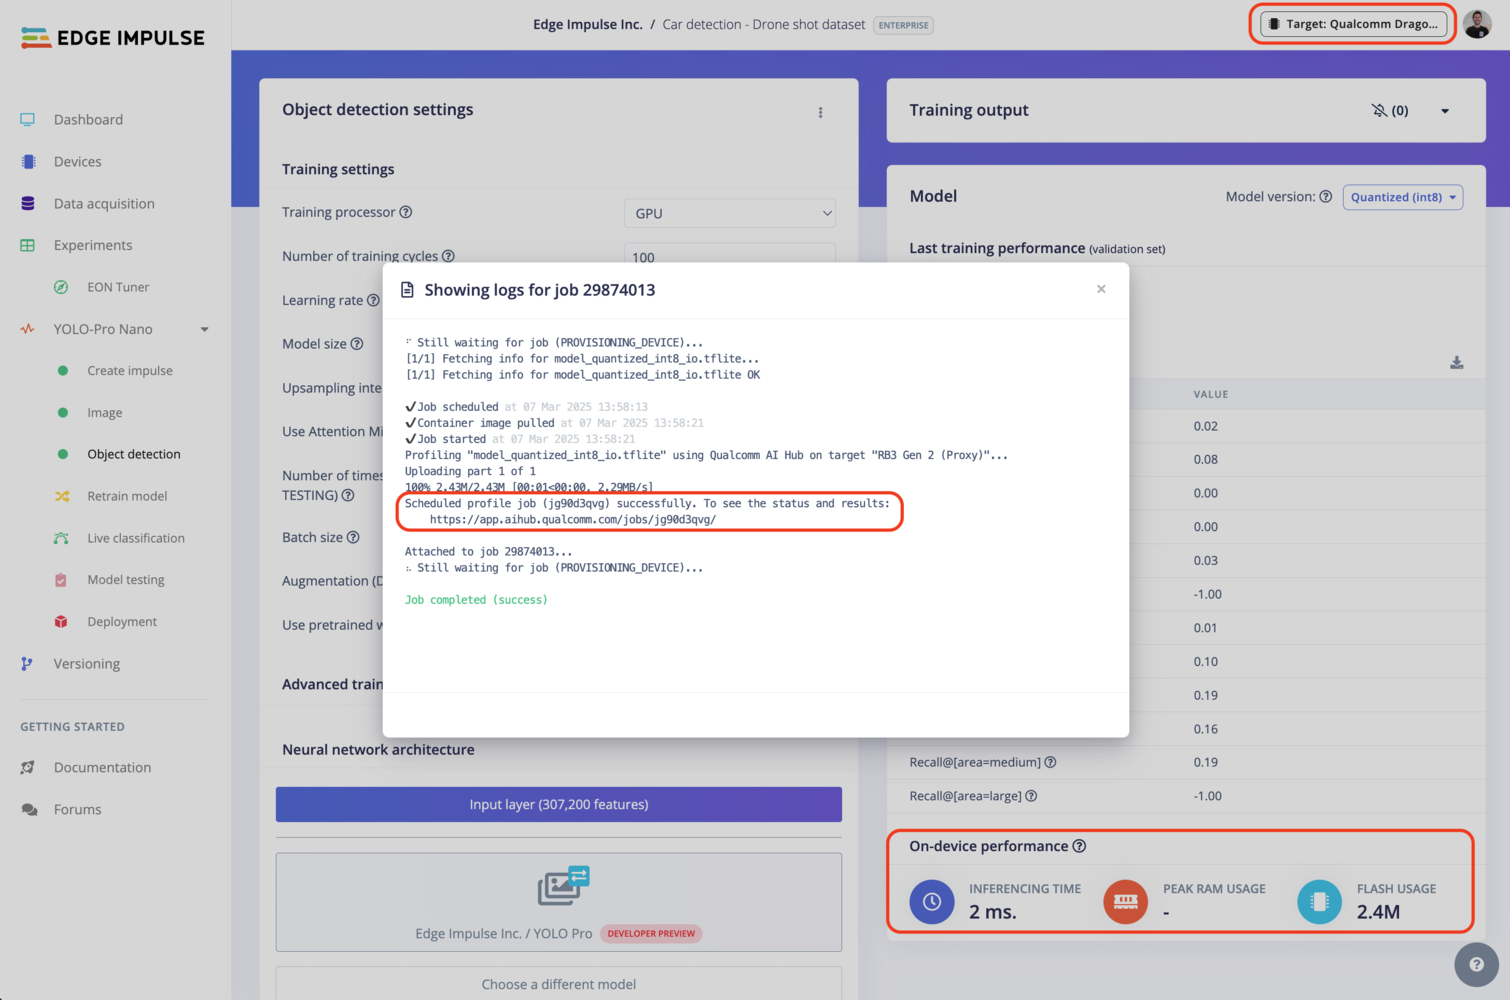
* Make sure to select the Dragonwing RB3 Gen 2 Development Kit as your target device. You can change the target at the top of the page near your user's logo.
* Head to your [Learning block](/studio/projects/learning-blocks) page in Edge Impulse Studio.
* Click on the **Calculate performance** button.
To provide the on-device performance, we use [Qualcomm® AI Hub](https://aihub.qualcomm.com/) in the background (see the image below) which run the compiled model on a physical device to gather metrics such as the mapping of model layers to compute units, inference latency, and peak memory usage. See more on Qualcomm® AI Hub [documentation](https://app.aihub.qualcomm.com/docs/) page.
## Next steps: building a machine learning model
With everything set up you can now build your first machine learning model with these tutorials:
* [Responding to your voice](/tutorials/end-to-end/keyword-spotting)
* [Recognize sounds from audio](/tutorials/end-to-end/sound-recognition)
* [Adding sight to your sensors](/tutorials/end-to-end/image-classification)
* [Object detection](/tutorials/end-to-end/object-detection-bounding-boxes)
* [Visual anomaly detection with FOMO-AD](/studio/projects/learning-blocks/blocks/visual-anomaly-detection-fomo-ad)
Looking to connect different sensors? Our [Linux SDKs](/tools/libraries/sdks/inference/linux) lets you easily send data from any sensor and any programming language (with examples in Node.js, Python, Go and C++) into Edge Impulse.
## Profiling your models
To profile your models for the Dragonwing QCS6490 device:
* Make sure to select the Dragonwing RB3 Gen 2 Development Kit as your target device. You can change the target at the top of the page near your user's logo.
* Head to your [Learning block](/studio/projects/learning-blocks) page in Edge Impulse Studio.
* Click on the **Calculate performance** button.
To provide the on-device performance, we use [Qualcomm® AI Hub](https://aihub.qualcomm.com/) in the background (see the image below) which run the compiled model on a physical device to gather metrics such as the mapping of model layers to compute units, inference latency, and peak memory usage. See more on Qualcomm® AI Hub [documentation](https://app.aihub.qualcomm.com/docs/) page.
 ## Deploying back to device
### Using the Edge Impulse Linux CLI
To run your impulse locally on the Vision AI-KIT 6490, open a terminal (not through serial connection, but either through SSH or in the UI) and run:
```bash theme={"system"}
$ edge-impulse-linux-runner
```
This will automatically compile your model with full hardware acceleration, download the model to your Tria Vision AI-KIT 6490, and then start classifying (use `--clean` to switch projects).
Alternatively, you can select the **Linux (AARCH64 with Qualcomm QNN)** option in the **Deployment** page.
## Deploying back to device
### Using the Edge Impulse Linux CLI
To run your impulse locally on the Vision AI-KIT 6490, open a terminal (not through serial connection, but either through SSH or in the UI) and run:
```bash theme={"system"}
$ edge-impulse-linux-runner
```
This will automatically compile your model with full hardware acceleration, download the model to your Tria Vision AI-KIT 6490, and then start classifying (use `--clean` to switch projects).
Alternatively, you can select the **Linux (AARCH64 with Qualcomm QNN)** option in the **Deployment** page.
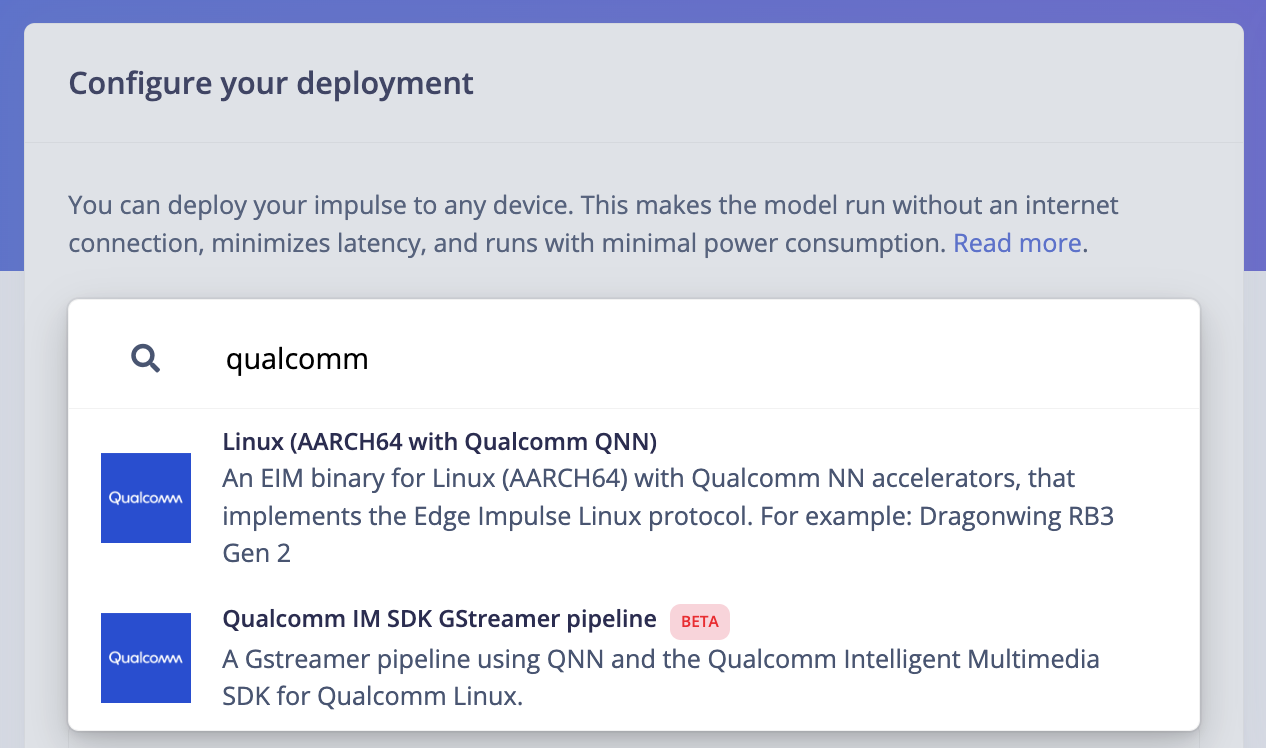 This will download an `.eim` model that you can run on your board with the following command:
```bash theme={"system"}
edge-impulse-linux-runner --model-file downloaded-model.eim
```
### Using the Edge Impulse Linux Inferencing SDKs
Our [Linux SDKs](/tools/libraries/sdks/inference/linux) has examples on how to integrate the `.eim` model with your favourite programming language.
You can download either the quantized version and the float32 versions but Qualcomm NN accelerator only supports quantized models. If you select the float32 version, the model will run on CPU.
### Using the IM SDK GStreamer option
When selecting this option, you will obtain a `.zip` folder. We provide instructions in the `README.md` file included in the compressed folder.
See more information on [Qualcomm IM SDK GStreamer pipeline](/hardware/deployments/run-qualcomm-im-sdk-gstreamer).
### Image model?
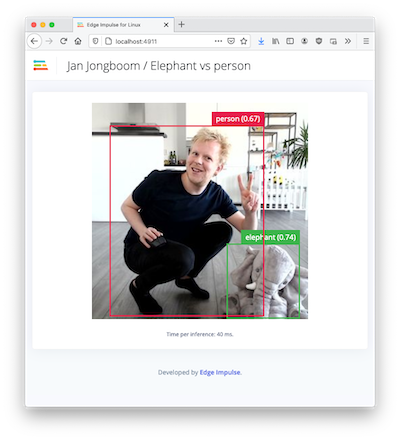
If you have an image model then you can get a peek of what your device sees by being on the same network as your device, and finding the 'Want to see a feed of the camera and live classification in your browser' message in the console. Open the URL in a browser and both the camera feed and the classification are shown:
This will download an `.eim` model that you can run on your board with the following command:
```bash theme={"system"}
edge-impulse-linux-runner --model-file downloaded-model.eim
```
### Using the Edge Impulse Linux Inferencing SDKs
Our [Linux SDKs](/tools/libraries/sdks/inference/linux) has examples on how to integrate the `.eim` model with your favourite programming language.
You can download either the quantized version and the float32 versions but Qualcomm NN accelerator only supports quantized models. If you select the float32 version, the model will run on CPU.
### Using the IM SDK GStreamer option
When selecting this option, you will obtain a `.zip` folder. We provide instructions in the `README.md` file included in the compressed folder.
See more information on [Qualcomm IM SDK GStreamer pipeline](/hardware/deployments/run-qualcomm-im-sdk-gstreamer).
### Image model?
If you have an image model then you can get a peek of what your device sees by being on the same network as your device, and finding the 'Want to see a feed of the camera and live classification in your browser' message in the console. Open the URL in a browser and both the camera feed and the classification are shown:
 ## Troubleshooting
### Capture process failed with code 255
If you start the CLI, and see:
```
Failed to initialize linux tool Capture process failed with code 255
```
You'll need to restart the camera server via:
```bash theme={"system"}
$ systemctl restart cam-server
```
## Troubleshooting
### Capture process failed with code 255
If you start the CLI, and see:
```
Failed to initialize linux tool Capture process failed with code 255
```
You'll need to restart the camera server via:
```bash theme={"system"}
$ systemctl restart cam-server
```