> ## Documentation Index
> Fetch the complete documentation index at: https://docs.edgeimpulse.com/llms.txt
> Use this file to discover all available pages before exploring further.
# Thundercomm Rubik Pi 3
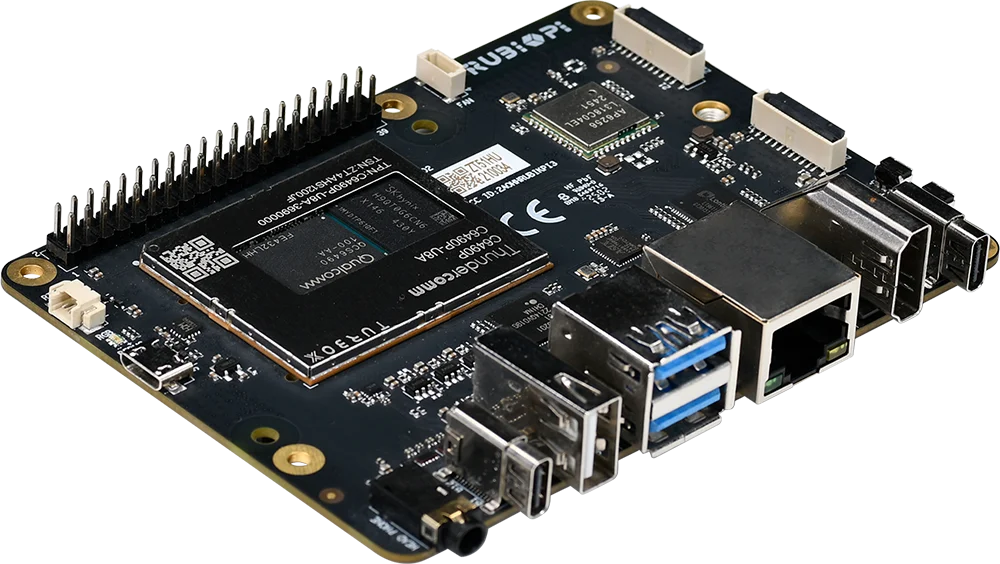
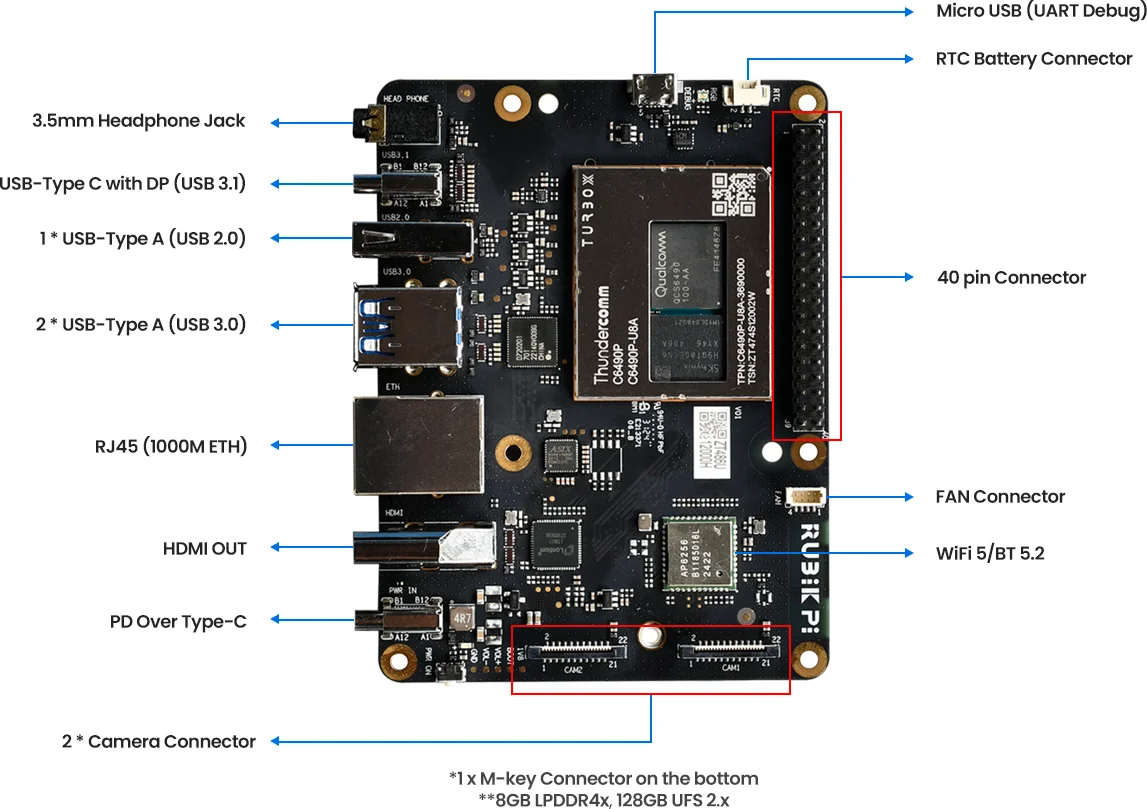
The [Thundercomm Rubik Pi 3](https://rubikpi.ai) is a powerful Linux-based development board based on the Qualcomm Dragonwing™ QCS6490 SoC. It has a Kryo™ 670 CPU, Adreno™ 643L GPU and 12 TOPS Hexagon™ 770 NPU. It also has onboard WiFi and Bluetooth, as well as common ports such as CSI camera inputs, USB3, a 4k HDMI video output, ethernet, and GPIO pins for interacting with external hardware. It also has 128gb of onboard storage for the Operating System and applications. The Rubik Pi 3 ships with either Qualcomm Linux or Ubuntu 24.04 pre-installed, and Edge Impulse supports both platforms.
 ## Setting Up Your Thundercomm Rubik Pi 3 - Ubuntu 24.04
### 1. Setup and connecting to the internet
1. Attach a USB keyboard and mouse, as well as an HDMI monitor. For computer vision projects, also attach a USB camera.
2. Connect power to the USB-C port on the right hand side of the board.
3. Press the power button, which is the front button (nearer the ports):
## Setting Up Your Thundercomm Rubik Pi 3 - Ubuntu 24.04
### 1. Setup and connecting to the internet
1. Attach a USB keyboard and mouse, as well as an HDMI monitor. For computer vision projects, also attach a USB camera.
2. Connect power to the USB-C port on the right hand side of the board.
3. Press the power button, which is the front button (nearer the ports):
 4. Once the board has booted up, you are brought to the console login. Login with the username `ubuntu` and the password `ubuntu`. (You might be required to change the password if this is the first boot.
5. Run the command `sudo nmtui`, and and navigate through the menu to add your WiFi. Alternatively, you can simply plug in an ethernet cable if available.
After connecting the board to the internet, reboot it. This will refresh the system clock (through the NTP), resolving an issue with invalid certificates when installing the Edge Impulse CLI.
### 2. Installing the Edge Impulse Linux CLI
Once rebooted, open up the terminal once again, and install the Edge Impulse CLI and other dependencies via:
```bash theme={"system"}
sudo apt update
curl -sL https://deb.nodesource.com/setup_20.x | sudo bash -
sudo apt install -y gcc g++ make build-essential nodejs sox gstreamer1.0-tools gstreamer1.0-plugins-good gstreamer1.0-plugins-base gstreamer1.0-plugins-base-apps
sudo npm install edge-impulse-linux -g --unsafe-perm
```
### 3. Connecting to Edge Impulse
With all dependencies set up, run:
```bash theme={"system"}
$ edge-impulse-linux
```
This will start a wizard which asks you to log in and choose an Edge Impulse project. If you want to switch projects, or use a different camera (e.g. a USB camera) run the command with the `--clean` argument.
### 4. Verifying that your device is connected
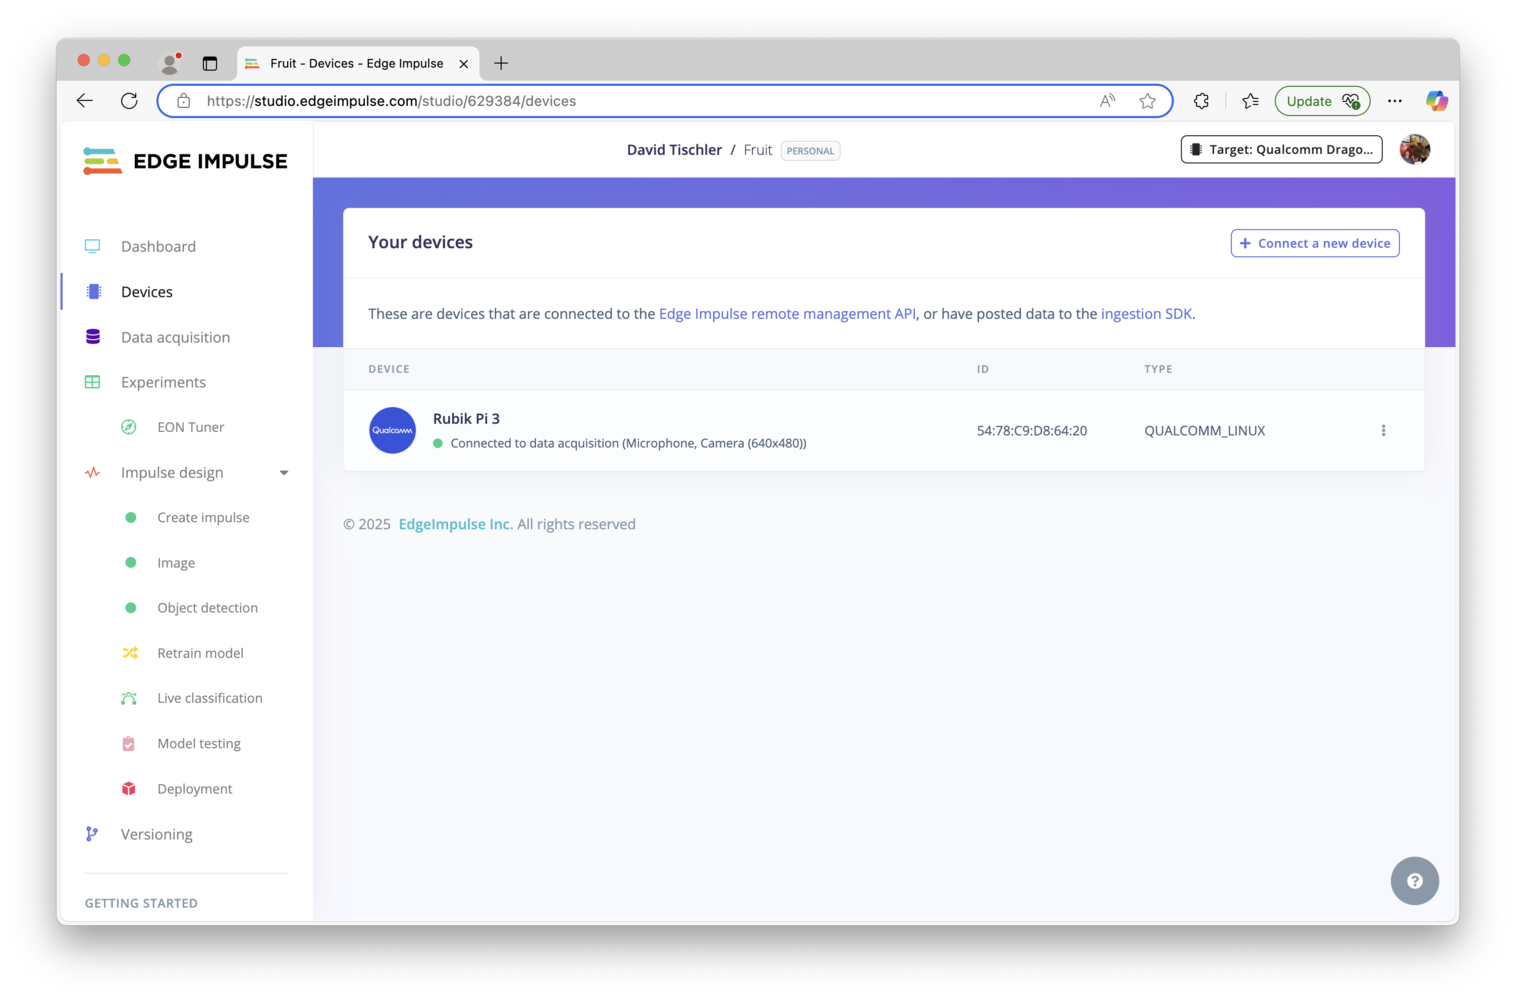
That's all! Your device is now connected to Edge Impulse. To verify this, go to [your Edge Impulse project](https://studio.edgeimpulse.com/studio/profile/projects), and click **Devices**. The device will be listed here.
4. Once the board has booted up, you are brought to the console login. Login with the username `ubuntu` and the password `ubuntu`. (You might be required to change the password if this is the first boot.
5. Run the command `sudo nmtui`, and and navigate through the menu to add your WiFi. Alternatively, you can simply plug in an ethernet cable if available.
After connecting the board to the internet, reboot it. This will refresh the system clock (through the NTP), resolving an issue with invalid certificates when installing the Edge Impulse CLI.
### 2. Installing the Edge Impulse Linux CLI
Once rebooted, open up the terminal once again, and install the Edge Impulse CLI and other dependencies via:
```bash theme={"system"}
sudo apt update
curl -sL https://deb.nodesource.com/setup_20.x | sudo bash -
sudo apt install -y gcc g++ make build-essential nodejs sox gstreamer1.0-tools gstreamer1.0-plugins-good gstreamer1.0-plugins-base gstreamer1.0-plugins-base-apps
sudo npm install edge-impulse-linux -g --unsafe-perm
```
### 3. Connecting to Edge Impulse
With all dependencies set up, run:
```bash theme={"system"}
$ edge-impulse-linux
```
This will start a wizard which asks you to log in and choose an Edge Impulse project. If you want to switch projects, or use a different camera (e.g. a USB camera) run the command with the `--clean` argument.
### 4. Verifying that your device is connected
That's all! Your device is now connected to Edge Impulse. To verify this, go to [your Edge Impulse project](https://studio.edgeimpulse.com/studio/profile/projects), and click **Devices**. The device will be listed here.
 ## Setting Up Your Thundercomm Rubik Pi 3 - Qualcomm Linux
### 1. Setup and connecting to the internet
1. Attach a USB keyboard and mouse, as well as an HDMI monitor. For computer vision projects, also attach a USB camera.
2. Connect power to the USB-C port on the right hand side of the board.
3. Press the power button, which is the front button (nearer the ports):
4. Once the board has booted up, open a terminal by clicking on the icon at the top-left of the screen.
5. Change to the 'root' user with `su root`
6. Run the command `rubikpi_config`, and navigate through the menu to add your WiFi. Alternatively, you can simply plug in an ethernet cable if available.
After connecting the board to the internet, reboot it. This will refresh the system clock (through the NTP), resolving an issue with invalid certificates when installing the Edge Impulse CLI.
### 2. Installing the Edge Impulse Linux CLI
Once rebooted, open up the terminal once again, and install the Edge Impulse CLI and other dependencies via:
```bash theme={"system"}
$ wget https://cdn.edgeimpulse.com/firmware/linux/setup-edge-impulse-qc-linux.sh
$ sh setup-edge-impulse-qc-linux.sh
```
Make note of the additional commands shown at the end of the installation process; the `source ~/.profile` command will be needed prior to running Edge Impulse in subsequent sessions.
### 3. Connecting to Edge Impulse
With all dependencies set up, run:
```bash theme={"system"}
$ edge-impulse-linux
```
This will start a wizard which asks you to log in and choose an Edge Impulse project. If you want to switch projects, or use a different camera (e.g. a USB camera) run the command with the `--clean` argument.
### 4. Verifying that your device is connected
That's all! Your device is now connected to Edge Impulse. To verify this, go to [your Edge Impulse project](https://studio.edgeimpulse.com/studio/profile/projects), and click **Devices**. The device will be listed here.
## Next steps: building a machine learning model
With everything set up you can now build your first machine learning model with these tutorials:
* [Responding to your voice](/tutorials/end-to-end/keyword-spotting)
* [Recognize sounds from audio](/tutorials/end-to-end/sound-recognition)
* [Adding sight to your sensors](/tutorials/end-to-end/image-classification)
* [Object detection](/tutorials/end-to-end/object-detection-bounding-boxes)
* [Visual anomaly detection with FOMO-AD](/studio/projects/learning-blocks/blocks/visual-anomaly-detection-fomo-ad)
Looking to connect different sensors? Our [Linux SDK](/tools/libraries/sdks/inference/linux) lets you easily send data from any sensor and any programming language (with examples in Node.js, Python, Go and C++) into Edge Impulse.
## Deploying back to device
### Using the Edge Impulse Linux CLI
To run your Impulse locally on the Rubik Pi 3, open a terminal and run:
```bash theme={"system"}
$ edge-impulse-linux-runner
```
This will automatically compile your model with full hardware acceleration, download the model to your Rubik Pi 3, and then start classifying (use `--clean` to switch projects).
Alternatively, you can select the **Linux (AARCH64 with Qualcomm QNN)** option in the **Deployment** page.
## Setting Up Your Thundercomm Rubik Pi 3 - Qualcomm Linux
### 1. Setup and connecting to the internet
1. Attach a USB keyboard and mouse, as well as an HDMI monitor. For computer vision projects, also attach a USB camera.
2. Connect power to the USB-C port on the right hand side of the board.
3. Press the power button, which is the front button (nearer the ports):
4. Once the board has booted up, open a terminal by clicking on the icon at the top-left of the screen.
5. Change to the 'root' user with `su root`
6. Run the command `rubikpi_config`, and navigate through the menu to add your WiFi. Alternatively, you can simply plug in an ethernet cable if available.
After connecting the board to the internet, reboot it. This will refresh the system clock (through the NTP), resolving an issue with invalid certificates when installing the Edge Impulse CLI.
### 2. Installing the Edge Impulse Linux CLI
Once rebooted, open up the terminal once again, and install the Edge Impulse CLI and other dependencies via:
```bash theme={"system"}
$ wget https://cdn.edgeimpulse.com/firmware/linux/setup-edge-impulse-qc-linux.sh
$ sh setup-edge-impulse-qc-linux.sh
```
Make note of the additional commands shown at the end of the installation process; the `source ~/.profile` command will be needed prior to running Edge Impulse in subsequent sessions.
### 3. Connecting to Edge Impulse
With all dependencies set up, run:
```bash theme={"system"}
$ edge-impulse-linux
```
This will start a wizard which asks you to log in and choose an Edge Impulse project. If you want to switch projects, or use a different camera (e.g. a USB camera) run the command with the `--clean` argument.
### 4. Verifying that your device is connected
That's all! Your device is now connected to Edge Impulse. To verify this, go to [your Edge Impulse project](https://studio.edgeimpulse.com/studio/profile/projects), and click **Devices**. The device will be listed here.
## Next steps: building a machine learning model
With everything set up you can now build your first machine learning model with these tutorials:
* [Responding to your voice](/tutorials/end-to-end/keyword-spotting)
* [Recognize sounds from audio](/tutorials/end-to-end/sound-recognition)
* [Adding sight to your sensors](/tutorials/end-to-end/image-classification)
* [Object detection](/tutorials/end-to-end/object-detection-bounding-boxes)
* [Visual anomaly detection with FOMO-AD](/studio/projects/learning-blocks/blocks/visual-anomaly-detection-fomo-ad)
Looking to connect different sensors? Our [Linux SDK](/tools/libraries/sdks/inference/linux) lets you easily send data from any sensor and any programming language (with examples in Node.js, Python, Go and C++) into Edge Impulse.
## Deploying back to device
### Using the Edge Impulse Linux CLI
To run your Impulse locally on the Rubik Pi 3, open a terminal and run:
```bash theme={"system"}
$ edge-impulse-linux-runner
```
This will automatically compile your model with full hardware acceleration, download the model to your Rubik Pi 3, and then start classifying (use `--clean` to switch projects).
Alternatively, you can select the **Linux (AARCH64 with Qualcomm QNN)** option in the **Deployment** page.
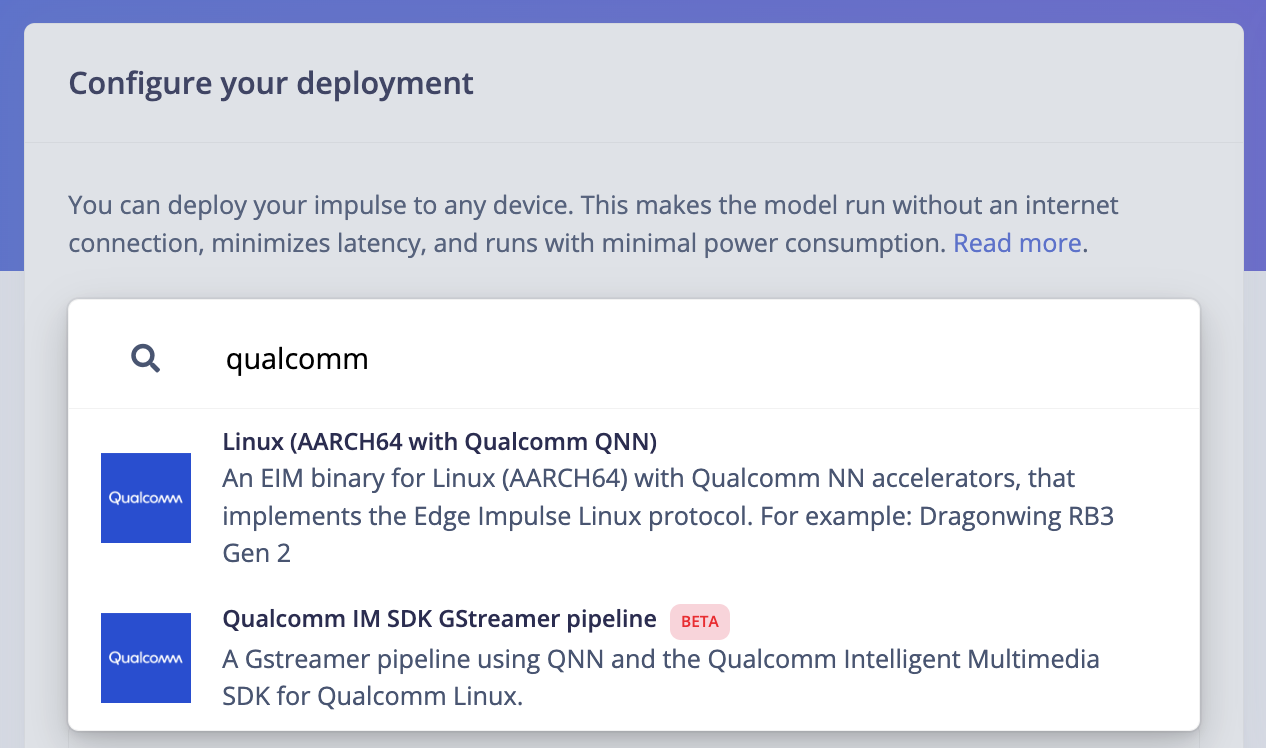 This will download an `.eim` model that you can run on your board with the following command:
```bash theme={"system"}
edge-impulse-linux-runner --model-file downloaded-model.eim
```
### Using the Edge Impulse Linux Inferencing SDKs
Our [Linux SDK](/tools/libraries/sdks/inference/linux) has examples on how to integrate the `.eim` model with your favorite programming language.
You can download either the quantized version and the float32 versions of your model, but the Qualcomm NN accelerator only supports quantized models. If you select the float32 version, the model will run on CPU.
### Using the IM SDK GStreamer option
When selecting this option, you will obtain a `.zip` folder. We provide instructions in the `README.md` file included in the compressed folder.
See more information on [Qualcomm IM SDK GStreamer pipeline](/hardware/deployments/run-qualcomm-im-sdk-gstreamer).
### Image model?
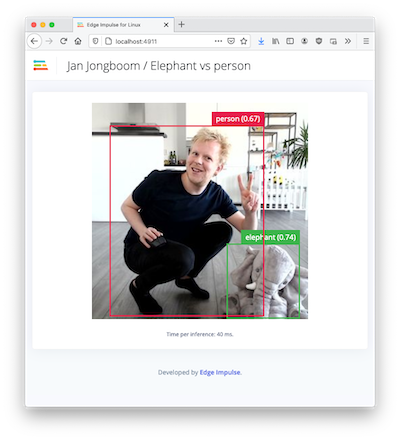
If you have an image model then you can get a peek of what your device sees by being on the same network as your device, and finding the 'Want to see a feed of the camera and live classification in your browser' message in the console. Open the URL in a browser and both the camera feed and the classification are shown:
This will download an `.eim` model that you can run on your board with the following command:
```bash theme={"system"}
edge-impulse-linux-runner --model-file downloaded-model.eim
```
### Using the Edge Impulse Linux Inferencing SDKs
Our [Linux SDK](/tools/libraries/sdks/inference/linux) has examples on how to integrate the `.eim` model with your favorite programming language.
You can download either the quantized version and the float32 versions of your model, but the Qualcomm NN accelerator only supports quantized models. If you select the float32 version, the model will run on CPU.
### Using the IM SDK GStreamer option
When selecting this option, you will obtain a `.zip` folder. We provide instructions in the `README.md` file included in the compressed folder.
See more information on [Qualcomm IM SDK GStreamer pipeline](/hardware/deployments/run-qualcomm-im-sdk-gstreamer).
### Image model?
If you have an image model then you can get a peek of what your device sees by being on the same network as your device, and finding the 'Want to see a feed of the camera and live classification in your browser' message in the console. Open the URL in a browser and both the camera feed and the classification are shown:
 ## Troubleshooting
### Capture process failed with code 255
If you start the CLI, and see:
```
Failed to initialize linux tool Capture process failed with code 255
```
You'll need to restart the camera server via:
```bash theme={"system"}
$ systemctl restart cam-server
```
## Troubleshooting
### Capture process failed with code 255
If you start the CLI, and see:
```
Failed to initialize linux tool Capture process failed with code 255
```
You'll need to restart the camera server via:
```bash theme={"system"}
$ systemctl restart cam-server
```