> ## Documentation Index
> Fetch the complete documentation index at: https://docs.edgeimpulse.com/llms.txt
> Use this file to discover all available pages before exploring further.
# SiLabs xG24 Dev Kit
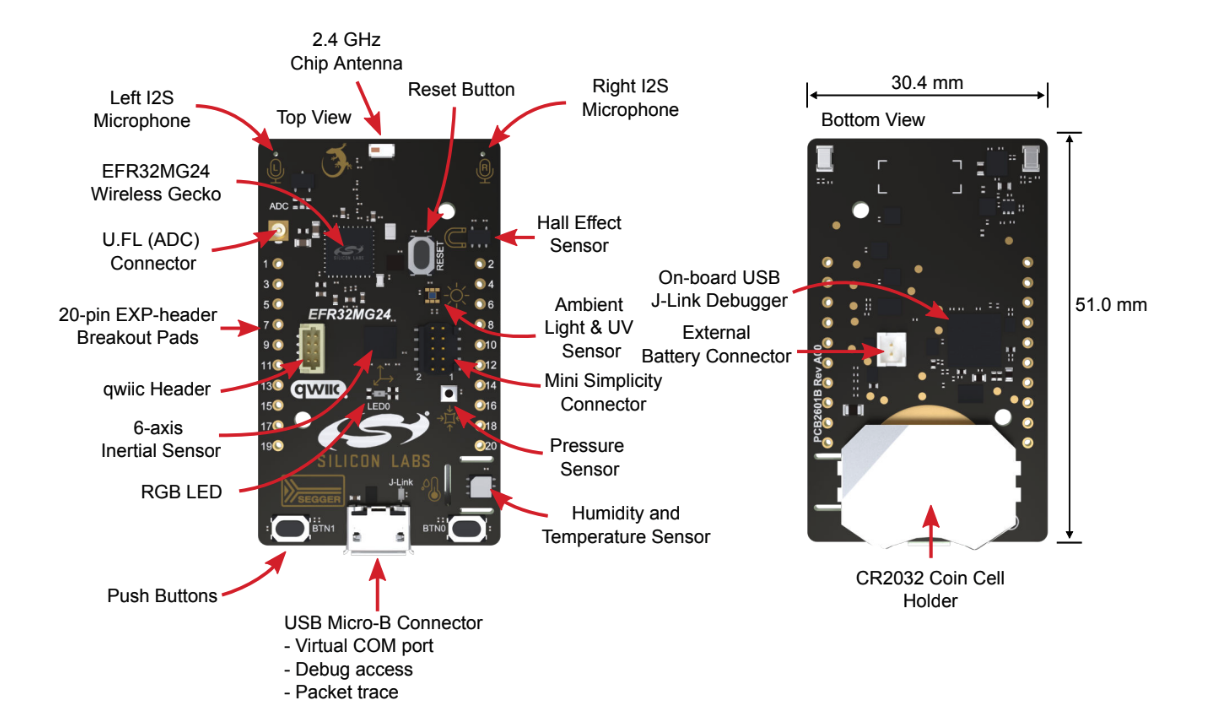
The Silicon Labs xG24 Dev Kit (xG24-DK2601B) is a compact, feature-packed development platform built for the EFR32MG24 Cortex-M33 microcontroller. It provides the fastest path to develop and prototype wireless IoT products. This development platform supports up to +10 dBm output power and includes support for the 20-bit ADC as well as the xG24's AI/ML hardware accelerator. The platform also features a wide variety of sensors, a microphone, Bluetooth Low Energy and a battery holder - and it's fully supported by Edge Impulse! You'll be able to sample raw data as well as build and deploy trained machine learning models directly from the Edge Impulse Studio - and even stream your machine learning results over BLE to a phone.
The Edge Impulse firmware for this development board is open source and hosted on GitHub: [edgeimpulse/firmware-silabs-xg24](https://github.com/edgeimpulse/firmware-silabs-xg24).
 ### Installing dependencies
To set this device up with Edge Impulse, you will need to install the following software:
1. [Simplicity Commander](https://community.silabs.com/s/article/simplicity-commander). A utility program we will use to flash firmware images onto the target.
2. The [Edge Impulse CLI](/tools/clis/edge-impulse-cli/installation) which will enable you to connect your xG24 Dev Kit directly to Edge Impulse Studio, so that you can collect raw data and trigger in-system inferences.
**Problems installing the CLI?**
See the [Installation and troubleshooting](/tools/clis/edge-impulse-cli/installation) guide.
Edge Impulse Studio can collect data directly from your xG24 Dev Kit and also help you trigger in-system inferences to debug your model, but in order to allow Edge Impulse Studio to interact with your xG24 Dev Kit you first need to flash it with our base firmware image.
#### 1. Download the base firmware image
[Download the latest Edge Impulse firmware](https://cdn.edgeimpulse.com/firmware/silabs-xg24.zip), and unzip the file. Once downloaded, unzip it to obtain the `firmware-xg24.hex` file, which we will be using in the following steps.
#### 2. Connect the xG24 Dev Kit to your computer
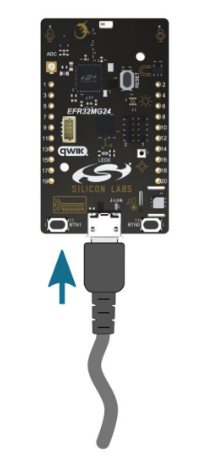
Use a micro-USB cable to connect the xG24 Dev Kit to your development computer (where you downloaded and installed [Simplicity Commander](https://community.silabs.com/s/article/simplicity-commander)).
### Installing dependencies
To set this device up with Edge Impulse, you will need to install the following software:
1. [Simplicity Commander](https://community.silabs.com/s/article/simplicity-commander). A utility program we will use to flash firmware images onto the target.
2. The [Edge Impulse CLI](/tools/clis/edge-impulse-cli/installation) which will enable you to connect your xG24 Dev Kit directly to Edge Impulse Studio, so that you can collect raw data and trigger in-system inferences.
**Problems installing the CLI?**
See the [Installation and troubleshooting](/tools/clis/edge-impulse-cli/installation) guide.
Edge Impulse Studio can collect data directly from your xG24 Dev Kit and also help you trigger in-system inferences to debug your model, but in order to allow Edge Impulse Studio to interact with your xG24 Dev Kit you first need to flash it with our base firmware image.
#### 1. Download the base firmware image
[Download the latest Edge Impulse firmware](https://cdn.edgeimpulse.com/firmware/silabs-xg24.zip), and unzip the file. Once downloaded, unzip it to obtain the `firmware-xg24.hex` file, which we will be using in the following steps.
#### 2. Connect the xG24 Dev Kit to your computer
Use a micro-USB cable to connect the xG24 Dev Kit to your development computer (where you downloaded and installed [Simplicity Commander](https://community.silabs.com/s/article/simplicity-commander)).
 #### 3. Load the base firmware image with Simplicity Commander
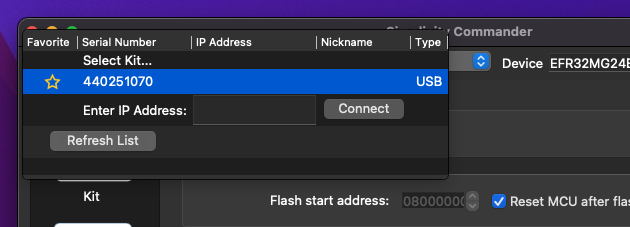
You can use [Simplicity Commander](https://community.silabs.com/s/article/simplicity-commander) to flash your xG24 Dev Kit with our [base firmware image](https://cdn.edgeimpulse.com/firmware/silabs-xg24.zip). To do this, first select your board from the dropdown list on the top left corner:
#### 3. Load the base firmware image with Simplicity Commander
You can use [Simplicity Commander](https://community.silabs.com/s/article/simplicity-commander) to flash your xG24 Dev Kit with our [base firmware image](https://cdn.edgeimpulse.com/firmware/silabs-xg24.zip). To do this, first select your board from the dropdown list on the top left corner:
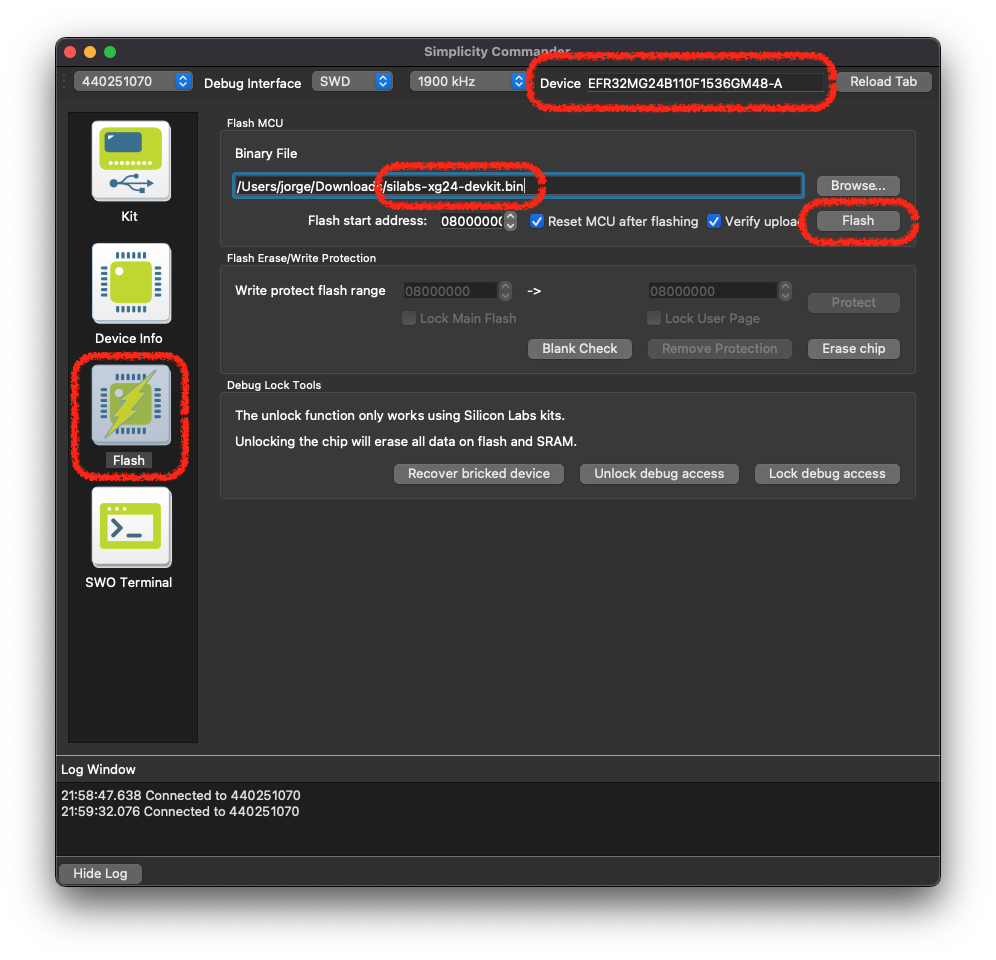
 Then go to the "Flash" section on the left sidebar, and select the base firmware image file you downloaded in the first step above (i.e., the file named `firmware-xg24.hex`). You can now press the `Flash` button to load the base firmware image onto the xG24 Dev Kit.
 **Keep Simplicity Commander Handy**
Simplicity Commander will be needed to upload any other project built on Edge Impulse, but the base firmware image only has to be loaded once.
### Connecting to Edge Impulse
With all the software in place, it's time to connect the xG24 Dev Kit to Edge Impulse.
#### 1. Connect the development board to your computer
Use a micro-USB cable to connect the development board to your computer.
#### 2. Setting keys
From a command prompt or terminal, run:
```
edge-impulse-daemon
```
This will start a wizard which will ask you to log in, and choose an Edge Impulse project. If you want to switch projects run the command with `--clean`.
Alternatively, recent versions of Google Chrome and Microsoft Edge can collect data directly from your development board, without the need for the Edge Impulse CLI. See [this blog post](https://edgeimpulse.com/blog/collect-sensor-data-straight-from-your-web-browser) for more information.
#### 3. Verifying that the device is connected
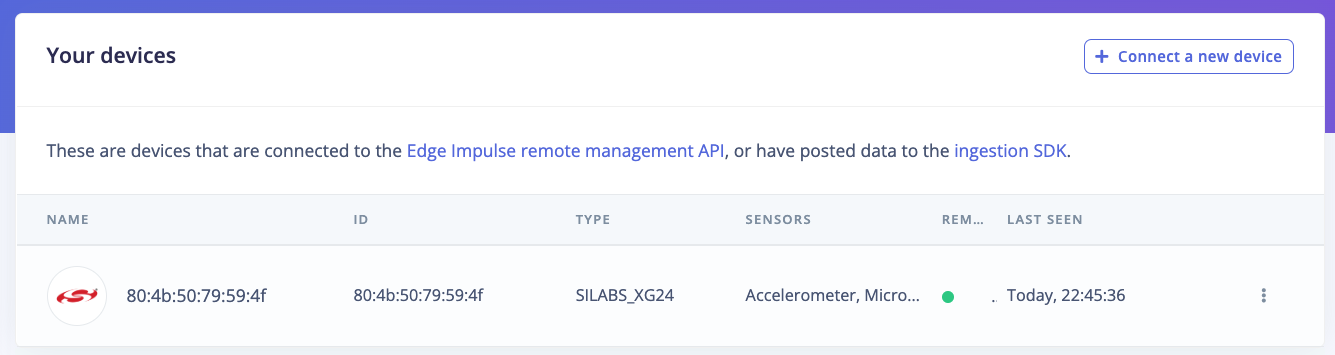
That's all! Your device is now connected to Edge Impulse. To verify this, go to [your Edge Impulse project](https://studio.edgeimpulse.com/studio/profile/projects), and click **Devices** on the left sidebar. The device will be listed there:
**Keep Simplicity Commander Handy**
Simplicity Commander will be needed to upload any other project built on Edge Impulse, but the base firmware image only has to be loaded once.
### Connecting to Edge Impulse
With all the software in place, it's time to connect the xG24 Dev Kit to Edge Impulse.
#### 1. Connect the development board to your computer
Use a micro-USB cable to connect the development board to your computer.
#### 2. Setting keys
From a command prompt or terminal, run:
```
edge-impulse-daemon
```
This will start a wizard which will ask you to log in, and choose an Edge Impulse project. If you want to switch projects run the command with `--clean`.
Alternatively, recent versions of Google Chrome and Microsoft Edge can collect data directly from your development board, without the need for the Edge Impulse CLI. See [this blog post](https://edgeimpulse.com/blog/collect-sensor-data-straight-from-your-web-browser) for more information.
#### 3. Verifying that the device is connected
That's all! Your device is now connected to Edge Impulse. To verify this, go to [your Edge Impulse project](https://studio.edgeimpulse.com/studio/profile/projects), and click **Devices** on the left sidebar. The device will be listed there:
 ### Next steps: building a machine learning model
With everything set up you can now build your first machine learning model with these tutorials:
* [Object detection on the SiLabs xG24 Dev Kit](/tutorials/hardware/silabs-xg24-devkit-object-detection).
* [Building a continuous motion recognition system](/tutorials/end-to-end/motion-recognition).
* [Recognizing sounds from audio](/tutorials/end-to-end/sound-recognition).
* [Keyword spotting](/tutorials/end-to-end/keyword-spotting).
Looking to connect different sensors? The [Data forwarder](/tools/clis/edge-impulse-cli/data-forwarder) lets you easily send data from any sensor into Edge Impulse.
### Bluetooth Demo
Our firmware is equipped with a simple BLE demo showing how to start/stop the inference over the BLE and acquire the results.
To use the demo, first install the **EFR Connect BLE Mobile App** on your mobile phone:
* [EFR Connect BLE Mobile App at Google Play](https://play.google.com/store/apps/details?id=com.siliconlabs.bledemo)
* [EFR Connect BLE Mobile App at Apple App Store](https://apps.apple.com/pl/app/efr-connect-ble-mobile-app/id1030932759)
Make sure your board is flashed with [a pre-built binary](https://cdn.edgeimpulse.com/firmware/silabs-xg24.zip). Power on the board and run the **EFR Connect BLE Mobile App**
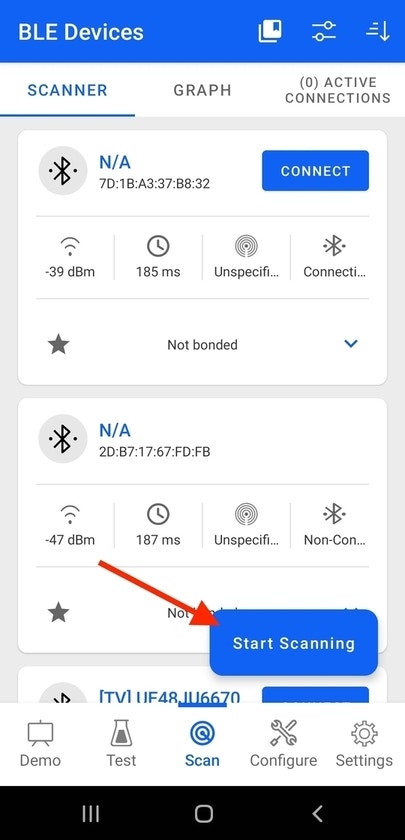
1. Scan your neighborhood for BLE devices
### Next steps: building a machine learning model
With everything set up you can now build your first machine learning model with these tutorials:
* [Object detection on the SiLabs xG24 Dev Kit](/tutorials/hardware/silabs-xg24-devkit-object-detection).
* [Building a continuous motion recognition system](/tutorials/end-to-end/motion-recognition).
* [Recognizing sounds from audio](/tutorials/end-to-end/sound-recognition).
* [Keyword spotting](/tutorials/end-to-end/keyword-spotting).
Looking to connect different sensors? The [Data forwarder](/tools/clis/edge-impulse-cli/data-forwarder) lets you easily send data from any sensor into Edge Impulse.
### Bluetooth Demo
Our firmware is equipped with a simple BLE demo showing how to start/stop the inference over the BLE and acquire the results.
To use the demo, first install the **EFR Connect BLE Mobile App** on your mobile phone:
* [EFR Connect BLE Mobile App at Google Play](https://play.google.com/store/apps/details?id=com.siliconlabs.bledemo)
* [EFR Connect BLE Mobile App at Apple App Store](https://apps.apple.com/pl/app/efr-connect-ble-mobile-app/id1030932759)
Make sure your board is flashed with [a pre-built binary](https://cdn.edgeimpulse.com/firmware/silabs-xg24.zip). Power on the board and run the **EFR Connect BLE Mobile App**
1. Scan your neighborhood for BLE devices
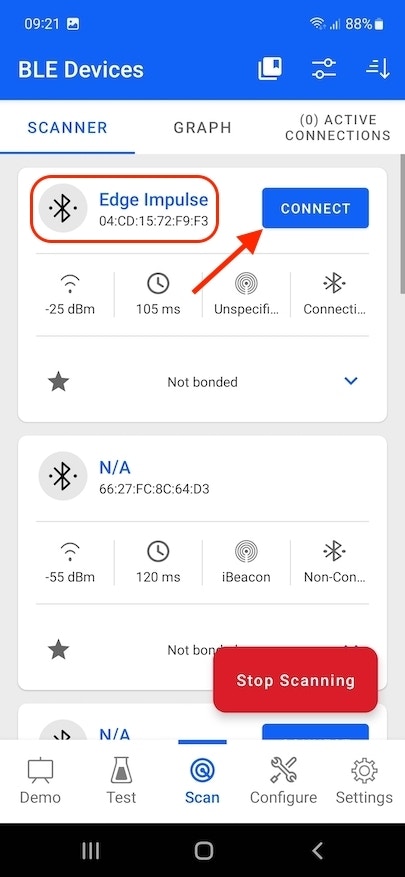
 2. Look for the device named **Edge Impulse** and tap **Connect**
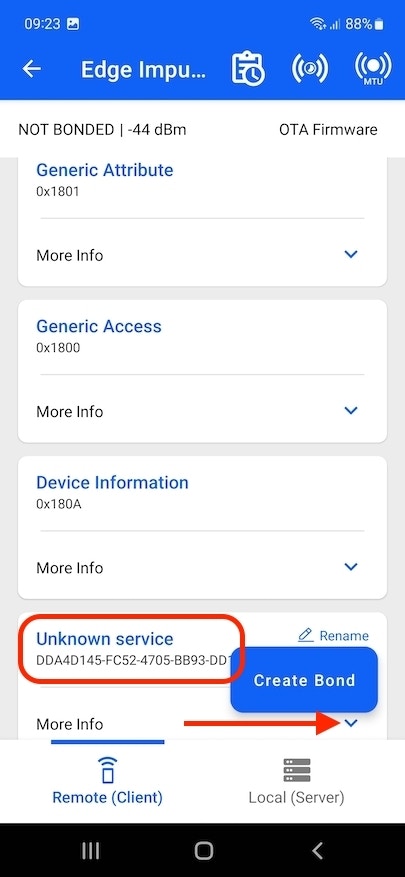
 3. Scroll down to **Unknown service** with UUID `DDA4D145-FC52-4705-BB93-DD1F295AA522` and select **More Info**
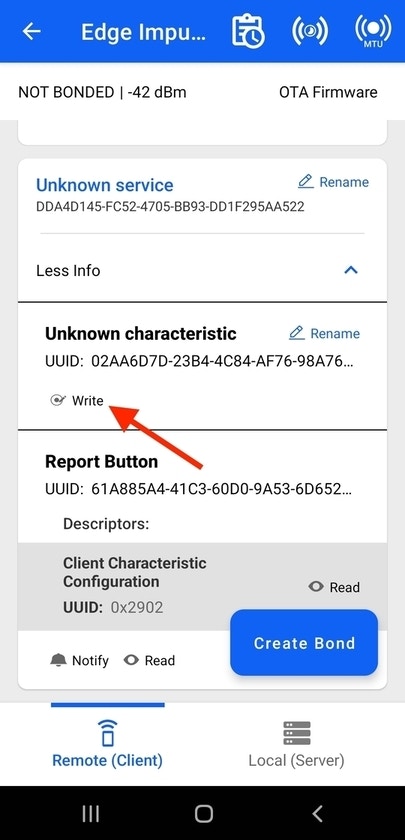
 4. Select **Write** for characteristics with UUID `02AA6D7D-23B4-4C84-AF76-98A7699F7FE2`
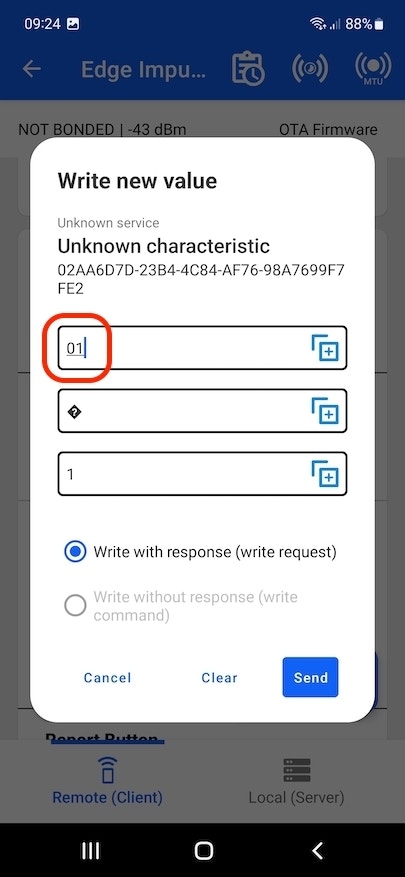
 5. In the **Hex** field enter `01` and press **Send**. This will start inferencing, the device should start blinking with LEDs.
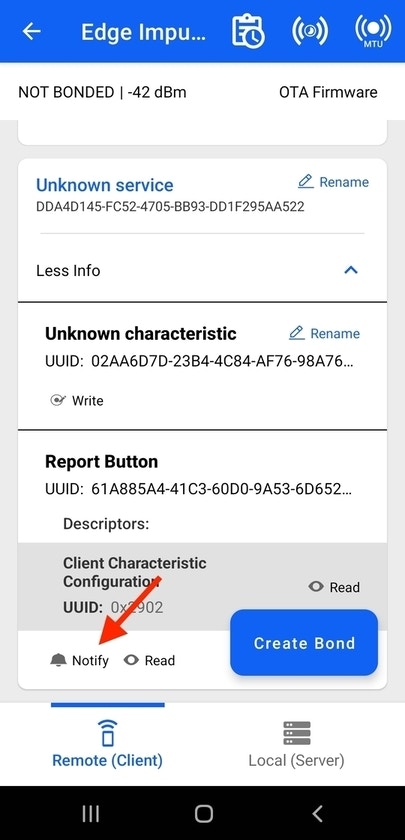
 6. For another characteristic with UUID `61A885A4-41C3-60D0-9A53-6D652A70D29C` enable **Notify** and observe the reported inference results.
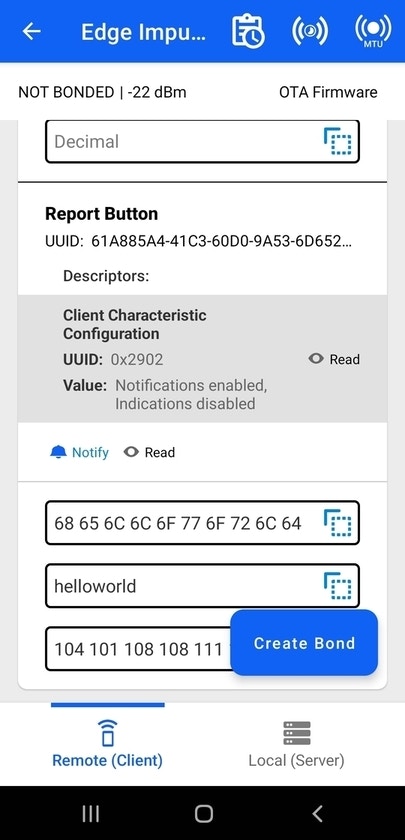 7. To stop the inference, send `00` to the characteristics `02AA6D7D-23B4-4C84-AF76-98A7699F7FE2`