> ## Documentation Index
> Fetch the complete documentation index at: https://docs.edgeimpulse.com/llms.txt
> Use this file to discover all available pages before exploring further.
# SiLabs Thunderboard Sense 2
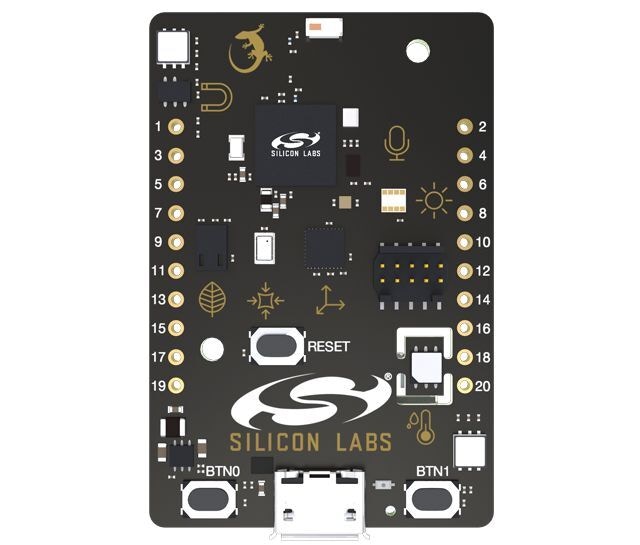
The Silicon Labs Thunderboard Sense 2 is a complete development board with a Cortex-M4 microcontroller, a wide variety of sensors, a microphone, Bluetooth Low Energy and a battery holder - and it's fully supported by Edge Impulse. You'll be able to sample raw data, build models, and deploy trained machine learning models directly from the studio - and even stream your machine learning results over BLE to a phone.
This board is **Not recommended for new designs**. For a replacement, see the [EFR32xG24 Dev Kit](https://www.silabs.com/development-tools/wireless/efr32xg24-dev-kit) which is [also fully supported by Edge Impulse](/hardware/boards/silabs-xg24-devkit)
The Edge Impulse firmware for this development board is open source and hosted on on GitHub: [edgeimpulse/firmware-silabs-thunderboard-sense-2](https://github.com/edgeimpulse/firmware-silabs-thunderboard-sense-2).
 ### Installing dependencies
To set this device up in Edge Impulse, you will need to install the following software:
1. [Edge Impulse CLI](/tools/clis/edge-impulse-cli/installation).
2. On Linux:
* GNU Screen: install for example via `sudo apt install screen`.
**Problems installing the CLI?**
See the [Installation and troubleshooting](/tools/clis/edge-impulse-cli/installation) guide.
### Connecting to Edge Impulse
With all the software in place it's time to connect the development board to Edge Impulse.
#### 1. Connect the development board to your computer
Use a micro-USB cable to connect the development board to your computer. The development board should mount as a USB mass-storage device (like a USB flash drive), with the name `TB004`. Make sure you can see this drive.
#### 2. Update the firmware
The development board does not come with the right firmware yet. To update the firmware:
1. [Download the latest Edge Impulse firmware](https://cdn.edgeimpulse.com/firmware/silabs-thunderboard-sense2.bin).
2. Drag the `silabs-thunderboard-sense2.bin` file to the `TB004` drive.
3. Wait 30 seconds.
#### 3. Setting keys
From a command prompt or terminal, run:
```
edge-impulse-daemon
```
This will start a wizard which will ask you to log in and choose an Edge Impulse project. If you want to switch projects run the command with `--clean`.
Alternatively, recent versions of Google Chrome and Microsoft Edge can collect data directly from your development board, without the need for the Edge Impulse CLI. See [this blog post](https://edgeimpulse.com/blog/collect-sensor-data-straight-from-your-web-browser) for more information.
#### 4. Verifying that the device is connected
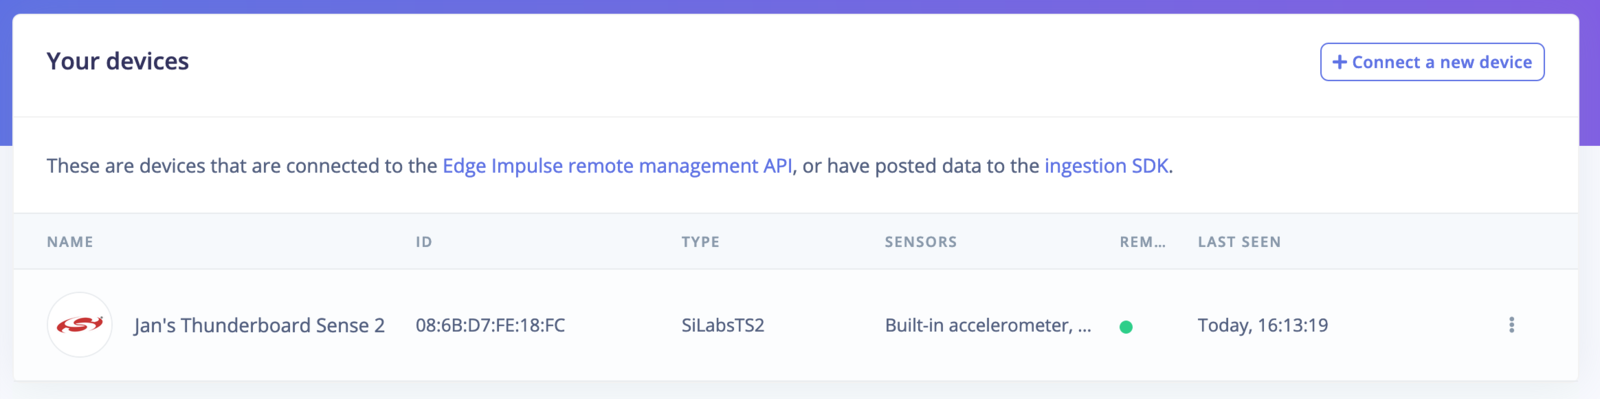
That's all! Your device is now connected to Edge Impulse. To verify this, go to [your Edge Impulse project](https://studio.edgeimpulse.com/studio/profile/projects), and click **Devices**. The device will be listed here.
### Installing dependencies
To set this device up in Edge Impulse, you will need to install the following software:
1. [Edge Impulse CLI](/tools/clis/edge-impulse-cli/installation).
2. On Linux:
* GNU Screen: install for example via `sudo apt install screen`.
**Problems installing the CLI?**
See the [Installation and troubleshooting](/tools/clis/edge-impulse-cli/installation) guide.
### Connecting to Edge Impulse
With all the software in place it's time to connect the development board to Edge Impulse.
#### 1. Connect the development board to your computer
Use a micro-USB cable to connect the development board to your computer. The development board should mount as a USB mass-storage device (like a USB flash drive), with the name `TB004`. Make sure you can see this drive.
#### 2. Update the firmware
The development board does not come with the right firmware yet. To update the firmware:
1. [Download the latest Edge Impulse firmware](https://cdn.edgeimpulse.com/firmware/silabs-thunderboard-sense2.bin).
2. Drag the `silabs-thunderboard-sense2.bin` file to the `TB004` drive.
3. Wait 30 seconds.
#### 3. Setting keys
From a command prompt or terminal, run:
```
edge-impulse-daemon
```
This will start a wizard which will ask you to log in and choose an Edge Impulse project. If you want to switch projects run the command with `--clean`.
Alternatively, recent versions of Google Chrome and Microsoft Edge can collect data directly from your development board, without the need for the Edge Impulse CLI. See [this blog post](https://edgeimpulse.com/blog/collect-sensor-data-straight-from-your-web-browser) for more information.
#### 4. Verifying that the device is connected
That's all! Your device is now connected to Edge Impulse. To verify this, go to [your Edge Impulse project](https://studio.edgeimpulse.com/studio/profile/projects), and click **Devices**. The device will be listed here.
 ### Next steps: building a machine learning model
With everything set up you can now build your first machine learning model with these tutorials:
* [Building a continuous motion recognition system](/tutorials/end-to-end/motion-recognition).
* [Recognizing sounds from audio](/tutorials/end-to-end/sound-recognition).
* [Keyword spotting](/tutorials/end-to-end/sound-recognition).
Looking to connect different sensors? The [Data forwarder](/tools/clis/edge-impulse-cli/data-forwarder) lets you easily send data from any sensor into Edge Impulse.
Did you know? You can also stream the results of your impulse over BLE to a nearby phone or gateway: see [Streaming results over BLE to your phone](https://github.com/edgeimpulse/firmware-silabs-thunderboard-sense-2#streaming-results-over-ble-to-your-phone).
### Bluetooth Demo
Our firmware is equipped with a simple BLE demo showing how to start/stop the inference over the BLE and acquire the results.
To use the demo, first install the **EFR Connect BLE Mobile App** on your mobile phone:
* [EFR Connect BLE Mobile App at Google Play](https://play.google.com/store/apps/details?id=com.siliconlabs.bledemo)
* [EFR Connect BLE Mobile App at Apple App Store](https://apps.apple.com/pl/app/efr-connect-ble-mobile-app/id1030932759)
Make sure your board is flashed with [a pre-built binary](https://cdn.edgeimpulse.com/firmware/silabs-thunderboard-sense2.bin). Power on the board and run the **EFR Connect BLE Mobile App**
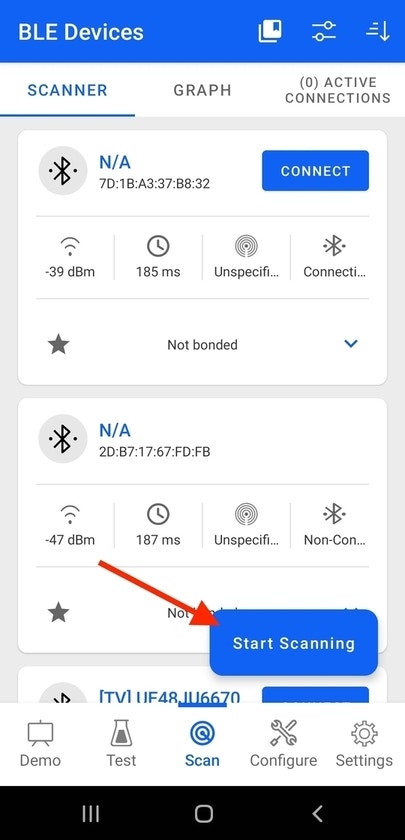
1. Scan your neighborhood for BLE devices
### Next steps: building a machine learning model
With everything set up you can now build your first machine learning model with these tutorials:
* [Building a continuous motion recognition system](/tutorials/end-to-end/motion-recognition).
* [Recognizing sounds from audio](/tutorials/end-to-end/sound-recognition).
* [Keyword spotting](/tutorials/end-to-end/sound-recognition).
Looking to connect different sensors? The [Data forwarder](/tools/clis/edge-impulse-cli/data-forwarder) lets you easily send data from any sensor into Edge Impulse.
Did you know? You can also stream the results of your impulse over BLE to a nearby phone or gateway: see [Streaming results over BLE to your phone](https://github.com/edgeimpulse/firmware-silabs-thunderboard-sense-2#streaming-results-over-ble-to-your-phone).
### Bluetooth Demo
Our firmware is equipped with a simple BLE demo showing how to start/stop the inference over the BLE and acquire the results.
To use the demo, first install the **EFR Connect BLE Mobile App** on your mobile phone:
* [EFR Connect BLE Mobile App at Google Play](https://play.google.com/store/apps/details?id=com.siliconlabs.bledemo)
* [EFR Connect BLE Mobile App at Apple App Store](https://apps.apple.com/pl/app/efr-connect-ble-mobile-app/id1030932759)
Make sure your board is flashed with [a pre-built binary](https://cdn.edgeimpulse.com/firmware/silabs-thunderboard-sense2.bin). Power on the board and run the **EFR Connect BLE Mobile App**
1. Scan your neighborhood for BLE devices
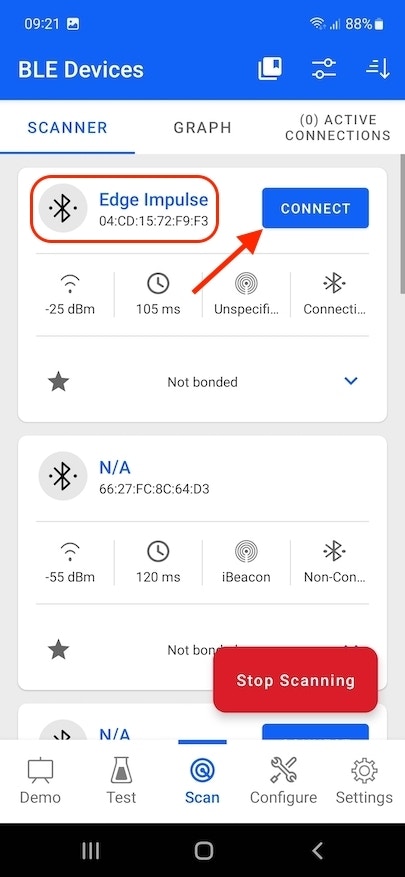
 2. Look for the device named **Edge Impulse** and tap **Connect**
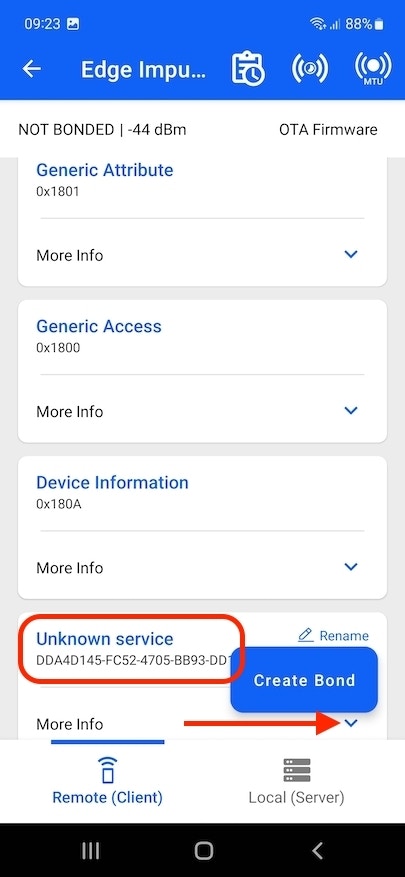
 3. Scroll down to **Unknown service** with UUID `DDA4D145-FC52-4705-BB93-DD1F295AA522` and select **More Info**
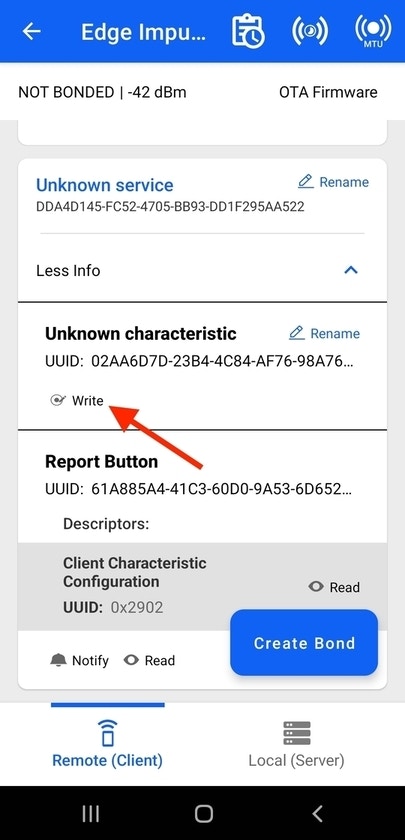
 4. Select **Write** for characteristics with UUID `02AA6D7D-23B4-4C84-AF76-98A7699F7FE2`
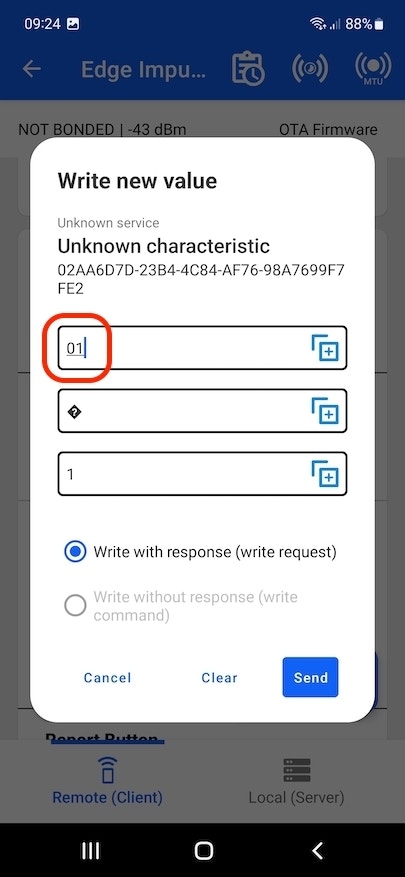
 5. In the **Hex** field enter `01` and press **Send**. This will start inferencing, the device should start blinking with LEDs.
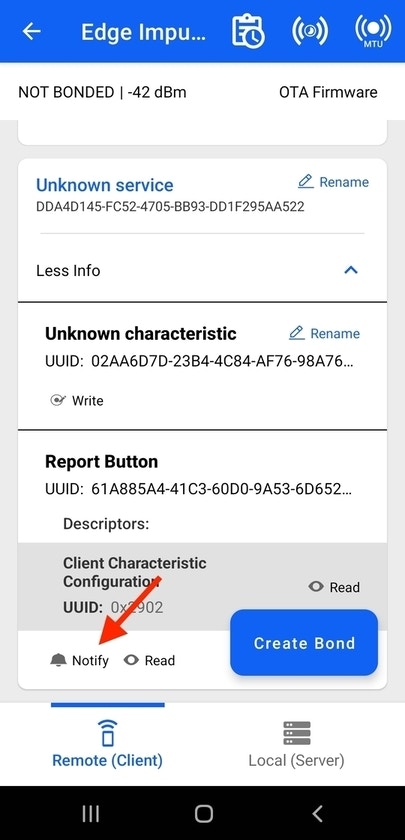
 6. For another characteristic with UUID `61A885A4-41C3-60D0-9A53-6D652A70D29C` enable **Notify** and observe the reported inference results.
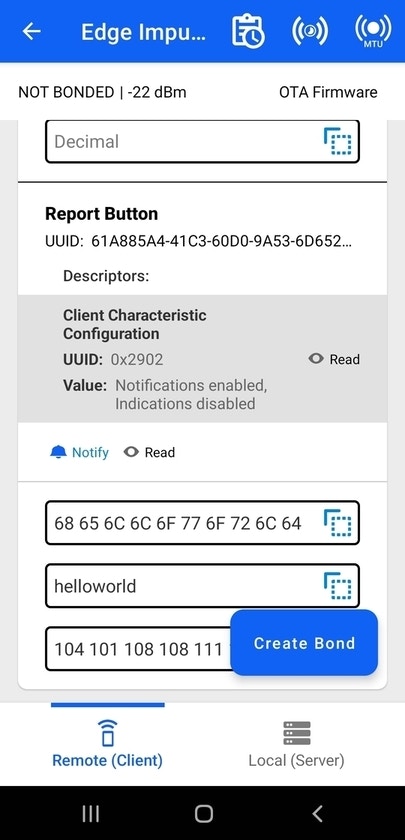 7. To stop the inference, send `00` to the characteristics `02AA6D7D-23B4-4C84-AF76-98A7699F7FE2`
### Troubleshooting
#### Dragging and dropping Edge Impulse .bin file results in FAIL.TXT
When dragging and dropping an Edge Impulse pre-built .bin firmware file, the binary seems to flash, but when the device reconnects a FAIL.TXT file appears with the contents "Error while connecting to CPU" and the following errors appear from the [Edge Impulse CLI impulse runner](/tools/clis/edge-impulse-cli/impulse-runner):
```
$ edge-impulse-run-impulse
Edge Impulse impulse runner v1.12.5
[SER] Connecting to /dev/tty.usbmodem0004401612721
[SER] Serial is connected, trying to read config...
[SER] Failed to get info off device:undefined. Is this device running a binary built through Edge Impulse? Reconnecting in 5 seconds...
[SER] Serial is connected, trying to read config...
```
To fix this error, install the Simplicity Studio 5 IDE and flash the binary through the IDE's built in "Upload application..." menu under "Debug Adapters", and select your Edge Impulse firmware to flash:
7. To stop the inference, send `00` to the characteristics `02AA6D7D-23B4-4C84-AF76-98A7699F7FE2`
### Troubleshooting
#### Dragging and dropping Edge Impulse .bin file results in FAIL.TXT
When dragging and dropping an Edge Impulse pre-built .bin firmware file, the binary seems to flash, but when the device reconnects a FAIL.TXT file appears with the contents "Error while connecting to CPU" and the following errors appear from the [Edge Impulse CLI impulse runner](/tools/clis/edge-impulse-cli/impulse-runner):
```
$ edge-impulse-run-impulse
Edge Impulse impulse runner v1.12.5
[SER] Connecting to /dev/tty.usbmodem0004401612721
[SER] Serial is connected, trying to read config...
[SER] Failed to get info off device:undefined. Is this device running a binary built through Edge Impulse? Reconnecting in 5 seconds...
[SER] Serial is connected, trying to read config...
```
To fix this error, install the Simplicity Studio 5 IDE and flash the binary through the IDE's built in "Upload application..." menu under "Debug Adapters", and select your Edge Impulse firmware to flash:
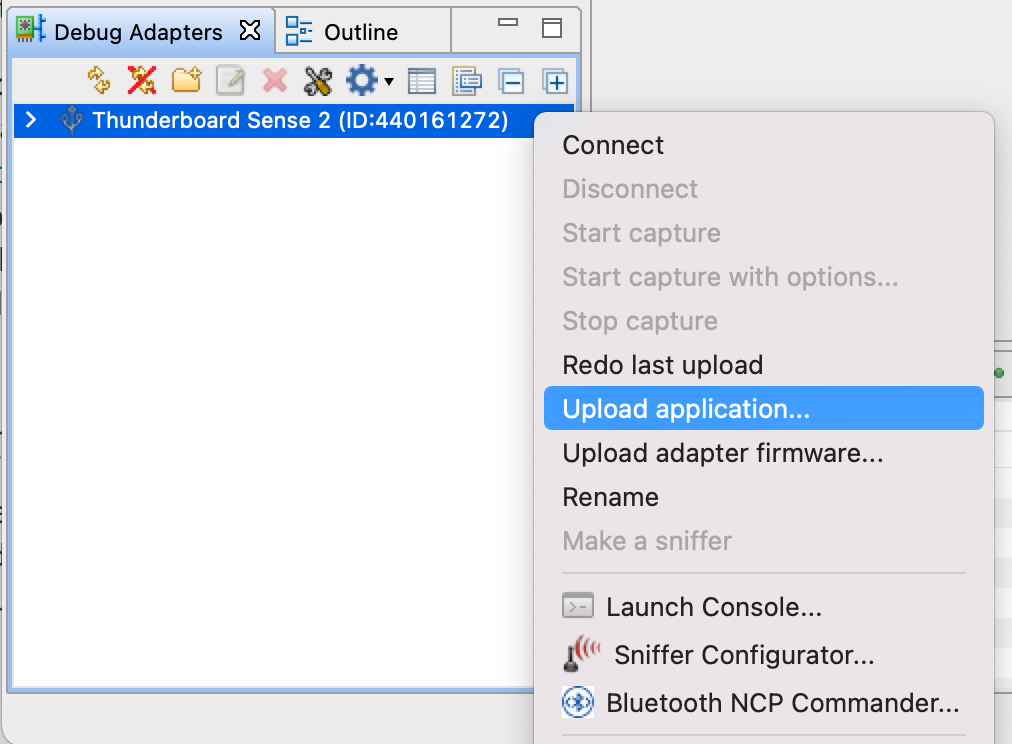 Your Edge Impulse inferencing application should then run successfully with `edge-impulse-run-impulse`.