> ## Documentation Index
> Fetch the complete documentation index at: https://docs.edgeimpulse.com/llms.txt
> Use this file to discover all available pages before exploring further.
# Renesas CK-RA6M5 Cloud Kit
The Renesas CK-RA6M5, Cloud Kit for RA6M5 MCU Group, enables users to experience the cloud connectivity options available from Renesas and Renesas Partners. A broad array of sensors on the CK-RA6M5 provide multiple options for observing user interaction with the Cloud Kit. By selecting from a choice of add-on devices, multiple cloud connectivity options are available.
The Edge Impulse firmware for this development board is open source and hosted on GitHub: [edgeimpulse/firmware-renesas-ck-ra6m5](https://github.com/edgeimpulse/firmware-renesas-ck-ra6m5).
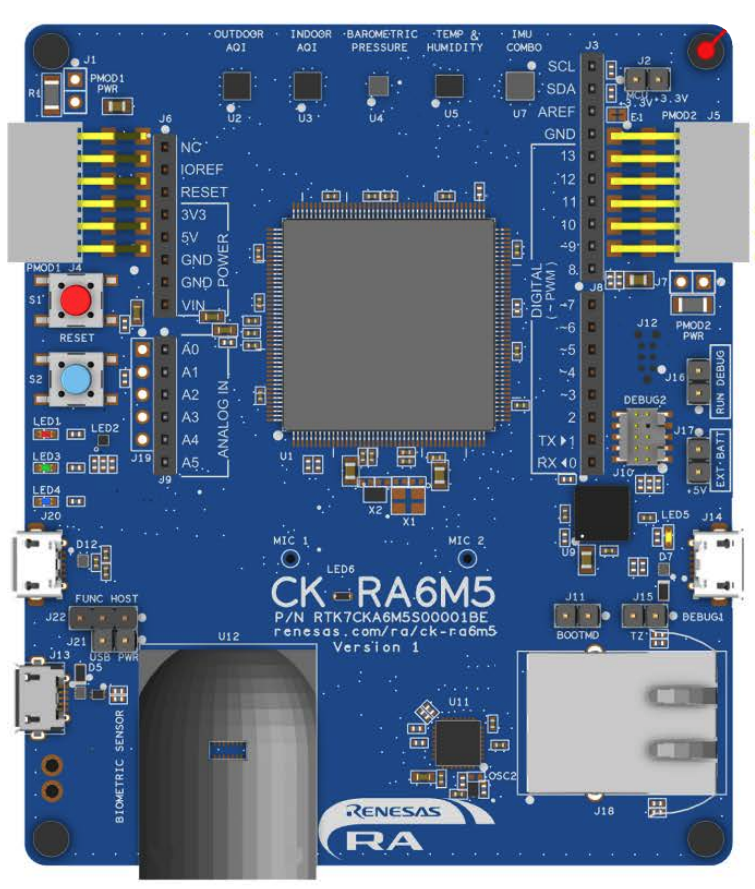 An earlier prototype version of the Renesas CK-RA6M5 Cloud Kit is also supported. The layout of this earlier prototype version is available [here](/.assets/images/renesas-ck-ra6m5/renesas-ck-ra6m5-hw-details.png).
### Installing dependencies
To set this device up in Edge Impulse, you will need to install the following software:
1. [Edge Impulse CLI](/tools/clis/edge-impulse-cli/installation).
2. On Linux:
* GNU Screen: install for example via `sudo apt install screen`.
**Problems installing the CLI?**
See the [Installation and troubleshooting](/tools/clis/edge-impulse-cli/installation) guide.
#### Updating the firmware
Edge Impulse Studio can collect data directly from your CK-RA6M5 Cloud Kit and also help you trigger in-system inferences to debug your model, but in order to allow Edge Impulse Studio to interact with your CK-RA6M5 Cloud Kit you first need to flash it with our base firmware image.
##### 1. Download the base firmware image
[Download the latest Edge Impulse firmware](https://cdn.edgeimpulse.com/firmware/renesas-ck-ra6m5.zip), and unzip the file, then locate the `flash-script` folder included, which we will be using in the following steps.
##### 2. Connect the CK-RA6M5 Cloud Kit to your computer
1. Check that:
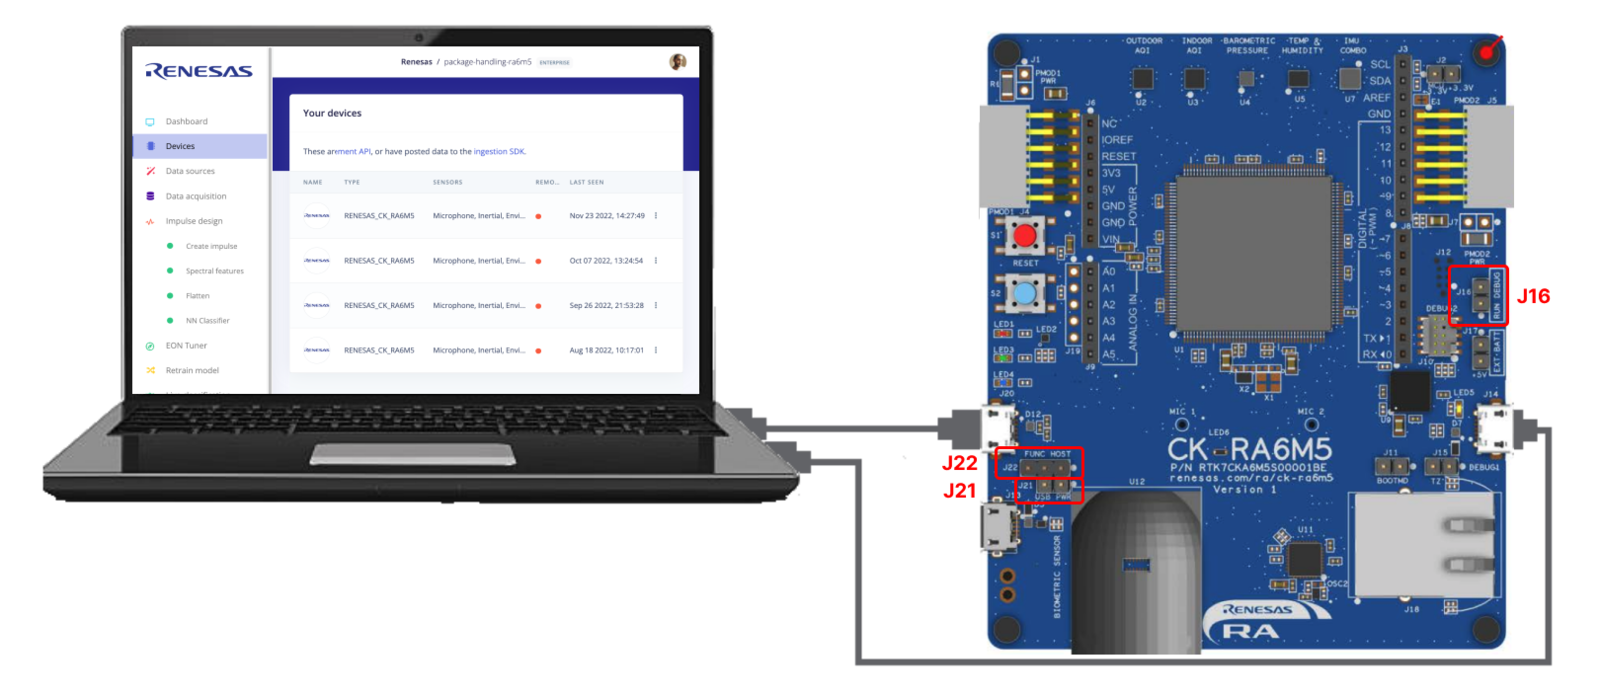
* J22 is set to link pins 2-3
* J21 link is closed
* J16 Link is open
2. Connect J14 and J20 on the CK-RA6M5 board to USB ports on the host PC using the 2 micro USB cables supplied.
3. Power LED (LED6) on the CK-RA6M5 board lights up white, indicating that the CK-RA6M5 board is powered on.
If the CK-RA6M5 board is not powered through the Debug port (J14) the current available to the board may be limited to 100 mA.
An earlier prototype version of the Renesas CK-RA6M5 Cloud Kit is also supported. The layout of this earlier prototype version is available [here](/.assets/images/renesas-ck-ra6m5/renesas-ck-ra6m5-hw-details.png).
### Installing dependencies
To set this device up in Edge Impulse, you will need to install the following software:
1. [Edge Impulse CLI](/tools/clis/edge-impulse-cli/installation).
2. On Linux:
* GNU Screen: install for example via `sudo apt install screen`.
**Problems installing the CLI?**
See the [Installation and troubleshooting](/tools/clis/edge-impulse-cli/installation) guide.
#### Updating the firmware
Edge Impulse Studio can collect data directly from your CK-RA6M5 Cloud Kit and also help you trigger in-system inferences to debug your model, but in order to allow Edge Impulse Studio to interact with your CK-RA6M5 Cloud Kit you first need to flash it with our base firmware image.
##### 1. Download the base firmware image
[Download the latest Edge Impulse firmware](https://cdn.edgeimpulse.com/firmware/renesas-ck-ra6m5.zip), and unzip the file, then locate the `flash-script` folder included, which we will be using in the following steps.
##### 2. Connect the CK-RA6M5 Cloud Kit to your computer
1. Check that:
* J22 is set to link pins 2-3
* J21 link is closed
* J16 Link is open
2. Connect J14 and J20 on the CK-RA6M5 board to USB ports on the host PC using the 2 micro USB cables supplied.
3. Power LED (LED6) on the CK-RA6M5 board lights up white, indicating that the CK-RA6M5 board is powered on.
If the CK-RA6M5 board is not powered through the Debug port (J14) the current available to the board may be limited to 100 mA.
 ##### 3. Load the base firmware image
Open the flash script for your operating system (`flash_windows.bat`, `flash_mac.command` or `flash_linux.sh`) to flash the firmware.
### Connecting to Edge Impulse
An earlier prototype version of the Renesas CK-RA6M5 Cloud Kit required a USB to Serial interface as shown [here](/.assets/images/renesas-ck-ra6m5/renesas-ck-ra6m5-serial.png). This is no longer the case.
#### 1. Setting keys
From a command prompt or terminal, run:
```
edge-impulse-daemon
```
This will start a wizard which will ask you to log in, and choose an Edge Impulse project. If you want to switch projects run the command with `--clean`.
Alternatively, recent versions of Google Chrome and Microsoft Edge can collect data directly from your development board, without the need for the Edge Impulse CLI. See [this blog post](https://edgeimpulse.com/blog/collect-sensor-data-straight-from-your-web-browser) for more information.
#### 2. Verifying that the device is connected
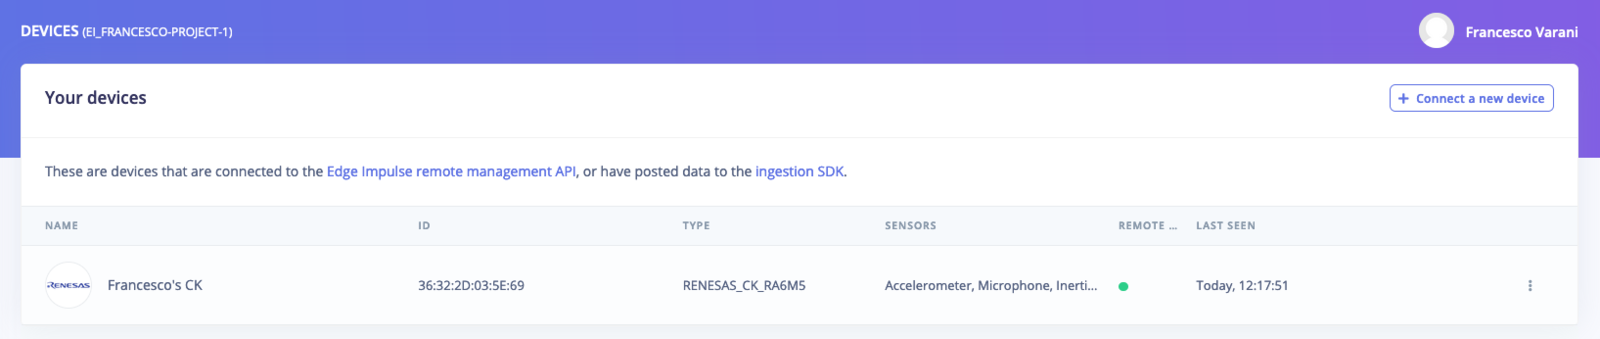
That's all! Your device is now connected to Edge Impulse. To verify this, go to [your Edge Impulse project](https://studio.edgeimpulse.com/studio/profile/projects), and click **Devices** on the left sidebar. The device will be listed there:
##### 3. Load the base firmware image
Open the flash script for your operating system (`flash_windows.bat`, `flash_mac.command` or `flash_linux.sh`) to flash the firmware.
### Connecting to Edge Impulse
An earlier prototype version of the Renesas CK-RA6M5 Cloud Kit required a USB to Serial interface as shown [here](/.assets/images/renesas-ck-ra6m5/renesas-ck-ra6m5-serial.png). This is no longer the case.
#### 1. Setting keys
From a command prompt or terminal, run:
```
edge-impulse-daemon
```
This will start a wizard which will ask you to log in, and choose an Edge Impulse project. If you want to switch projects run the command with `--clean`.
Alternatively, recent versions of Google Chrome and Microsoft Edge can collect data directly from your development board, without the need for the Edge Impulse CLI. See [this blog post](https://edgeimpulse.com/blog/collect-sensor-data-straight-from-your-web-browser) for more information.
#### 2. Verifying that the device is connected
That's all! Your device is now connected to Edge Impulse. To verify this, go to [your Edge Impulse project](https://studio.edgeimpulse.com/studio/profile/projects), and click **Devices** on the left sidebar. The device will be listed there:
 ### Next steps: building a machine learning model
With everything set up you can now build your first machine learning model with these tutorials:
* [Building a continuous motion recognition system](/tutorials/end-to-end/motion-recognition).
* [Recognizing sounds from audio](/tutorials/end-to-end/sound-recognition).
* [Keyword spotting](/tutorials/end-to-end/keyword-spotting).
Looking to connect different sensors? The [Data forwarder](/tools/clis/edge-impulse-cli/data-forwarder) lets you easily send data from any sensor into Edge Impulse.
### Next steps: building a machine learning model
With everything set up you can now build your first machine learning model with these tutorials:
* [Building a continuous motion recognition system](/tutorials/end-to-end/motion-recognition).
* [Recognizing sounds from audio](/tutorials/end-to-end/sound-recognition).
* [Keyword spotting](/tutorials/end-to-end/keyword-spotting).
Looking to connect different sensors? The [Data forwarder](/tools/clis/edge-impulse-cli/data-forwarder) lets you easily send data from any sensor into Edge Impulse.