> ## Documentation Index
> Fetch the complete documentation index at: https://docs.edgeimpulse.com/llms.txt
> Use this file to discover all available pages before exploring further.
# Raspberry Pi 4
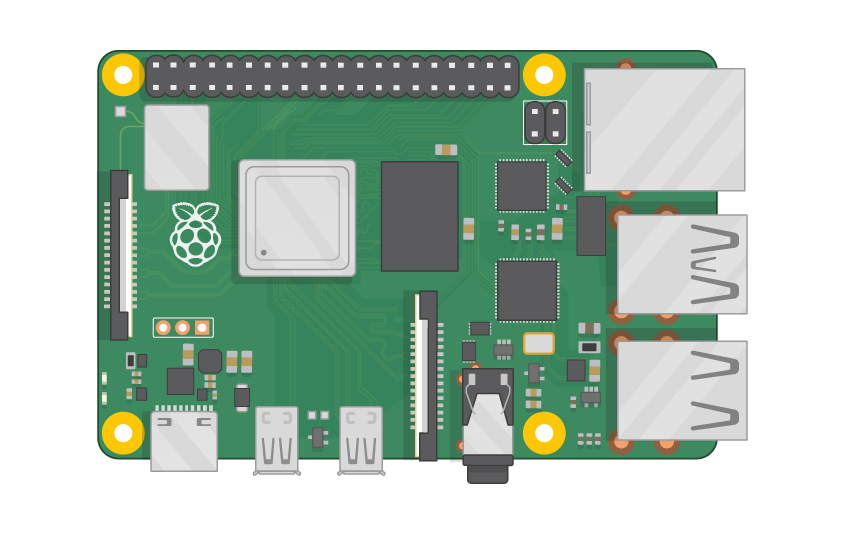
The Raspberry Pi 4 is a versatile Linux development board with a quad-core processor running at 1.5GHz, a GPIO header to connect sensors, and the ability to easily add an external microphone or camera - and it's fully supported by Edge Impulse. You'll be able to sample raw data, build models, and deploy trained machine learning models directly from the Studio.
In addition to the Raspberry Pi 4 we recommend that you also add a camera and / or a microphone. Most popular USB webcams and the [Camera Module](https://www.raspberrypi.org/products/camera-module-v2/) work fine on the development board out of the box.
 ### Prerequisites
For more detailed Raspberry Pi setup instructions please see their official documentation: [Getting started with Raspberry Pi](https://www.raspberrypi.org/documentation/computers/getting-started.html).
#### Headless Setup
You can set up your Raspberry Pi without a screen. To do so:
1. Flash the [Raspberry Pi OS](https://www.raspberrypi.org/software/) image to an SD card using the Raspberry Pi Imager.
You must use 64-bit OS with **\_aarch64** and 32-bit OS with **armv7l\_**\*
2. During the flashing process, access the Customisation options menu in the Raspberry Pi Imager to preconfigure the following options:
* Set your hostname to something memorable (e.g., `raspberrypi`).
* Choose a username and password (as of Bookworm, the default `pi`/`raspberry` is no longer available).
* Configure your WiFi settings for network architecture (SSID, password).
`wpa_supplicant.conf` cannot be used from Bookworm onward to set up WiFi and networking. You must use the Pi Imager or the advanced menu`raspi-config` tool to set up WiFi.
* Configure Remote Access by enabling SSH, set the SSH to use password authentication.
You can also create an empty file called `ssh` in the boot drive to enable SSH if you have not set up SSH through the Raspberry Pi Imager options.
3. Insert the SD card into your Raspberry Pi 4, and let the device boot up.
4. Find the IP address of your Raspberry Pi. You can either do this through the DHCP logs in your router or by scanning your network.
You can scan your network on macOS and Linux via:
```bash theme={"system"}
arp -na | grep -i dc:a6:32
```
which should return something like:
```
? (192.168.1.19) at dc:a6:32:f5:b6:7e on en0 ifscope [ethernet]
```
Here `192.168.1.19` is your IP address.
5. Connect to the Raspberry Pi over SSH. Open a terminal window on MacOS or Linux and run (replace `username` with your chosen username). If you're using Windows, you can use [PuTTY](https://www.putty.org/) or the Windows Subsystem for Linux (WSL) to access SSH:
```bash theme={"system"}
ssh @192.168.1.19
```
You can also try using `@` instead of the IP address if your system supports mDNS.
If you are prompted with a security warning about the authenticity of the host, type `yes` and press Enter then enter your chosen password.
6\. You can now run commands directly on your Raspberry Pi through the terminal. Please continue to the next section to install Edge Impulse dependencies.
#### Setup with a Screen
If you have a screen and a keyboard/mouse attached to your Raspberry Pi:
1. Flash the [Raspberry Pi OS](https://www.raspberrypi.org/software/) image to an SD card. During the flashing process, access the Customisation options menu in the Raspberry Pi Imager to preconfigure the following options:
* Set your hostname to something memorable (e.g., `raspberrypi`).
* Choose a username and password (as of Bookworm, the default `pi`/`raspberry` is no longer available).
* Configure your WiFi settings for network architecture (SSID, password).
`wpa_supplicant.conf` cannot be used from Bookworm onward to set up WiFi and networking. You must use the Pi Imager or the advanced menu`raspi-config` tool to set up WiFi.
2. Insert the SD card into your Raspberry Pi 5, and let the device boot up.
3. Connect to your WiFi network via the UI if not already set up during the flashing process.
4. Click the 'Terminal' icon in the top bar of the Raspberry Pi.
5. You can now run commands directly on your Raspberry Pi through the terminal. Please continue to the next section to install Edge Impulse dependencies.
The following setup instructions are for Raspberry Pi OS Bullseye and older releases. It is recommended to use the latest Raspberry Pi OS Bookworm or newer releases.
#### Headless Setup
You can set up your Raspberry Pi without a screen. To do so:
1. Flash the [Raspberry Pi OS](https://www.raspberrypi.org/software/) image to an SD card.
You must use 64-bit OS with **\_aarch64** and 32-bit OS with **armv7l\_**\*
2. To set up WiFi, either use the Raspberry Pi Imager OS Customisation options or after flashing the OS, find the `boot` mass-storage device on your computer, and create a new file called **wpa\_supplicant.conf** in the `boot` drive. Add the following code:
```plaintext theme={"system"}
ctrl_interface=DIR=/var/run/wpa_supplicant GROUP=netdev
update_config=1
country=
network={
ssid=""
psk=""
}
```
(Replace the fields marked with `<>` with your WiFi credentials)
3. Create an empty file called `ssh` in the boot drive to enable SSH or set up SSH through the Raspberry Pi Imager "SERVICES" options.
4. Insert the SD card into your Raspberry Pi 4, and let the device boot up.
5. Find the IP address of your Raspberry Pi. You can either do this through the DHCP logs in your router, or by scanning your network. E.g., on macOS and Linux via:
```bash theme={"system"}
arp -na | grep -i dc:a6:32
? (192.168.1.19) at dc:a6:32:f5:b6:7e on en0 ifscope [ethernet]
```
Here `192.168.1.19` is your IP address.
You can also try using `raspberrypi.local` instead of the IP address if your system supports mDNS.
6. Connect to the Raspberry Pi over SSH. Open a terminal window and run:
```bash theme={"system"}
ssh @192.168.1.19
```
7. Log in with the default username `pi` and password `raspberry`.
#### Setup with a Screen
If you have a screen and a keyboard/mouse attached to your Raspberry Pi:
1. Flash the [Raspberry Pi OS](https://www.raspberrypi.org/software/) image to an SD card.
2. Insert the SD card into your Raspberry Pi 4, and let the device boot up.
3. Connect to your WiFi network.
4. Click the 'Terminal' icon in the top bar of the Raspberry Pi.
### Installing dependencies
To set this device up in Edge Impulse, run the following commands:
```bash theme={"system"}
sudo apt update
curl -sL https://deb.nodesource.com/setup_20.x | sudo bash -
sudo apt install -y gcc g++ make build-essential nodejs sox gstreamer1.0-tools gstreamer1.0-plugins-good gstreamer1.0-plugins-base gstreamer1.0-plugins-base-apps
sudo npm install edge-impulse-linux -g --unsafe-perm
```
**Important:** Edge Impulse requires Node.js version 20.x or later. Using older versions may lead to installation issues or runtime errors. Please ensure you have the correct version installed before proceeding with the setup.
For CSI cameras (like the Raspberry Pi Camera Module), you also need to install the `gstreamer1.0-libcamera` package:
```bash theme={"system"}
sudo apt install gstreamer1.0-libcamera
```
If you have a Raspberry Pi Camera Module, you also need to activate it first. Run the following commands:
```bash theme={"system"}
sudo raspi-config
```
Use the cursor keys to select and open Interfacing Options, and then select Camera and follow the prompt to enable the camera. Then reboot the Raspberry.
#### Install with Docker
If you want to install Edge Impulse on your Raspberry Pi using Docker you can run the following commands:
```bash theme={"system"}
docker run -it --rm --privileged --network=host -v /dev/:/dev/ --env UDEV=1 --device /dev:/dev --entrypoint /bin/bash ubuntu:20.04
```
Once on the Docker container, run:
```bash theme={"system"}
apt-get update
apt-get install wget -y
wget https://deb.nodesource.com/setup_20.x
bash setup_20.x
apt install -y gcc g++ make build-essential nodejs sox gstreamer1.0-tools gstreamer1.0-plugins-good gstreamer1.0-plugins-base gstreamer1.0-plugins-base-apps vim v4l-utils usbutils udev
apt-get install npm -y
npm install edge-impulse-linux -g --unsafe-perm
```
and
```bash theme={"system"}
/lib/systemd/systemd-udevd --daemon
```
You should now be able to run Edge Impulse CLI tools from the container running on your Raspberry.
*Note that this will only work using an external USB camera.*
### Connecting to Edge Impulse
With all software set up, connect your camera or microphone to your Raspberry Pi (see 'Next steps' further on this page if you want to connect a different sensor), and run:
```bash theme={"system"}
edge-impulse-linux
```
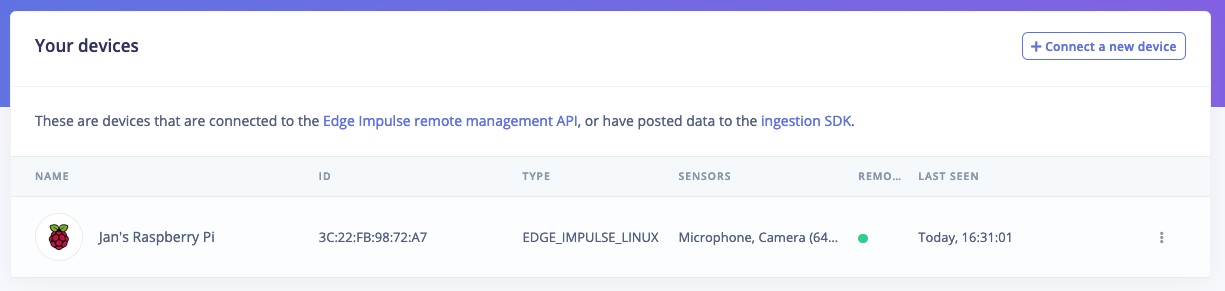
This command connects your Raspberry Pi to Edge Impulse Studio. It will prompt you to log in and select a project. Once authenticated, your Raspberry Pi will appear in the Edge Impulse Studio under Devices. To verify this, go to [your Edge Impulse project](https://studio.edgeimpulse.com/studio/profile/projects), and click **Devices**. The device will be listed here.
### Prerequisites
For more detailed Raspberry Pi setup instructions please see their official documentation: [Getting started with Raspberry Pi](https://www.raspberrypi.org/documentation/computers/getting-started.html).
#### Headless Setup
You can set up your Raspberry Pi without a screen. To do so:
1. Flash the [Raspberry Pi OS](https://www.raspberrypi.org/software/) image to an SD card using the Raspberry Pi Imager.
You must use 64-bit OS with **\_aarch64** and 32-bit OS with **armv7l\_**\*
2. During the flashing process, access the Customisation options menu in the Raspberry Pi Imager to preconfigure the following options:
* Set your hostname to something memorable (e.g., `raspberrypi`).
* Choose a username and password (as of Bookworm, the default `pi`/`raspberry` is no longer available).
* Configure your WiFi settings for network architecture (SSID, password).
`wpa_supplicant.conf` cannot be used from Bookworm onward to set up WiFi and networking. You must use the Pi Imager or the advanced menu`raspi-config` tool to set up WiFi.
* Configure Remote Access by enabling SSH, set the SSH to use password authentication.
You can also create an empty file called `ssh` in the boot drive to enable SSH if you have not set up SSH through the Raspberry Pi Imager options.
3. Insert the SD card into your Raspberry Pi 4, and let the device boot up.
4. Find the IP address of your Raspberry Pi. You can either do this through the DHCP logs in your router or by scanning your network.
You can scan your network on macOS and Linux via:
```bash theme={"system"}
arp -na | grep -i dc:a6:32
```
which should return something like:
```
? (192.168.1.19) at dc:a6:32:f5:b6:7e on en0 ifscope [ethernet]
```
Here `192.168.1.19` is your IP address.
5. Connect to the Raspberry Pi over SSH. Open a terminal window on MacOS or Linux and run (replace `username` with your chosen username). If you're using Windows, you can use [PuTTY](https://www.putty.org/) or the Windows Subsystem for Linux (WSL) to access SSH:
```bash theme={"system"}
ssh @192.168.1.19
```
You can also try using `@` instead of the IP address if your system supports mDNS.
If you are prompted with a security warning about the authenticity of the host, type `yes` and press Enter then enter your chosen password.
6\. You can now run commands directly on your Raspberry Pi through the terminal. Please continue to the next section to install Edge Impulse dependencies.
#### Setup with a Screen
If you have a screen and a keyboard/mouse attached to your Raspberry Pi:
1. Flash the [Raspberry Pi OS](https://www.raspberrypi.org/software/) image to an SD card. During the flashing process, access the Customisation options menu in the Raspberry Pi Imager to preconfigure the following options:
* Set your hostname to something memorable (e.g., `raspberrypi`).
* Choose a username and password (as of Bookworm, the default `pi`/`raspberry` is no longer available).
* Configure your WiFi settings for network architecture (SSID, password).
`wpa_supplicant.conf` cannot be used from Bookworm onward to set up WiFi and networking. You must use the Pi Imager or the advanced menu`raspi-config` tool to set up WiFi.
2. Insert the SD card into your Raspberry Pi 5, and let the device boot up.
3. Connect to your WiFi network via the UI if not already set up during the flashing process.
4. Click the 'Terminal' icon in the top bar of the Raspberry Pi.
5. You can now run commands directly on your Raspberry Pi through the terminal. Please continue to the next section to install Edge Impulse dependencies.
The following setup instructions are for Raspberry Pi OS Bullseye and older releases. It is recommended to use the latest Raspberry Pi OS Bookworm or newer releases.
#### Headless Setup
You can set up your Raspberry Pi without a screen. To do so:
1. Flash the [Raspberry Pi OS](https://www.raspberrypi.org/software/) image to an SD card.
You must use 64-bit OS with **\_aarch64** and 32-bit OS with **armv7l\_**\*
2. To set up WiFi, either use the Raspberry Pi Imager OS Customisation options or after flashing the OS, find the `boot` mass-storage device on your computer, and create a new file called **wpa\_supplicant.conf** in the `boot` drive. Add the following code:
```plaintext theme={"system"}
ctrl_interface=DIR=/var/run/wpa_supplicant GROUP=netdev
update_config=1
country=
network={
ssid=""
psk=""
}
```
(Replace the fields marked with `<>` with your WiFi credentials)
3. Create an empty file called `ssh` in the boot drive to enable SSH or set up SSH through the Raspberry Pi Imager "SERVICES" options.
4. Insert the SD card into your Raspberry Pi 4, and let the device boot up.
5. Find the IP address of your Raspberry Pi. You can either do this through the DHCP logs in your router, or by scanning your network. E.g., on macOS and Linux via:
```bash theme={"system"}
arp -na | grep -i dc:a6:32
? (192.168.1.19) at dc:a6:32:f5:b6:7e on en0 ifscope [ethernet]
```
Here `192.168.1.19` is your IP address.
You can also try using `raspberrypi.local` instead of the IP address if your system supports mDNS.
6. Connect to the Raspberry Pi over SSH. Open a terminal window and run:
```bash theme={"system"}
ssh @192.168.1.19
```
7. Log in with the default username `pi` and password `raspberry`.
#### Setup with a Screen
If you have a screen and a keyboard/mouse attached to your Raspberry Pi:
1. Flash the [Raspberry Pi OS](https://www.raspberrypi.org/software/) image to an SD card.
2. Insert the SD card into your Raspberry Pi 4, and let the device boot up.
3. Connect to your WiFi network.
4. Click the 'Terminal' icon in the top bar of the Raspberry Pi.
### Installing dependencies
To set this device up in Edge Impulse, run the following commands:
```bash theme={"system"}
sudo apt update
curl -sL https://deb.nodesource.com/setup_20.x | sudo bash -
sudo apt install -y gcc g++ make build-essential nodejs sox gstreamer1.0-tools gstreamer1.0-plugins-good gstreamer1.0-plugins-base gstreamer1.0-plugins-base-apps
sudo npm install edge-impulse-linux -g --unsafe-perm
```
**Important:** Edge Impulse requires Node.js version 20.x or later. Using older versions may lead to installation issues or runtime errors. Please ensure you have the correct version installed before proceeding with the setup.
For CSI cameras (like the Raspberry Pi Camera Module), you also need to install the `gstreamer1.0-libcamera` package:
```bash theme={"system"}
sudo apt install gstreamer1.0-libcamera
```
If you have a Raspberry Pi Camera Module, you also need to activate it first. Run the following commands:
```bash theme={"system"}
sudo raspi-config
```
Use the cursor keys to select and open Interfacing Options, and then select Camera and follow the prompt to enable the camera. Then reboot the Raspberry.
#### Install with Docker
If you want to install Edge Impulse on your Raspberry Pi using Docker you can run the following commands:
```bash theme={"system"}
docker run -it --rm --privileged --network=host -v /dev/:/dev/ --env UDEV=1 --device /dev:/dev --entrypoint /bin/bash ubuntu:20.04
```
Once on the Docker container, run:
```bash theme={"system"}
apt-get update
apt-get install wget -y
wget https://deb.nodesource.com/setup_20.x
bash setup_20.x
apt install -y gcc g++ make build-essential nodejs sox gstreamer1.0-tools gstreamer1.0-plugins-good gstreamer1.0-plugins-base gstreamer1.0-plugins-base-apps vim v4l-utils usbutils udev
apt-get install npm -y
npm install edge-impulse-linux -g --unsafe-perm
```
and
```bash theme={"system"}
/lib/systemd/systemd-udevd --daemon
```
You should now be able to run Edge Impulse CLI tools from the container running on your Raspberry.
*Note that this will only work using an external USB camera.*
### Connecting to Edge Impulse
With all software set up, connect your camera or microphone to your Raspberry Pi (see 'Next steps' further on this page if you want to connect a different sensor), and run:
```bash theme={"system"}
edge-impulse-linux
```
This command connects your Raspberry Pi to Edge Impulse Studio. It will prompt you to log in and select a project. Once authenticated, your Raspberry Pi will appear in the Edge Impulse Studio under Devices. To verify this, go to [your Edge Impulse project](https://studio.edgeimpulse.com/studio/profile/projects), and click **Devices**. The device will be listed here.
 You can now sample raw data, build models, and deploy trained machine learning models directly from the Studio. Please let us know if you have any questions or need further assistance: [forum.edgeimpulse.com](https://forum.edgeimpulse.com).
If you want to switch projects run the command with `--clean`.
### Next steps: building a machine learning model
With everything set up you can now build your first machine learning model with these tutorials:
* [Keyword spotting](/tutorials/end-to-end/keyword-spotting)
* [Sound recognition](/tutorials/end-to-end/sound-recognition)
* [Image classification](/tutorials/end-to-end/image-classification)
* [object detection](/tutorials/end-to-end/object-detection-bounding-boxes).
* [Object detection with centroids (FOMO)](/tutorials/end-to-end/object-detection-centroids)
Looking to connect different sensors? Our [Linux SDK](/tools/libraries/sdks/inference/linux) lets you easily send data from any sensor and any programming language (with examples in Node.js, Python, Go and C++) into Edge Impulse.
### Deploying back to device
To run your impulse locally, just connect to your Raspberry Pi again, and run:
```bash theme={"system"}
edge-impulse-linux-runner
```
This will automatically compile your model with full hardware acceleration, download the model to your Raspberry Pi, and then start classifying. Our [Linux SDK](/tools/libraries/sdks/inference/linux) has examples on how to integrate the model with your favourite programming language.
#### Image model?
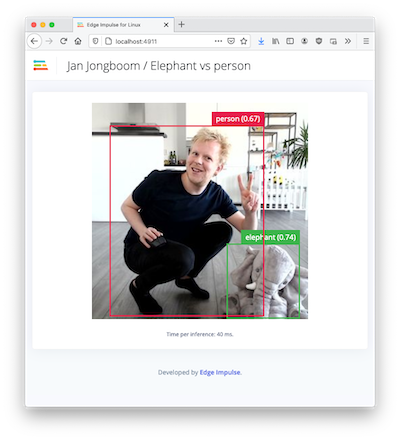
If you have an image model then you can get a peek of what your device sees by being on the same network as your device, and finding the 'Want to see a feed of the camera and live classification in your browser' message in the console. Open the URL in a browser and both the camera feed and the classification are shown:
You can now sample raw data, build models, and deploy trained machine learning models directly from the Studio. Please let us know if you have any questions or need further assistance: [forum.edgeimpulse.com](https://forum.edgeimpulse.com).
If you want to switch projects run the command with `--clean`.
### Next steps: building a machine learning model
With everything set up you can now build your first machine learning model with these tutorials:
* [Keyword spotting](/tutorials/end-to-end/keyword-spotting)
* [Sound recognition](/tutorials/end-to-end/sound-recognition)
* [Image classification](/tutorials/end-to-end/image-classification)
* [object detection](/tutorials/end-to-end/object-detection-bounding-boxes).
* [Object detection with centroids (FOMO)](/tutorials/end-to-end/object-detection-centroids)
Looking to connect different sensors? Our [Linux SDK](/tools/libraries/sdks/inference/linux) lets you easily send data from any sensor and any programming language (with examples in Node.js, Python, Go and C++) into Edge Impulse.
### Deploying back to device
To run your impulse locally, just connect to your Raspberry Pi again, and run:
```bash theme={"system"}
edge-impulse-linux-runner
```
This will automatically compile your model with full hardware acceleration, download the model to your Raspberry Pi, and then start classifying. Our [Linux SDK](/tools/libraries/sdks/inference/linux) has examples on how to integrate the model with your favourite programming language.
#### Image model?
If you have an image model then you can get a peek of what your device sees by being on the same network as your device, and finding the 'Want to see a feed of the camera and live classification in your browser' message in the console. Open the URL in a browser and both the camera feed and the classification are shown:
 ### Troubleshooting
#### Wrong OS bits
If you see the following error when trying to deploy a .eim model to your Raspberry Pi:
```
Failed to run impulse Error: Unsupported architecture “aarch64”
```
It likely means you are attempting to deploy a .eim Edge Impulse model file to a 32-bit operating system running on a 64-bit CPU. To check your hardware architecture and OS in Linux, please run the following commands:
```bash theme={"system"}
uname -m
uname -a
getconf LONG_BIT
```
If you see something like this as the output:
```
uname -m
aarch64
uname -a
Linux raspberrypi 6.1.21-v8+ #1642 SMP PREEMPT Mon Apr 3 17:24:20 BST 2023 aarch64 GNU/Linux
getconf LONG_BIT
32
```
It means that you are running a 32-bit OS on a 64-bit CPU. To run .eim models on *aarch64* CPUs, you *must* use a 64-bit operating system. Please download and install the 64-bit version of Raspberry Pi OS if you see `aarch64` when you run `uname -m`.
#### CSI Camera Issues
When using RPi OS Bookworm and RPi camera module you need to install gstreamer1.0-libcamera package first. However once gstreamer1.0-libcamera is installed it hides v4l2deviceproviders, as a result it hides webcam.
To resolve this issue, you need to install the gstreamer1.0-libcamera package and use the latest edge-impulse-linux >=v1.9.2 to fix this issue.
### Troubleshooting
#### Wrong OS bits
If you see the following error when trying to deploy a .eim model to your Raspberry Pi:
```
Failed to run impulse Error: Unsupported architecture “aarch64”
```
It likely means you are attempting to deploy a .eim Edge Impulse model file to a 32-bit operating system running on a 64-bit CPU. To check your hardware architecture and OS in Linux, please run the following commands:
```bash theme={"system"}
uname -m
uname -a
getconf LONG_BIT
```
If you see something like this as the output:
```
uname -m
aarch64
uname -a
Linux raspberrypi 6.1.21-v8+ #1642 SMP PREEMPT Mon Apr 3 17:24:20 BST 2023 aarch64 GNU/Linux
getconf LONG_BIT
32
```
It means that you are running a 32-bit OS on a 64-bit CPU. To run .eim models on *aarch64* CPUs, you *must* use a 64-bit operating system. Please download and install the 64-bit version of Raspberry Pi OS if you see `aarch64` when you run `uname -m`.
#### CSI Camera Issues
When using RPi OS Bookworm and RPi camera module you need to install gstreamer1.0-libcamera package first. However once gstreamer1.0-libcamera is installed it hides v4l2deviceproviders, as a result it hides webcam.
To resolve this issue, you need to install the gstreamer1.0-libcamera package and use the latest edge-impulse-linux >=v1.9.2 to fix this issue.