> ## Documentation Index
> Fetch the complete documentation index at: https://docs.edgeimpulse.com/llms.txt
> Use this file to discover all available pages before exploring further.
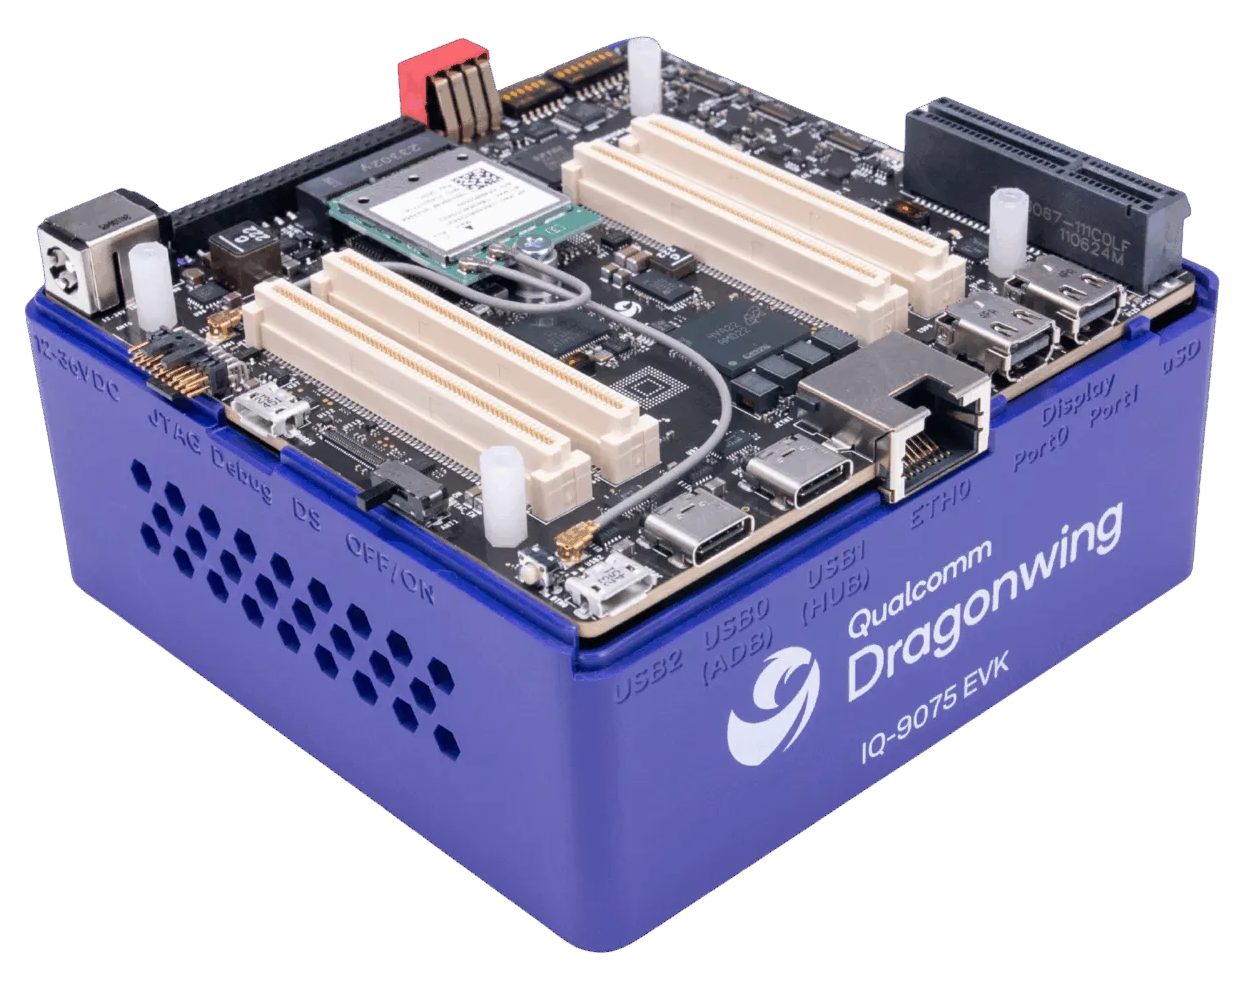
# Qualcomm Dragonwing IQ-9075 Evaluation Kit (EVK)
The Qualcomm Dragonwing™ IQ-9075 Evaluation Kit (EVK) is a powerful Linux-based evaluation kit based around the IQ-9075 SoC. It has a 6-core CPU, Adreno™ 663 GPU and 100 TOPS Hexagon™ NPU that can run 13B parameter LLM/VLM models. It's available from a variety of distributors like [Lantronix](https://www.lantronix.com/products/qualcomm-dragonwing-iq-9075-evk/). Production ready devices based on Dragonwing IQ-9075 are available from various manufacturers such as [Advantech](https://www.advantech.com/en-us/products/932c8818-07cc-4917-89e9-7a678ddc029c/air-055/mod_4e23ea2a-d196-4884-8c62-c31780fbafb0).
 ## Setting Up Your Dragonwing IQ-9075 EVK
### Installing Ubuntu 24.04
The Dragonwing IQ-9075 EVK does not come with an OS yet. You'll need to install Ubuntu 24.04 to follow the tutorials in this documentation.
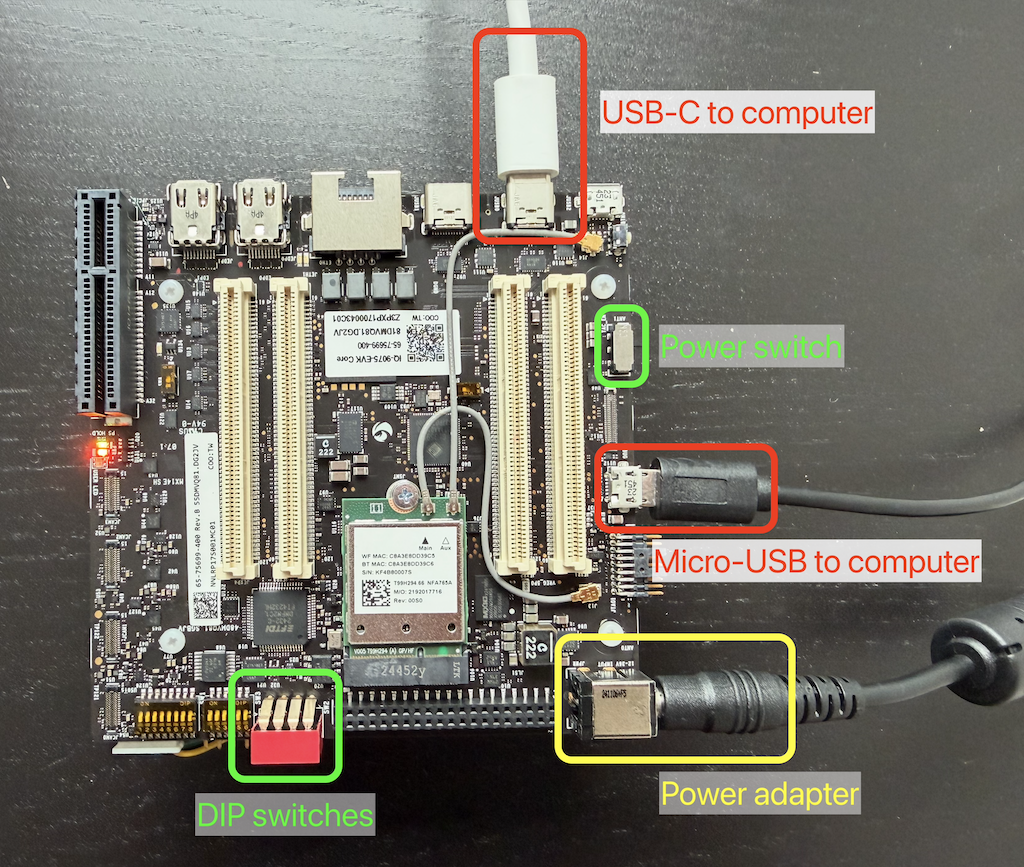
1. Connect power to the board, then connect the EVK to your computer using *two* USB cables.
## Setting Up Your Dragonwing IQ-9075 EVK
### Installing Ubuntu 24.04
The Dragonwing IQ-9075 EVK does not come with an OS yet. You'll need to install Ubuntu 24.04 to follow the tutorials in this documentation.
1. Connect power to the board, then connect the EVK to your computer using *two* USB cables.
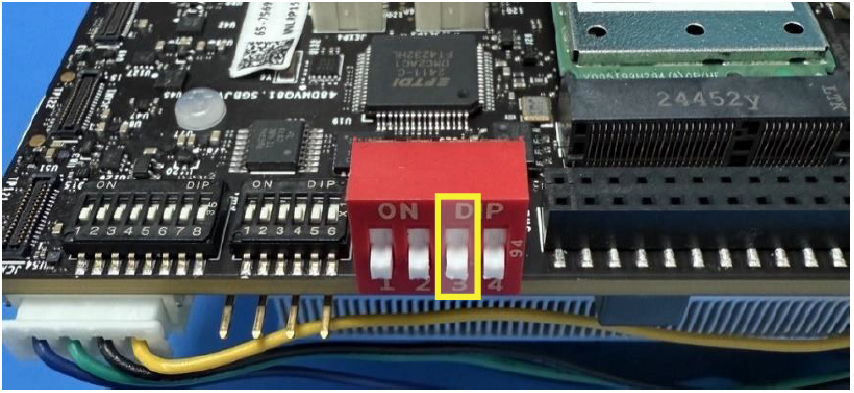
 2. Toggle EDL mode on.
* If you have board variant A: Toggle DIP switch 3 to 'ON':
2. Toggle EDL mode on.
* If you have board variant A: Toggle DIP switch 3 to 'ON':
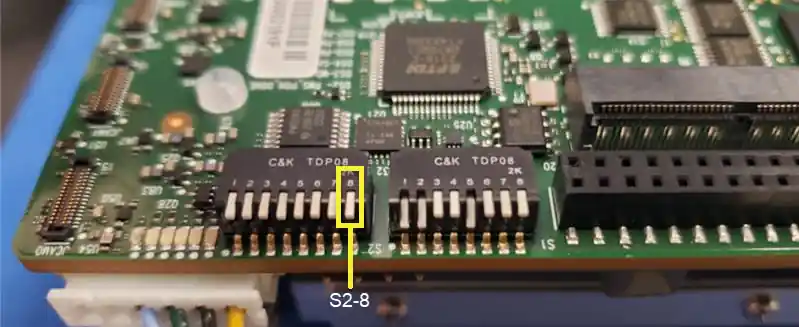
 * If you have board variant B: Toggle DIP switch S2-8 to 'ON'.
 3. Now, depending on the OS on your computer:
1) You need to swap out the Qualcomm USB driver for a WinUSB driver, otherwise you cannot flash the board.
1. Download and unzip QDL:
* [Download for x86](https://softwarecenter.qualcomm.com/api/download/software/tools/Qualcomm_Device_Loader/Windows/2.3.9.2/QDL_2.3.9.2_Win_x64.zip) (e.g. Intel/AMD processors)
* [Download for ARM64](https://softwarecenter.qualcomm.com/api/download/software/tools/Qualcomm_Device_Loader/Windows/ARM64/2.3.9.2/QDL_2.3.9.2_Win_ARM64.zip) (e.g. Snapdragon processors)
2. Turn your Dragonwing IQ-9075 EVK on via the power switch.
3. In the QDL folder, find `install_driver.bat`. Right-click, and select "Run as administrator".
3. Now, depending on the OS on your computer:
1) You need to swap out the Qualcomm USB driver for a WinUSB driver, otherwise you cannot flash the board.
1. Download and unzip QDL:
* [Download for x86](https://softwarecenter.qualcomm.com/api/download/software/tools/Qualcomm_Device_Loader/Windows/2.3.9.2/QDL_2.3.9.2_Win_x64.zip) (e.g. Intel/AMD processors)
* [Download for ARM64](https://softwarecenter.qualcomm.com/api/download/software/tools/Qualcomm_Device_Loader/Windows/ARM64/2.3.9.2/QDL_2.3.9.2_Win_ARM64.zip) (e.g. Snapdragon processors)
2. Turn your Dragonwing IQ-9075 EVK on via the power switch.
3. In the QDL folder, find `install_driver.bat`. Right-click, and select "Run as administrator".
 4. This should print something akin to:
```
Total driver packages: 1
Added driver packages: 1
Successfully installed: qcserlib.inf
```
> If you get an error, make sure DIP 3 / DIP S2-8 is switched 'ON', disconnect the power adapter and try again.
2) Open a terminal, and run:
```bash theme={"system"}
Invoke-WebRequest -Uri https://cdn.edgeimpulse.com/qc-ai-docs/device-setup/iq9075-evk-ubuntu-desktop-24-windows.ps1 -OutFile "iq9075-evk-ubuntu-desktop-24-windows.ps1"
.\iq9075-evk-ubuntu-desktop-24-windows.ps1 -FlashCdt -FlashUfs -FlashSail -FlashUbuntu
```
1. Open a terminal, and run:
```bash theme={"system"}
wget https://cdn.edgeimpulse.com/qc-ai-docs/device-setup/iq9075-evk-ubuntu-desktop-24-macos-linux.sh
bash iq9075-evk-ubuntu-desktop-24-macos-linux.sh --flash-cdt --flash-ufs --flash-sail --flash-ubuntu
```
1. Update your udev rules. Open a terminal and run:
```bash theme={"system"}
echo 'SUBSYSTEMS=="usb", ATTRS{idVendor}=="05c6", ATTRS{idProduct}=="9008", MODE="0664", GROUP="plugdev"' | sudo tee /etc/udev/rules.d/51-qcom-usb.rules > /dev/null
sudo systemctl restart udev
```
2. Disconnect and reconnect the USB cables to your Dragonwing IQ-9075 EVK.
3. Then, from a terminal, run:
```bash theme={"system"}
wget https://cdn.edgeimpulse.com/qc-ai-docs/device-setup/iq9075-evk-ubuntu-desktop-24-macos-linux.sh
bash iq9075-evk-ubuntu-desktop-24-macos-linux.sh --flash-cdt --flash-ufs --flash-sail --flash-ubuntu
```
If you don't see **"Waiting for EDL device"** — and the script immediately exits — power the board off and disconnect the power adapter; then reconnect the power adapter.
4. Afterwards:
* If you have board variant A: Toggle DIP switch 3 to 'OFF':
* If you have board variant B: Toggle DIP switch S2-8 to 'ON'.
5. Toggle power switch OFF, then switch it back ON. Your board will now boot up.
### Configuring Ubuntu 24
Now that we have Ubuntu 24.04 installed, lets connect your Dragonwing IQ-9075 EVK to the internet.
1. You need to connect to the device using a serial port. You can either use your favorite serial terminal application (use baud rate 115200) or, on your computer:
1. Install [Node.js](https://nodejs.org/en) (on Windows: make sure to enable 'Tools for Native Modules').
2. Install the [Edge Impulse CLI](https://docs.edgeimpulse.com/tools/clis/edge-impulse-cli/installation) by opening a command prompt or terminal window, and running:
```bash theme={"system"}
npm install -g edge-impulse-cli
```
> Issues with installing the Edge Impulse CLI? See the [install instructions](https://docs.edgeimpulse.com/tools/clis/edge-impulse-cli/installation).
3. You can now connect to your board via:
```bash theme={"system"}
edge-impulse-serial-terminal
# ? Which device do you want to connect to? (🔍 type to search) (Press to submit)
# /dev/tty.usbserial-NNLRP17S001M0 (WNC)
# /dev/tty.usbserial-NNLRP17S001M3 (WNC)
# ❯ /dev/tty.usbserial-NNLRP17S001M1 (WNC)
# /dev/tty.usbserial-NNLRP17S001M2 (WNC)
# [SER] Connecting to /dev/tty.usbserial-NNLRP17S001M1 (baud rate 115200)
# [SER] Connected to /dev/tty.usbserial-NNLRP17S001M1. Press CTRL+D to quit.
```
> The EVK exposes multiple serial ports; and it's unclear which is which (especially on Windows). On macOS it seems to be the port ending in `M1`. Try restarting the board while attaching to one of the ports, you should see boot messages from Ubuntu.
4. Once you are connected to the board, and you don't see any log messages anymore; press `ENTER` and log in with username `ubuntu`, password `ubuntu`:
```bash theme={"system"}
# Ubuntu 24.04.3 LTS ubuntu ttyMSM0
#
# ubuntu login: ubuntu
```
To disconnect, press `CTRL+D`.
2. From your terminal, set up WiFi:
```bash theme={"system"}
# Connect to WiFi
sudo nmcli dev wifi connect "" password ""
# Force ntp sync so we get the correct date/time
sudo systemctl restart systemd-timesyncd.service
# To verify...
date
# ... Should return the current date
```
3. *Optional:* If you want to connect over SSH:
1. Find your IP address:
```bash theme={"system"}
sudo apt update && sudo apt install -y net-tools
ifconfig | grep -Eo 'inet (addr:)?([0-9]*\.){3}[0-9]*' | grep -Eo '([0-9]*\.){3}[0-9]*' | grep -v '127.0.0.1'
# 192.168.1.253
```
2. On your host machine (so not on your dev board), open a command prompt or terminal and run:
```bash theme={"system"}
ssh ubuntu@192.168.1.253
```
(Replace 192.168.1.253 with the IP you found in the previous step)
Your board is now ready. You can disconnect the USB-C to your computer cable (keep the micro-USB cable connected if you haven't set up SSH).
### Installing drivers, AI Engine Direct and the IM-SDK
Now that we have Ubuntu 24.04 installed and connected to a network, let's install GPU drivers and the Qualcomm AI Engine Direct SDK (to run neural networks).
From the terminal or ssh session on your development board, run:
1. Install some base packages:
```bash theme={"system"}
sudo apt update
sudo apt install -y unzip wget curl python3 python3-pip python3-venv software-properties-common
```
2. Download and install the AI Engine Direct SDK library and development headers:
```bash theme={"system"}
# Add the Qualcomm IoT PPA (if it doesn't exist yet)
if [ ! -f /etc/apt/sources.list.d/ubuntu-qcom-iot-ubuntu-qcom-ppa-noble.list ]; then
sudo apt-add-repository -y ppa:ubuntu-qcom-iot/qcom-ppa
fi
# Install the AI Engine Direct SDK library and development headers
sudo apt install -y libqnn1 libsnpe1 libqnn-dev libsnpe-dev
```
3. Install OpenCL GPU drivers:
```bash theme={"system"}
sudo apt update
sudo apt install -y clinfo qcom-adreno1
# Symlink OpenCL library to /usr/lib/
if [ ! -f /usr/lib/libOpenCL.so ]; then
sudo ln -s /lib/aarch64-linux-gnu/libOpenCL.so.1.0.0 /usr/lib/libOpenCL.so
fi
# Reboot the device
sudo reboot
# Verify installation
clinfo
# ... Should return
# Number of platforms 1
# Platform Name QUALCOMM Snapdragon(TM)
# Platform Vendor QUALCOMM
# Platform Version OpenCL 3.0 QUALCOMM build: 0808.0.7
```
## Next steps: building a machine learning model
With everything set up you can now build your first machine learning model with these tutorials:
* [Responding to your voice](/tutorials/end-to-end/keyword-spotting)
* [Recognize sounds from audio](/tutorials/end-to-end/sound-recognition)
* [Adding sight to your sensors](/tutorials/end-to-end/image-classification)
* [Object detection](/tutorials/end-to-end/object-detection-bounding-boxes)
* [Visual anomaly detection with FOMO-AD](/studio/projects/learning-blocks/blocks/visual-anomaly-detection-fomo-ad)
Looking to connect different sensors? Our [Linux SDK](/tools/libraries/sdks/inference/linux) lets you easily send data from any sensor and any programming language (with examples in Node.js, Python, Go and C++) into Edge Impulse.
## Profiling your models
To profile your models for the Dragonwing IQ-9075 Evaluation Kit (EVK):
* Make sure to select the Dragonwing IQ-9075 EVK as your target device. You can change the target at the top of the page near your user's logo.
* Head to your [Learning block](/studio/projects/learning-blocks) page in Edge Impulse Studio.
* Click on the **Calculate performance** button.
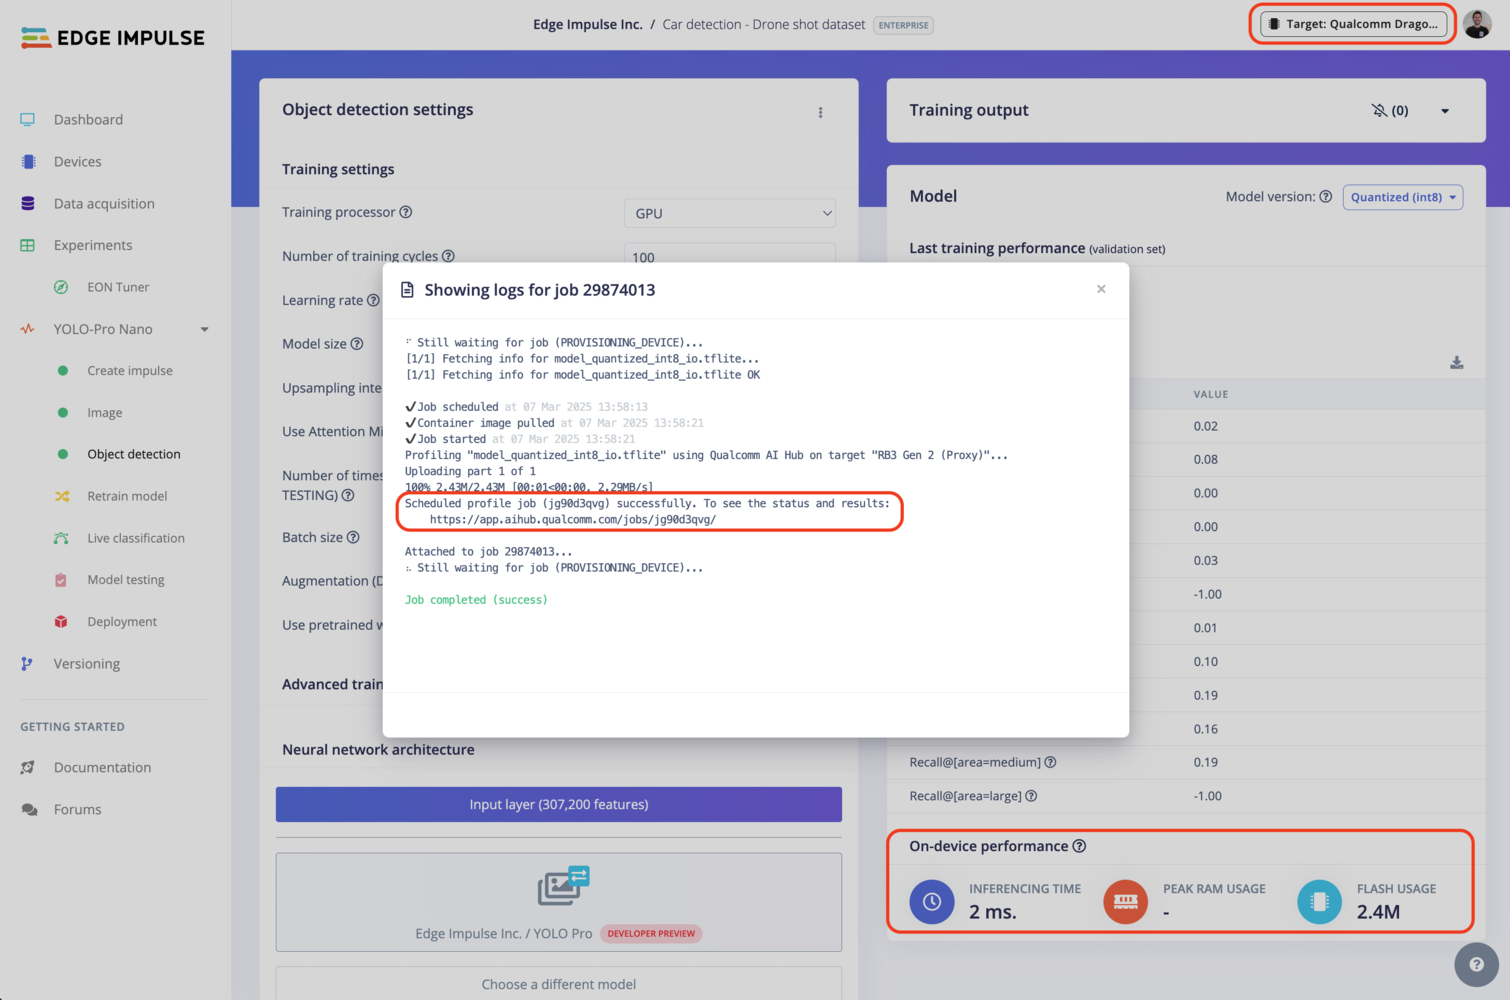
To provide the on-device performance, we use [Qualcomm® AI Hub](https://aihub.qualcomm.com/) in the background (see the image below) which run the compiled model on a physical device to gather metrics such as the mapping of model layers to compute units, inference latency, and peak memory usage. See more on Qualcomm® AI Hub [documentation](https://app.aihub.qualcomm.com/docs/) page.
4. This should print something akin to:
```
Total driver packages: 1
Added driver packages: 1
Successfully installed: qcserlib.inf
```
> If you get an error, make sure DIP 3 / DIP S2-8 is switched 'ON', disconnect the power adapter and try again.
2) Open a terminal, and run:
```bash theme={"system"}
Invoke-WebRequest -Uri https://cdn.edgeimpulse.com/qc-ai-docs/device-setup/iq9075-evk-ubuntu-desktop-24-windows.ps1 -OutFile "iq9075-evk-ubuntu-desktop-24-windows.ps1"
.\iq9075-evk-ubuntu-desktop-24-windows.ps1 -FlashCdt -FlashUfs -FlashSail -FlashUbuntu
```
1. Open a terminal, and run:
```bash theme={"system"}
wget https://cdn.edgeimpulse.com/qc-ai-docs/device-setup/iq9075-evk-ubuntu-desktop-24-macos-linux.sh
bash iq9075-evk-ubuntu-desktop-24-macos-linux.sh --flash-cdt --flash-ufs --flash-sail --flash-ubuntu
```
1. Update your udev rules. Open a terminal and run:
```bash theme={"system"}
echo 'SUBSYSTEMS=="usb", ATTRS{idVendor}=="05c6", ATTRS{idProduct}=="9008", MODE="0664", GROUP="plugdev"' | sudo tee /etc/udev/rules.d/51-qcom-usb.rules > /dev/null
sudo systemctl restart udev
```
2. Disconnect and reconnect the USB cables to your Dragonwing IQ-9075 EVK.
3. Then, from a terminal, run:
```bash theme={"system"}
wget https://cdn.edgeimpulse.com/qc-ai-docs/device-setup/iq9075-evk-ubuntu-desktop-24-macos-linux.sh
bash iq9075-evk-ubuntu-desktop-24-macos-linux.sh --flash-cdt --flash-ufs --flash-sail --flash-ubuntu
```
If you don't see **"Waiting for EDL device"** — and the script immediately exits — power the board off and disconnect the power adapter; then reconnect the power adapter.
4. Afterwards:
* If you have board variant A: Toggle DIP switch 3 to 'OFF':
* If you have board variant B: Toggle DIP switch S2-8 to 'ON'.
5. Toggle power switch OFF, then switch it back ON. Your board will now boot up.
### Configuring Ubuntu 24
Now that we have Ubuntu 24.04 installed, lets connect your Dragonwing IQ-9075 EVK to the internet.
1. You need to connect to the device using a serial port. You can either use your favorite serial terminal application (use baud rate 115200) or, on your computer:
1. Install [Node.js](https://nodejs.org/en) (on Windows: make sure to enable 'Tools for Native Modules').
2. Install the [Edge Impulse CLI](https://docs.edgeimpulse.com/tools/clis/edge-impulse-cli/installation) by opening a command prompt or terminal window, and running:
```bash theme={"system"}
npm install -g edge-impulse-cli
```
> Issues with installing the Edge Impulse CLI? See the [install instructions](https://docs.edgeimpulse.com/tools/clis/edge-impulse-cli/installation).
3. You can now connect to your board via:
```bash theme={"system"}
edge-impulse-serial-terminal
# ? Which device do you want to connect to? (🔍 type to search) (Press to submit)
# /dev/tty.usbserial-NNLRP17S001M0 (WNC)
# /dev/tty.usbserial-NNLRP17S001M3 (WNC)
# ❯ /dev/tty.usbserial-NNLRP17S001M1 (WNC)
# /dev/tty.usbserial-NNLRP17S001M2 (WNC)
# [SER] Connecting to /dev/tty.usbserial-NNLRP17S001M1 (baud rate 115200)
# [SER] Connected to /dev/tty.usbserial-NNLRP17S001M1. Press CTRL+D to quit.
```
> The EVK exposes multiple serial ports; and it's unclear which is which (especially on Windows). On macOS it seems to be the port ending in `M1`. Try restarting the board while attaching to one of the ports, you should see boot messages from Ubuntu.
4. Once you are connected to the board, and you don't see any log messages anymore; press `ENTER` and log in with username `ubuntu`, password `ubuntu`:
```bash theme={"system"}
# Ubuntu 24.04.3 LTS ubuntu ttyMSM0
#
# ubuntu login: ubuntu
```
To disconnect, press `CTRL+D`.
2. From your terminal, set up WiFi:
```bash theme={"system"}
# Connect to WiFi
sudo nmcli dev wifi connect "" password ""
# Force ntp sync so we get the correct date/time
sudo systemctl restart systemd-timesyncd.service
# To verify...
date
# ... Should return the current date
```
3. *Optional:* If you want to connect over SSH:
1. Find your IP address:
```bash theme={"system"}
sudo apt update && sudo apt install -y net-tools
ifconfig | grep -Eo 'inet (addr:)?([0-9]*\.){3}[0-9]*' | grep -Eo '([0-9]*\.){3}[0-9]*' | grep -v '127.0.0.1'
# 192.168.1.253
```
2. On your host machine (so not on your dev board), open a command prompt or terminal and run:
```bash theme={"system"}
ssh ubuntu@192.168.1.253
```
(Replace 192.168.1.253 with the IP you found in the previous step)
Your board is now ready. You can disconnect the USB-C to your computer cable (keep the micro-USB cable connected if you haven't set up SSH).
### Installing drivers, AI Engine Direct and the IM-SDK
Now that we have Ubuntu 24.04 installed and connected to a network, let's install GPU drivers and the Qualcomm AI Engine Direct SDK (to run neural networks).
From the terminal or ssh session on your development board, run:
1. Install some base packages:
```bash theme={"system"}
sudo apt update
sudo apt install -y unzip wget curl python3 python3-pip python3-venv software-properties-common
```
2. Download and install the AI Engine Direct SDK library and development headers:
```bash theme={"system"}
# Add the Qualcomm IoT PPA (if it doesn't exist yet)
if [ ! -f /etc/apt/sources.list.d/ubuntu-qcom-iot-ubuntu-qcom-ppa-noble.list ]; then
sudo apt-add-repository -y ppa:ubuntu-qcom-iot/qcom-ppa
fi
# Install the AI Engine Direct SDK library and development headers
sudo apt install -y libqnn1 libsnpe1 libqnn-dev libsnpe-dev
```
3. Install OpenCL GPU drivers:
```bash theme={"system"}
sudo apt update
sudo apt install -y clinfo qcom-adreno1
# Symlink OpenCL library to /usr/lib/
if [ ! -f /usr/lib/libOpenCL.so ]; then
sudo ln -s /lib/aarch64-linux-gnu/libOpenCL.so.1.0.0 /usr/lib/libOpenCL.so
fi
# Reboot the device
sudo reboot
# Verify installation
clinfo
# ... Should return
# Number of platforms 1
# Platform Name QUALCOMM Snapdragon(TM)
# Platform Vendor QUALCOMM
# Platform Version OpenCL 3.0 QUALCOMM build: 0808.0.7
```
## Next steps: building a machine learning model
With everything set up you can now build your first machine learning model with these tutorials:
* [Responding to your voice](/tutorials/end-to-end/keyword-spotting)
* [Recognize sounds from audio](/tutorials/end-to-end/sound-recognition)
* [Adding sight to your sensors](/tutorials/end-to-end/image-classification)
* [Object detection](/tutorials/end-to-end/object-detection-bounding-boxes)
* [Visual anomaly detection with FOMO-AD](/studio/projects/learning-blocks/blocks/visual-anomaly-detection-fomo-ad)
Looking to connect different sensors? Our [Linux SDK](/tools/libraries/sdks/inference/linux) lets you easily send data from any sensor and any programming language (with examples in Node.js, Python, Go and C++) into Edge Impulse.
## Profiling your models
To profile your models for the Dragonwing IQ-9075 Evaluation Kit (EVK):
* Make sure to select the Dragonwing IQ-9075 EVK as your target device. You can change the target at the top of the page near your user's logo.
* Head to your [Learning block](/studio/projects/learning-blocks) page in Edge Impulse Studio.
* Click on the **Calculate performance** button.
To provide the on-device performance, we use [Qualcomm® AI Hub](https://aihub.qualcomm.com/) in the background (see the image below) which run the compiled model on a physical device to gather metrics such as the mapping of model layers to compute units, inference latency, and peak memory usage. See more on Qualcomm® AI Hub [documentation](https://app.aihub.qualcomm.com/docs/) page.
 ## Deploying back to device
### Using the Edge Impulse Linux CLI
To run your impulse locally on the Dragonwing IQ-9075 EVK, open a terminal and run:
```bash theme={"system"}
$ edge-impulse-linux-runner
```
This will automatically compile your model with full hardware acceleration, download the model to your Dragonwing IQ-9075 EVK, and then start classifying (use `--clean` to switch projects).
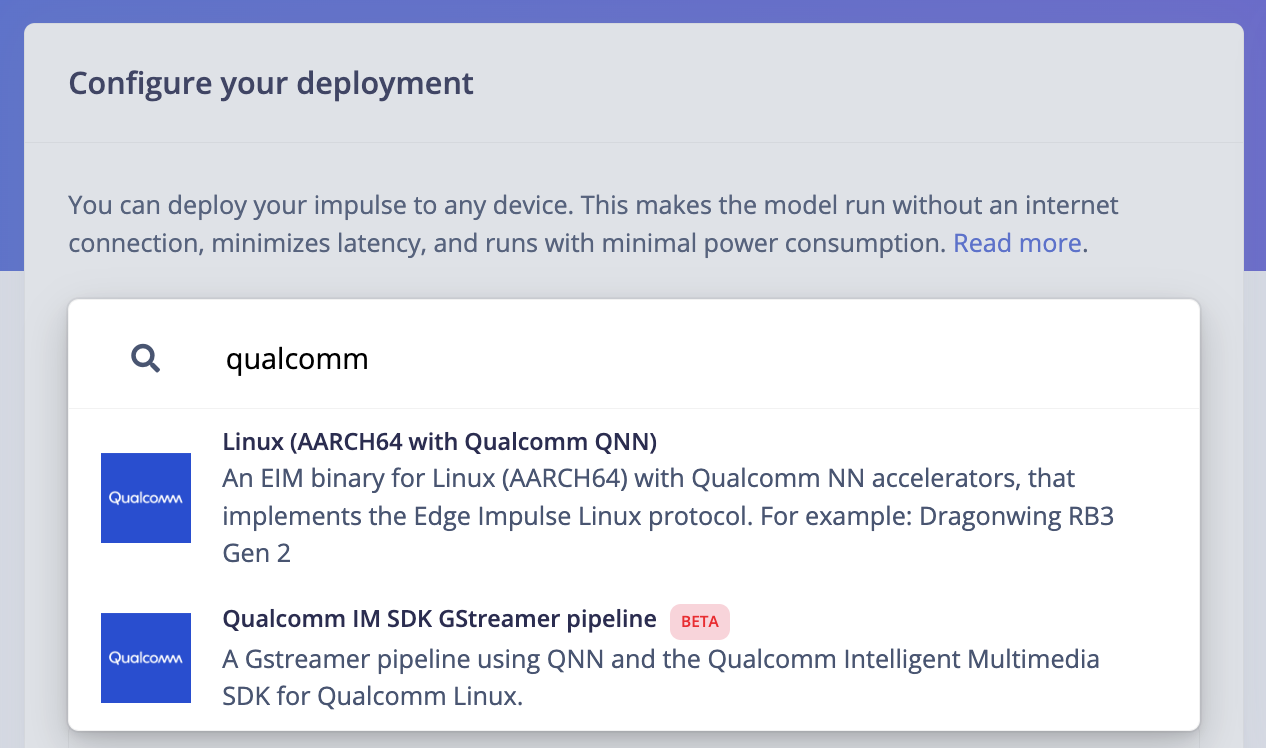
Alternatively, you can select the **Linux (AARCH64 with Qualcomm QNN)** option in the **Deployment** page.
## Deploying back to device
### Using the Edge Impulse Linux CLI
To run your impulse locally on the Dragonwing IQ-9075 EVK, open a terminal and run:
```bash theme={"system"}
$ edge-impulse-linux-runner
```
This will automatically compile your model with full hardware acceleration, download the model to your Dragonwing IQ-9075 EVK, and then start classifying (use `--clean` to switch projects).
Alternatively, you can select the **Linux (AARCH64 with Qualcomm QNN)** option in the **Deployment** page.
 This will download an `.eim` model that you can run on your board with the following command:
```bash theme={"system"}
edge-impulse-linux-runner --model-file downloaded-model.eim
```
### Using the Edge Impulse Linux Inferencing SDKs
Our [Linux SDK](/tools/libraries/sdks/inference/linux) has examples on how to integrate the `.eim` model with your favourite programming language.
You can download either the quantized version and the float32 versions but Qualcomm NN accelerator only supports quantized models. If you select the float32 version, the model will run on CPU.
### Using the IM SDK GStreamer option
When selecting this option, you will obtain a `.zip` folder. We provide instructions in the `README.md` file included in the compressed folder.
See more information on [Qualcomm IM SDK GStreamer pipeline](/hardware/deployments/run-qualcomm-im-sdk-gstreamer).
### Image model?
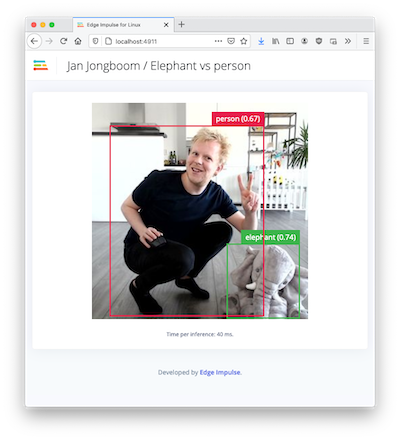
If you have an image model then you can get a peek of what your device sees by being on the same network as your device, and finding the 'Want to see a feed of the camera and live classification in your browser' message in the console. Open the URL in a browser and both the camera feed and the classification are shown:
This will download an `.eim` model that you can run on your board with the following command:
```bash theme={"system"}
edge-impulse-linux-runner --model-file downloaded-model.eim
```
### Using the Edge Impulse Linux Inferencing SDKs
Our [Linux SDK](/tools/libraries/sdks/inference/linux) has examples on how to integrate the `.eim` model with your favourite programming language.
You can download either the quantized version and the float32 versions but Qualcomm NN accelerator only supports quantized models. If you select the float32 version, the model will run on CPU.
### Using the IM SDK GStreamer option
When selecting this option, you will obtain a `.zip` folder. We provide instructions in the `README.md` file included in the compressed folder.
See more information on [Qualcomm IM SDK GStreamer pipeline](/hardware/deployments/run-qualcomm-im-sdk-gstreamer).
### Image model?
If you have an image model then you can get a peek of what your device sees by being on the same network as your device, and finding the 'Want to see a feed of the camera and live classification in your browser' message in the console. Open the URL in a browser and both the camera feed and the classification are shown:
 ## Troubleshooting
### qdl: unable to open USB device
If you see `qdl: unable to open USB device` when flashing the board (on Windows) then make sure to update the driver using QDL's install\_driver.bat (see above).
## Troubleshooting
### qdl: unable to open USB device
If you see `qdl: unable to open USB device` when flashing the board (on Windows) then make sure to update the driver using QDL's install\_driver.bat (see above).