> ## Documentation Index
> Fetch the complete documentation index at: https://docs.edgeimpulse.com/llms.txt
> Use this file to discover all available pages before exploring further.
# Qualcomm Dragonwing IQ-8275 Evaluation Kit
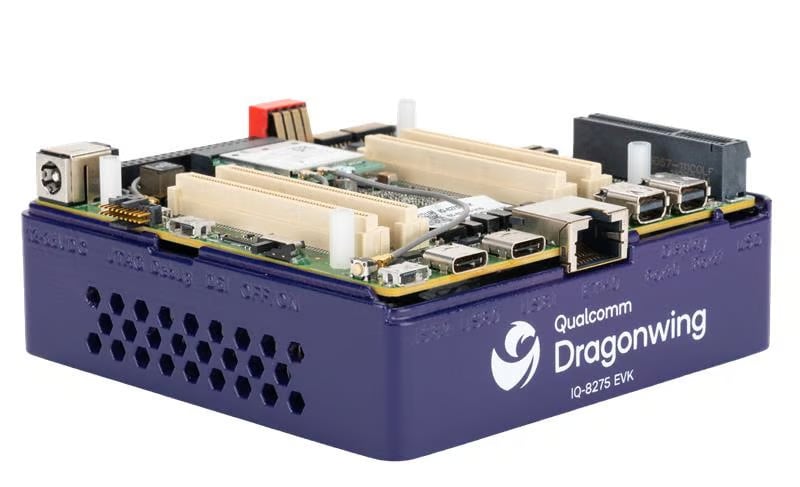
The Qualcomm Dragonwing™ IQ-8275 Evaluation Kit (EVK) is a powerful Linux-based evaluation kit based around the IQ-8275 SoC, which has an 8-core Kyro™ CPU, an Adreno™ 623 GPU, and a 40 TOPS Hexagon™ NPU. It supports running both Ubuntu and Qualcomm Linux, and is designed to help developers quickly prototype and evaluate their applications on a high-performance platform.
 ## Setting up the EVK
The sections below provide abbreviated setup steps to get your IQ-8275 EVK up and running with Ubuntu. For further details, please refer to the Qualcomm Dragonwing [IQ-8275 EVK Ubuntu setup](https://dragonwingdocs.qualcomm.com/Ubuntu/devices/iq8275-evk/set-up-the-device) documentation.
The IQ-8275 EVK also supports running Qualcomm Linux. If this is your preferred operating system, please refer to the Qualcomm Dragonwing [IQ-8275 EVK Qualcomm Linux setup](https://dragonwingdocs.qualcomm.com/Linux/devices/iq8275-evk/set-up-the-device) documentation for guidance.
### Powering on the EVK
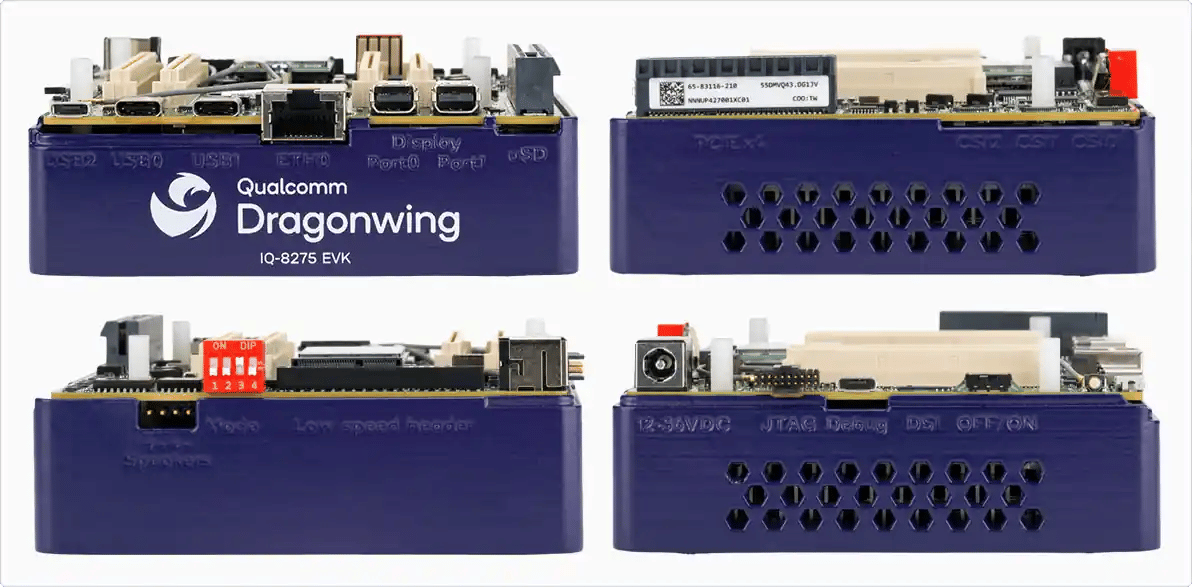
The IQ-8275 EVK receives its main power through a 2.10 mm barrel jack connector, which supports an input voltage range of 12 V to 36 V. The EVK also includes a USB-C to barrel plug adapter for convenience. Connect a +12 V power adapter to supply power to the board.
### Flashing Ubuntu
**Updating Ubuntu image instead of flashing**
If you have previously flashed your EVK and simply want to update the Ubuntu image, you can do so without reflashing. Follow the instructions in the IQ-8275 EVK [Upgrade Ubuntu image](https://dragonwingdocs.qualcomm.com/Ubuntu/devices/iq8275-evk/update-software/upgrade-ubuntu) documentation.
To flash the IQ-8275 EVK, you will first need to connect a USB-C cable to `USB0` on the board and the other end to your host device.
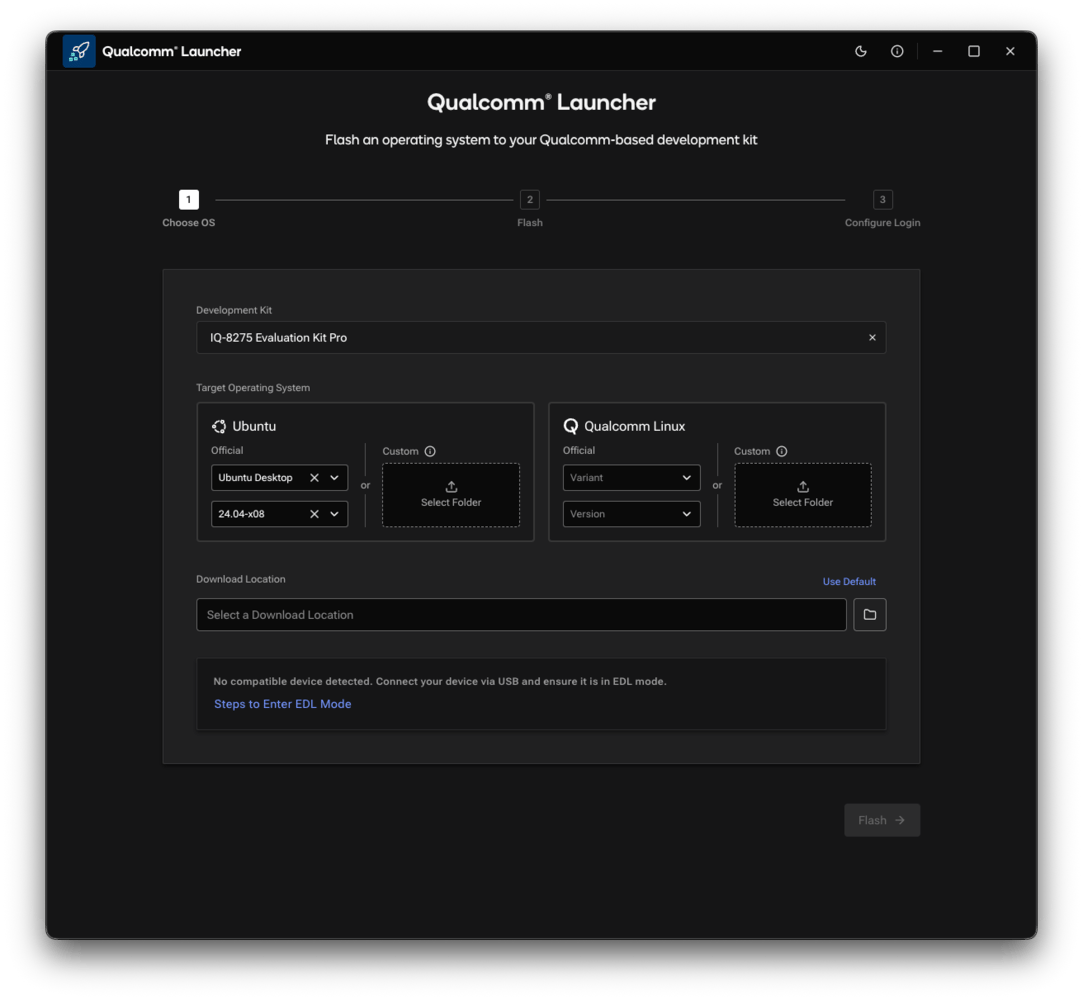
Then, you will be able to flash the board using the Qualcomm Launcher tool, which provides a user-friendly GUI for flashing firmware and operating systems onto Qualcomm devices. This is the preferred method for flashing Ubuntu onto your EVK. See the IQ-8275 EVK [Flash Ubuntu using Qualcomm Launcher](https://dragonwingdocs.qualcomm.com/Ubuntu/devices/iq8275-evk/update-software/flash-using-qualcomm-launcher) documentation for step-by-step instructions.
## Setting up the EVK
The sections below provide abbreviated setup steps to get your IQ-8275 EVK up and running with Ubuntu. For further details, please refer to the Qualcomm Dragonwing [IQ-8275 EVK Ubuntu setup](https://dragonwingdocs.qualcomm.com/Ubuntu/devices/iq8275-evk/set-up-the-device) documentation.
The IQ-8275 EVK also supports running Qualcomm Linux. If this is your preferred operating system, please refer to the Qualcomm Dragonwing [IQ-8275 EVK Qualcomm Linux setup](https://dragonwingdocs.qualcomm.com/Linux/devices/iq8275-evk/set-up-the-device) documentation for guidance.
### Powering on the EVK
The IQ-8275 EVK receives its main power through a 2.10 mm barrel jack connector, which supports an input voltage range of 12 V to 36 V. The EVK also includes a USB-C to barrel plug adapter for convenience. Connect a +12 V power adapter to supply power to the board.
### Flashing Ubuntu
**Updating Ubuntu image instead of flashing**
If you have previously flashed your EVK and simply want to update the Ubuntu image, you can do so without reflashing. Follow the instructions in the IQ-8275 EVK [Upgrade Ubuntu image](https://dragonwingdocs.qualcomm.com/Ubuntu/devices/iq8275-evk/update-software/upgrade-ubuntu) documentation.
To flash the IQ-8275 EVK, you will first need to connect a USB-C cable to `USB0` on the board and the other end to your host device.
Then, you will be able to flash the board using the Qualcomm Launcher tool, which provides a user-friendly GUI for flashing firmware and operating systems onto Qualcomm devices. This is the preferred method for flashing Ubuntu onto your EVK. See the IQ-8275 EVK [Flash Ubuntu using Qualcomm Launcher](https://dragonwingdocs.qualcomm.com/Ubuntu/devices/iq8275-evk/update-software/flash-using-qualcomm-launcher) documentation for step-by-step instructions.
 Alternatively, you can use the Qualcomm Device Loader (QDL) tool, which is a command-line utility for flashing devices in Emergency Download Mode (EDL). This approach is more manual, but it can be useful for advanced users or in situations where the Qualcomm Launcher tool is not available. If you would like to use this approach, see the IQ-8275 EVK [Flash Ubuntu using QDL](https://dragonwingdocs.qualcomm.com/Ubuntu/devices/iq8275-evk/update-software/flash-over-qli) documentation.
### Setting up the UART
If you skipped setting up the UART connection in the Qualcomm Launcher, or used QDL to flash the board, you will need to set up the UART connection manually. See the IQ-8275 EVK [Set up the debug UART](https://dragonwingdocs.qualcomm.com/Ubuntu/devices/iq8275-evk/set-up-the-device#set-up-the-debug-uart) instructions for guidance based on your host operating system.
### Connecting to a network
Again, if you skipped setting up a network connection in the Qualcomm Launcher, or used QDL to flash the board, you will need to set up the network connection manually. Using a serial console on your host, connect to the IQ-8275 EVK with a 115200 baud rate and configure the Wi-Fi using `nmcli`.
```bash theme={"system"}
sudo nmcli dev wifi connect password
```
```bash theme={"system"}
nmcli -p device
ip addr show wlp1s0
```
```bash theme={"system"}
ping edgeimpulse.com
```
### Connecting over SSH
After completing the steps above, your IQ-8275 EVK can now be used as a single board computer by attaching a mouse, keyboard, and display. However, you can also optionally connect over SSH instead by following these steps.
The default username and password are both `ubuntu`.
```bash theme={"system"}
ip addr show wlp1s0
```
```bash theme={"system"}
ssh @
```
```bash theme={"system"}
```
### Installing dependencies
Below is a minimal set of dependencies that you will need to install on your IQ-8275 EVK in order to run accelerated Edge Impulse models. Execute the commands on your EVK.
For a more comprehensive list of dependencies, see the IQ-8275 EVK [Install required software packages](https://dragonwingdocs.qualcomm.com/Ubuntu/devices/iq8275-evk/Install_required_software_packages) documentation.
#### Base packages
```bash theme={"system"}
sudo apt update
sudo apt install -y unzip wget curl nodejs npm python3 python3-pip python3-venv software-properties-common
```
#### Edge Impulse Linux CLI
```bash theme={"system"}
npm install -g edge-impulse-linux
```
For more information about the Edge Impulse Linux CLI, see the [Edge Impulse Linux CLI](/tools/clis/edge-impulse-linux-cli) documentation.
#### Additional packages
```bash theme={"system"}
# Add the Qualcomm IoT PPA (if it doesn't exist yet)
if [ ! -f /etc/apt/sources.list.d/ubuntu-qcom-iot-ubuntu-qcom-ppa-noble.list ]; then
sudo apt-add-repository -y ppa:ubuntu-qcom-iot/qcom-ppa
fi
# Install the AI Engine Direct SDK library and development headers
sudo apt install -y libqnn1 libsnpe1 libqnn-dev libsnpe-dev
# Install OpenCL GPU drivers
sudo apt install -y clinfo qcom-adreno1
# Symlink OpenCL library to /usr/lib/
if [ ! -f /usr/lib/libOpenCL.so ]; then
sudo ln -s /lib/aarch64-linux-gnu/libOpenCL.so.1.0.0 /usr/lib/libOpenCL.so
fi
# Reboot the device
sudo reboot
# Verify installation
clinfo
# ... Should return
# Number of platforms 1
# Platform Name QUALCOMM Snapdragon(TM)
# Platform Vendor QUALCOMM
# Platform Version OpenCL 3.0 QUALCOMM build: 0808.0.7
```
## Connecting to Edge Impulse
You can use the Edge Impulse Linux CLI to connect your IQ-8275 EVK to a project in Edge Impulse Studio. This allows you to send data from the device to the cloud for training and inference.
```bash theme={"system"}
edge-impulse-linux
```
Executing the command above will prompt you to log in to your Edge Impulse account and select a project. Once connected, your EVK will appear on the devices page within your project. You can now collect data directly from your EVK.
To connect your EVK to a different project, execute the command above with the `--clean` flag.
## Building a model
With everything set up you can now build your first machine learning model with these tutorials:
* [Responding to your voice](/tutorials/end-to-end/keyword-spotting)
* [Recognize sounds from audio](/tutorials/end-to-end/sound-recognition)
* [Adding sight to your sensors](/tutorials/end-to-end/image-classification)
* [Object detection](/tutorials/end-to-end/object-detection-bounding-boxes)
* [Visual anomaly detection with FOMO-AD](/studio/projects/learning-blocks/blocks/visual-anomaly-detection-fomo-ad)
If you want to connect to different sensors, our [Linux SDKs](/tools/libraries/sdks/inference/linux) let you easily send data from any sensor and any programming language (with examples in Node.js, Python, Go and C++) into Edge Impulse.
## Profiling a model
To profile your models for the IQ-8275 EVK in Studio:
* Make sure to select the IQ-8275 EVK as your [Target device](/studio/projects/dashboard/target-device). You can change the target at the top of the page near your user logo.
* On the settings page for you learning block, click the `Calculate performance` button in the On-device performance section.
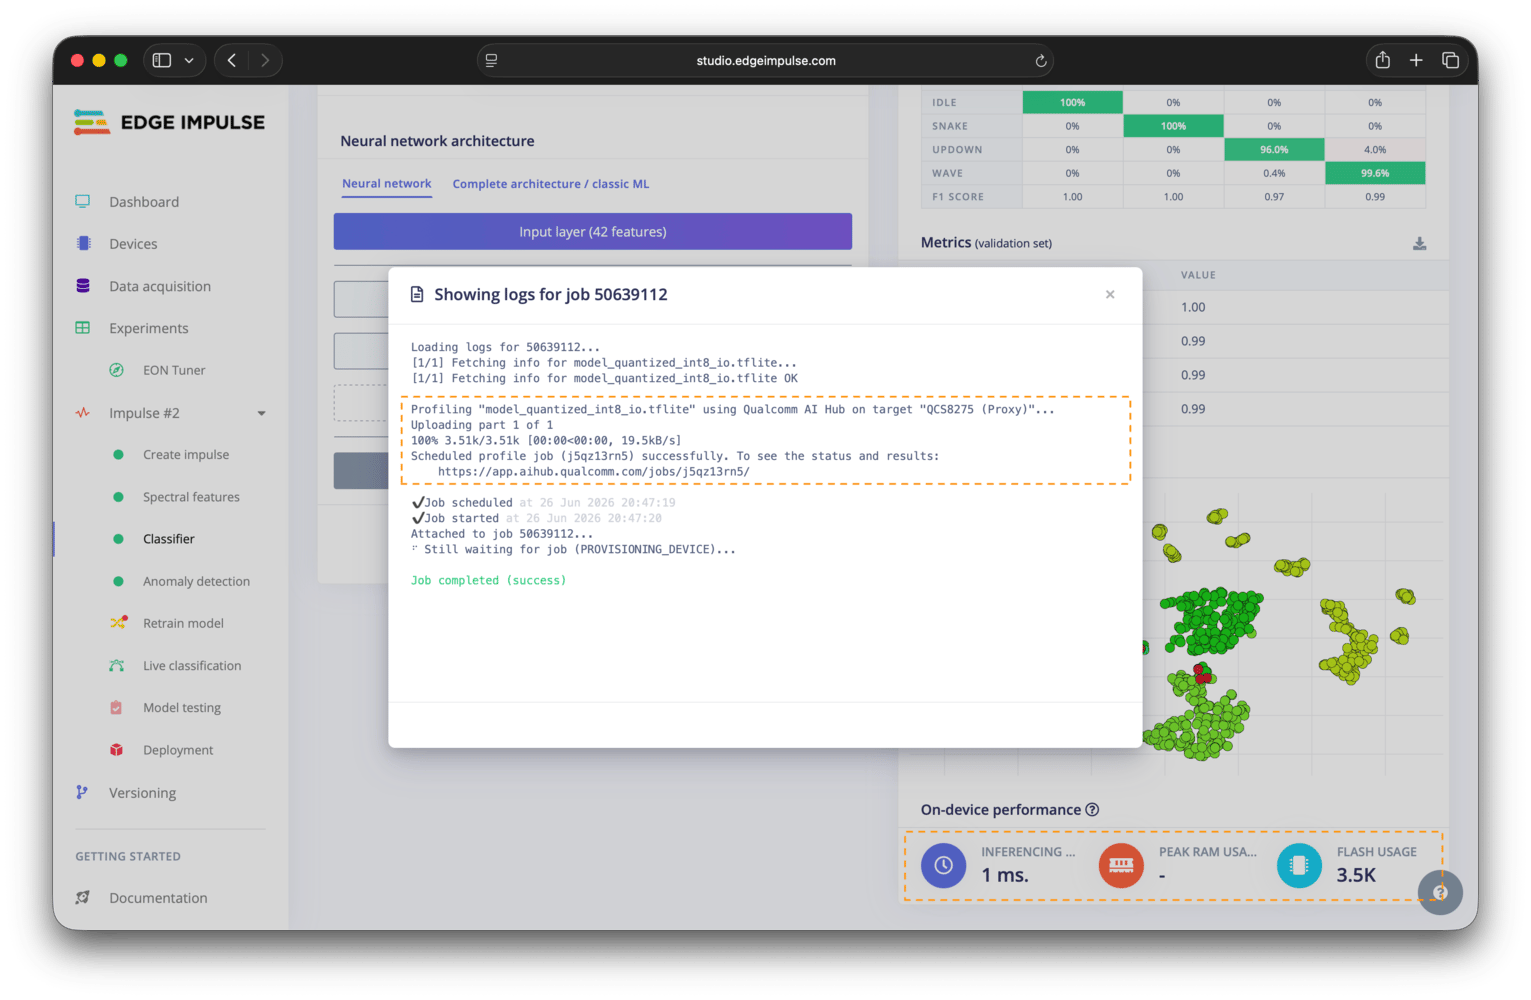
To provide the on-device performance, we use [Qualcomm® AI Hub](https://aihub.qualcomm.com/) behind the scenes. The compiled model is run on a physical device to gather metrics such as the mapping of model layers to compute units, inference latency, peak memory usage, and flash usage. See more details in the [Qualcomm® AI Hub documentation](https://app.aihub.qualcomm.com/docs/).
Alternatively, you can use the Qualcomm Device Loader (QDL) tool, which is a command-line utility for flashing devices in Emergency Download Mode (EDL). This approach is more manual, but it can be useful for advanced users or in situations where the Qualcomm Launcher tool is not available. If you would like to use this approach, see the IQ-8275 EVK [Flash Ubuntu using QDL](https://dragonwingdocs.qualcomm.com/Ubuntu/devices/iq8275-evk/update-software/flash-over-qli) documentation.
### Setting up the UART
If you skipped setting up the UART connection in the Qualcomm Launcher, or used QDL to flash the board, you will need to set up the UART connection manually. See the IQ-8275 EVK [Set up the debug UART](https://dragonwingdocs.qualcomm.com/Ubuntu/devices/iq8275-evk/set-up-the-device#set-up-the-debug-uart) instructions for guidance based on your host operating system.
### Connecting to a network
Again, if you skipped setting up a network connection in the Qualcomm Launcher, or used QDL to flash the board, you will need to set up the network connection manually. Using a serial console on your host, connect to the IQ-8275 EVK with a 115200 baud rate and configure the Wi-Fi using `nmcli`.
```bash theme={"system"}
sudo nmcli dev wifi connect password
```
```bash theme={"system"}
nmcli -p device
ip addr show wlp1s0
```
```bash theme={"system"}
ping edgeimpulse.com
```
### Connecting over SSH
After completing the steps above, your IQ-8275 EVK can now be used as a single board computer by attaching a mouse, keyboard, and display. However, you can also optionally connect over SSH instead by following these steps.
The default username and password are both `ubuntu`.
```bash theme={"system"}
ip addr show wlp1s0
```
```bash theme={"system"}
ssh @
```
```bash theme={"system"}
```
### Installing dependencies
Below is a minimal set of dependencies that you will need to install on your IQ-8275 EVK in order to run accelerated Edge Impulse models. Execute the commands on your EVK.
For a more comprehensive list of dependencies, see the IQ-8275 EVK [Install required software packages](https://dragonwingdocs.qualcomm.com/Ubuntu/devices/iq8275-evk/Install_required_software_packages) documentation.
#### Base packages
```bash theme={"system"}
sudo apt update
sudo apt install -y unzip wget curl nodejs npm python3 python3-pip python3-venv software-properties-common
```
#### Edge Impulse Linux CLI
```bash theme={"system"}
npm install -g edge-impulse-linux
```
For more information about the Edge Impulse Linux CLI, see the [Edge Impulse Linux CLI](/tools/clis/edge-impulse-linux-cli) documentation.
#### Additional packages
```bash theme={"system"}
# Add the Qualcomm IoT PPA (if it doesn't exist yet)
if [ ! -f /etc/apt/sources.list.d/ubuntu-qcom-iot-ubuntu-qcom-ppa-noble.list ]; then
sudo apt-add-repository -y ppa:ubuntu-qcom-iot/qcom-ppa
fi
# Install the AI Engine Direct SDK library and development headers
sudo apt install -y libqnn1 libsnpe1 libqnn-dev libsnpe-dev
# Install OpenCL GPU drivers
sudo apt install -y clinfo qcom-adreno1
# Symlink OpenCL library to /usr/lib/
if [ ! -f /usr/lib/libOpenCL.so ]; then
sudo ln -s /lib/aarch64-linux-gnu/libOpenCL.so.1.0.0 /usr/lib/libOpenCL.so
fi
# Reboot the device
sudo reboot
# Verify installation
clinfo
# ... Should return
# Number of platforms 1
# Platform Name QUALCOMM Snapdragon(TM)
# Platform Vendor QUALCOMM
# Platform Version OpenCL 3.0 QUALCOMM build: 0808.0.7
```
## Connecting to Edge Impulse
You can use the Edge Impulse Linux CLI to connect your IQ-8275 EVK to a project in Edge Impulse Studio. This allows you to send data from the device to the cloud for training and inference.
```bash theme={"system"}
edge-impulse-linux
```
Executing the command above will prompt you to log in to your Edge Impulse account and select a project. Once connected, your EVK will appear on the devices page within your project. You can now collect data directly from your EVK.
To connect your EVK to a different project, execute the command above with the `--clean` flag.
## Building a model
With everything set up you can now build your first machine learning model with these tutorials:
* [Responding to your voice](/tutorials/end-to-end/keyword-spotting)
* [Recognize sounds from audio](/tutorials/end-to-end/sound-recognition)
* [Adding sight to your sensors](/tutorials/end-to-end/image-classification)
* [Object detection](/tutorials/end-to-end/object-detection-bounding-boxes)
* [Visual anomaly detection with FOMO-AD](/studio/projects/learning-blocks/blocks/visual-anomaly-detection-fomo-ad)
If you want to connect to different sensors, our [Linux SDKs](/tools/libraries/sdks/inference/linux) let you easily send data from any sensor and any programming language (with examples in Node.js, Python, Go and C++) into Edge Impulse.
## Profiling a model
To profile your models for the IQ-8275 EVK in Studio:
* Make sure to select the IQ-8275 EVK as your [Target device](/studio/projects/dashboard/target-device). You can change the target at the top of the page near your user logo.
* On the settings page for you learning block, click the `Calculate performance` button in the On-device performance section.
To provide the on-device performance, we use [Qualcomm® AI Hub](https://aihub.qualcomm.com/) behind the scenes. The compiled model is run on a physical device to gather metrics such as the mapping of model layers to compute units, inference latency, peak memory usage, and flash usage. See more details in the [Qualcomm® AI Hub documentation](https://app.aihub.qualcomm.com/docs/).
 ## Deploying a model
You can run your trained model on the IQ-8275 EVK using one of the [EIM](/hardware/deployments/run-linux-eim) or [IM SDK GStreamer](/hardware/deployments/run-qualcomm-im-sdk-gstreamer) deployment options. The EIM option is recommended for most users, while the GStreamer option is more advanced and requires additional setup.
### With an EIM deployment
In your project on the deployment page, select the `Qualcomm Dragonwing IQ 8275 EVK (AARCH64 with Qualcomm QNN)` deployment option and build it. This will generate and download an `.eim` file that you will be able to run on your IQ-8275 EVK using the Edge Impulse Linux CLI or the Edge Impulse Linux Inferencing SDKs.
## Deploying a model
You can run your trained model on the IQ-8275 EVK using one of the [EIM](/hardware/deployments/run-linux-eim) or [IM SDK GStreamer](/hardware/deployments/run-qualcomm-im-sdk-gstreamer) deployment options. The EIM option is recommended for most users, while the GStreamer option is more advanced and requires additional setup.
### With an EIM deployment
In your project on the deployment page, select the `Qualcomm Dragonwing IQ 8275 EVK (AARCH64 with Qualcomm QNN)` deployment option and build it. This will generate and download an `.eim` file that you will be able to run on your IQ-8275 EVK using the Edge Impulse Linux CLI or the Edge Impulse Linux Inferencing SDKs.
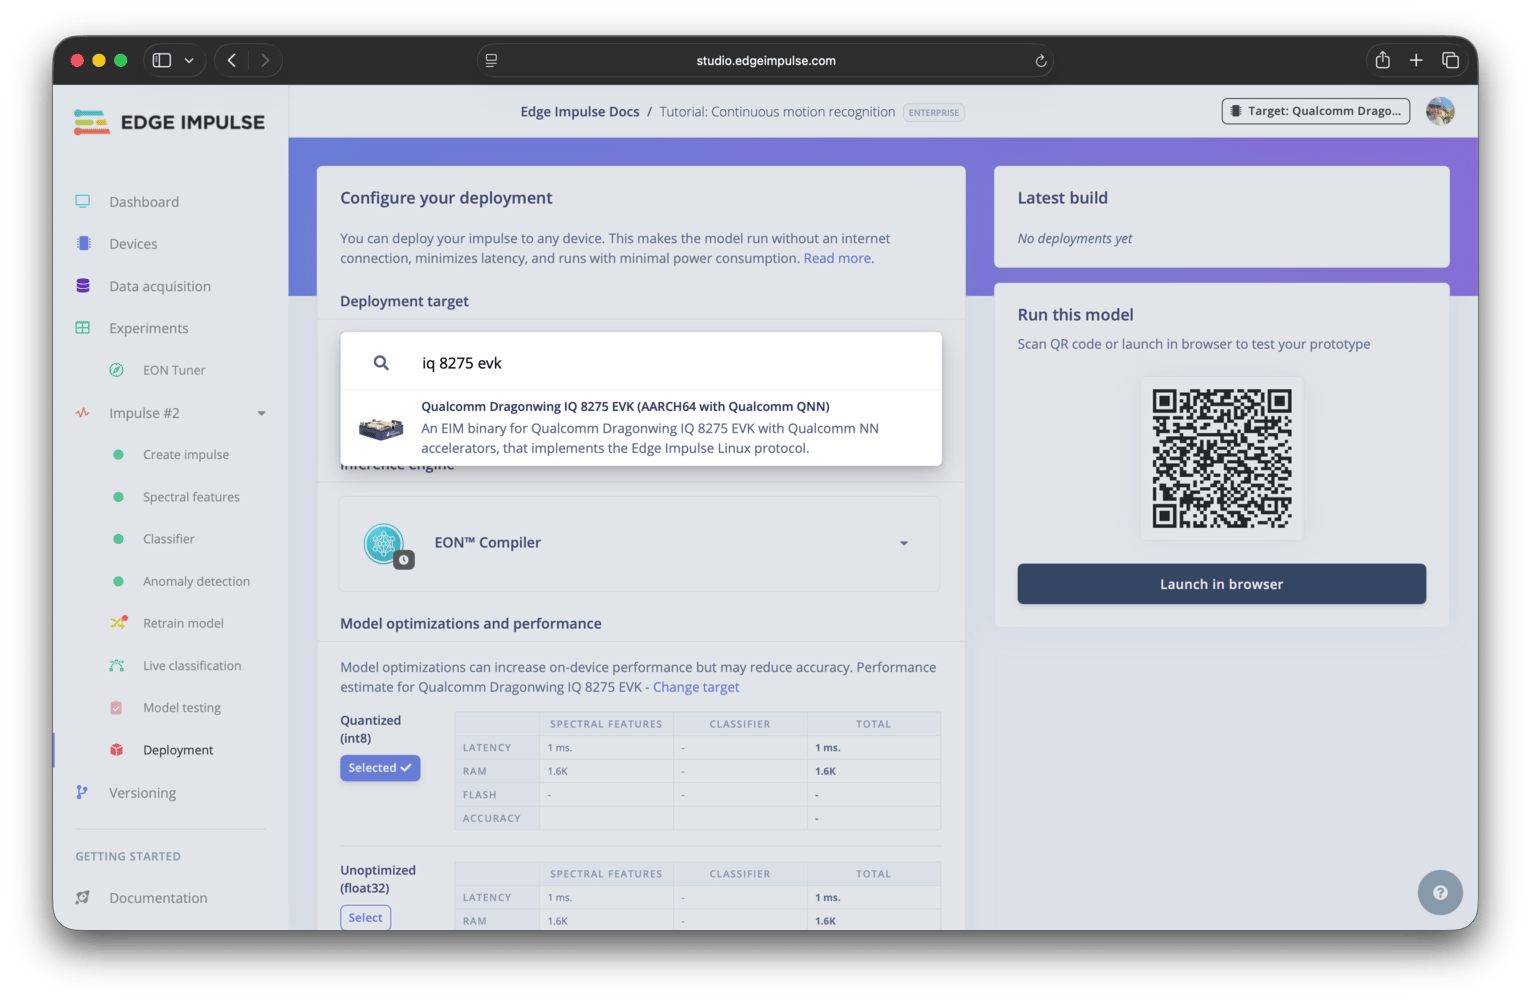 Note that, instead of downloading your model from the deployment page, you can also use the Edge Impulse Linux CLI to automatically compile your model with full hardware acceleration, download the model to your IQ-8275 EVK, and then start classifying. See the instructions below for more details.
#### Using the Edge Impulse Linux CLI
If you have not yet downloaded the `.eim` file, you can use the Edge Impulse Linux CLI to automatically build your model, download it to your IQ-8275 EVK, and then start running inference. To do this, execute the following command on your EVK and follow the prompts:
```bash theme={"system"}
edge-impulse-linux-runner
```
If you need to change the project that your EVK is connected to, you can use the `--clean` flag to reset the connection and select a new project.
If you have already downloaded an `.eim` file and moved it to your IQ-8275 EVK, you can run it by executing the command below on your EVK and following the prompts:
```bash theme={"system"}
edge-impulse-linux-runner --model-file .eim
```
#### Using the Edge Impulse Linux Inferencing SDKs
The `.eim` file can also be used with the Edge Impulse Linux Inferencing SDKs. Our [Linux SDKs](/tools/libraries/sdks/inference/linux) documentation has examples on how to integrate the `.eim` model with your favourite programming language.
### With an IM SDK GStreamer plugin deployment
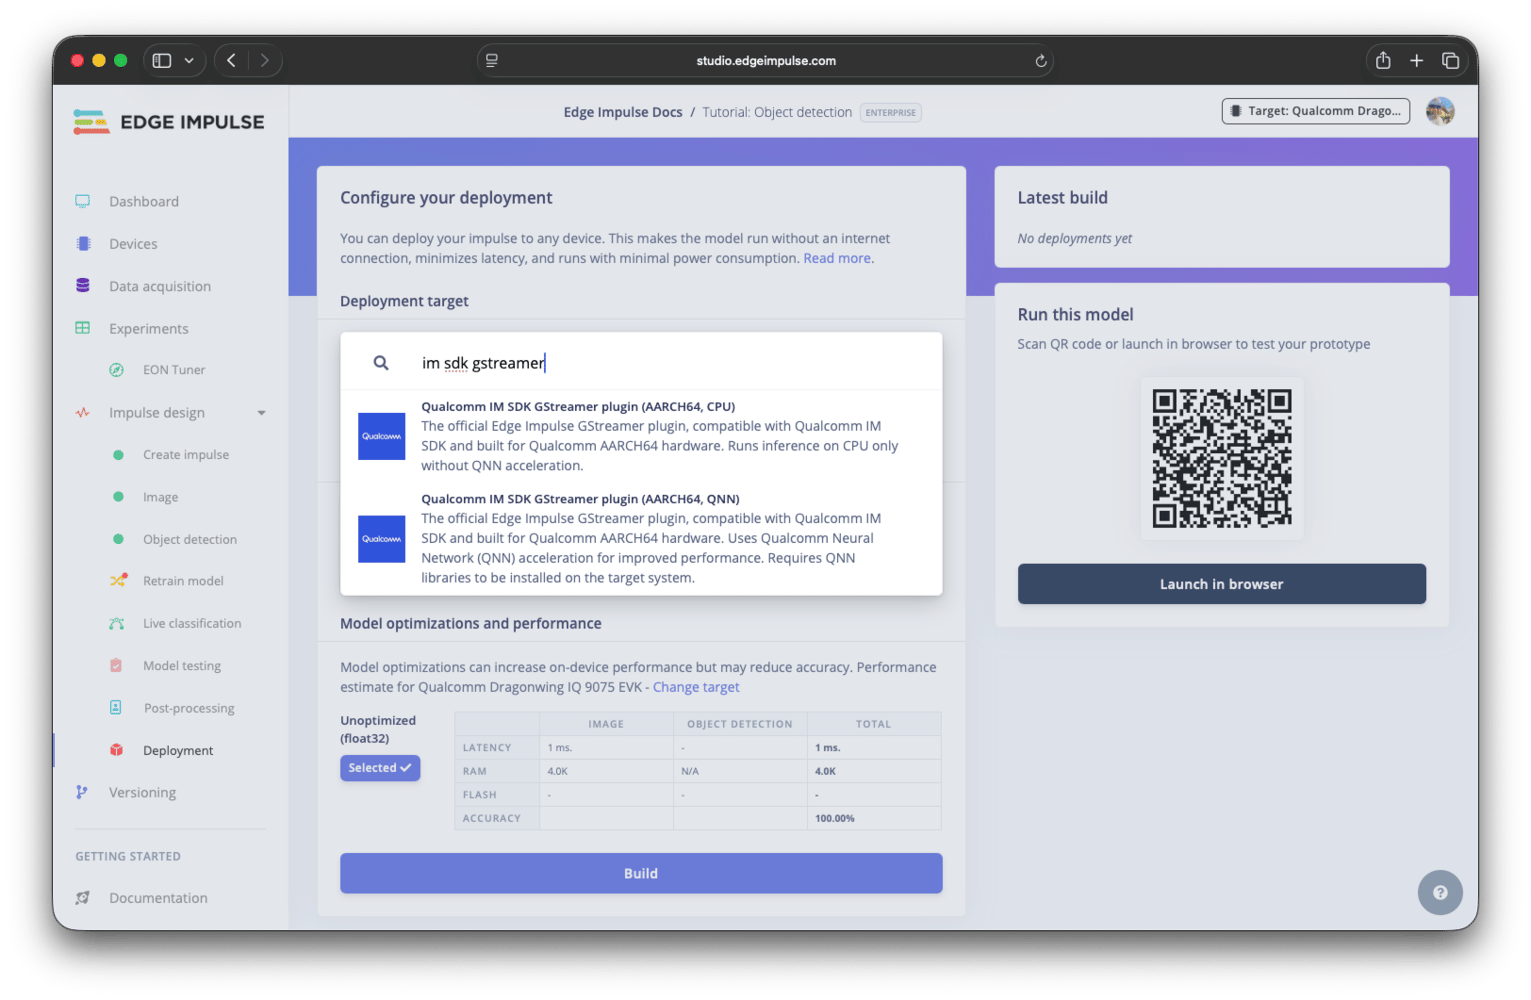
In your project on the deployment page, select one of the Qualcomm IM SDK GStreamer deployment options and build it. This will generate and download a `.zip` file. After unzipping the archive, you will find a `README.md` file with instructions on how to use the IM SDK GStreamer plugin to run your model.
Note that, instead of downloading your model from the deployment page, you can also use the Edge Impulse Linux CLI to automatically compile your model with full hardware acceleration, download the model to your IQ-8275 EVK, and then start classifying. See the instructions below for more details.
#### Using the Edge Impulse Linux CLI
If you have not yet downloaded the `.eim` file, you can use the Edge Impulse Linux CLI to automatically build your model, download it to your IQ-8275 EVK, and then start running inference. To do this, execute the following command on your EVK and follow the prompts:
```bash theme={"system"}
edge-impulse-linux-runner
```
If you need to change the project that your EVK is connected to, you can use the `--clean` flag to reset the connection and select a new project.
If you have already downloaded an `.eim` file and moved it to your IQ-8275 EVK, you can run it by executing the command below on your EVK and following the prompts:
```bash theme={"system"}
edge-impulse-linux-runner --model-file .eim
```
#### Using the Edge Impulse Linux Inferencing SDKs
The `.eim` file can also be used with the Edge Impulse Linux Inferencing SDKs. Our [Linux SDKs](/tools/libraries/sdks/inference/linux) documentation has examples on how to integrate the `.eim` model with your favourite programming language.
### With an IM SDK GStreamer plugin deployment
In your project on the deployment page, select one of the Qualcomm IM SDK GStreamer deployment options and build it. This will generate and download a `.zip` file. After unzipping the archive, you will find a `README.md` file with instructions on how to use the IM SDK GStreamer plugin to run your model.
 ## Previewing image models
If you have an image model, you can see a preview of what your IQ-8275 EVK sees.
After starting inference with the Edge Impulse Linux CLI, look for the message in your terminal that says `Want to see a feed of the camera and live classification in your browser`. Open the provided URL in a browser and both the camera feed and the inference results are shown in real-time. Note that if you are opening the browser on a different device than the IQ-8275 EVK, you will need to be on the same network.
## Troubleshooting
No common issues have been identified thus far. If you encounter an issue, please reach out on the [forum](https://forum.edgeimpulse.com) or, if you are on the Enterprise plan, through your support channels.
## Previewing image models
If you have an image model, you can see a preview of what your IQ-8275 EVK sees.
After starting inference with the Edge Impulse Linux CLI, look for the message in your terminal that says `Want to see a feed of the camera and live classification in your browser`. Open the provided URL in a browser and both the camera feed and the inference results are shown in real-time. Note that if you are opening the browser on a different device than the IQ-8275 EVK, you will need to be on the same network.
## Troubleshooting
No common issues have been identified thus far. If you encounter an issue, please reach out on the [forum](https://forum.edgeimpulse.com) or, if you are on the Enterprise plan, through your support channels.