> ## Documentation Index
> Fetch the complete documentation index at: https://docs.edgeimpulse.com/llms.txt
> Use this file to discover all available pages before exploring further.
# Particle Photon 2
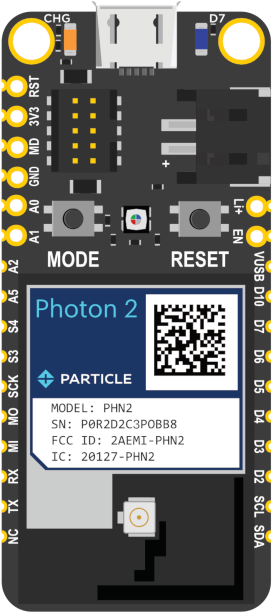
The [Photon 2](https://store.particle.io/products/photon-2) with Edge ML Kit is a development system with a microcontroller and Wi-Fi networking containing a Realtek RTL8721DM MCU ARM Cortex M33. The form-factor is similar to the Argon (Adafruit Feather), but the Photon 2 supports 2.4 GHz and 5 GHz Wi-Fi, BLE, and has much larger RAM and flash that can support larger applications. Included in the kit are sensors used for embedded machine learning inferencing.
It is intended to replace both the Photon and Argon modules. It contains the same module as the P2, making it easier to migrate from a pin-based development module to a SMD mass-production module if desired.
 ### Installing dependencies
To set this device up in Edge Impulse, you will need to install the following software:
1. [Edge Impulse CLI](/tools/clis/edge-impulse-cli/installation)
2. [Particle CLI](https://docs.particle.io/getting-started/developer-tools/cli/)
3. [Particle Workbench](https://docs.particle.io/workbench/) (Optional, only required if deploying to Particle Library)
**Problems installing the CLI?**
See the [Installation and troubleshooting](/tools/clis/edge-impulse-cli/installation) guide.
#### Setup the Particle Photon 2 with the accelerometer and PDM microphone
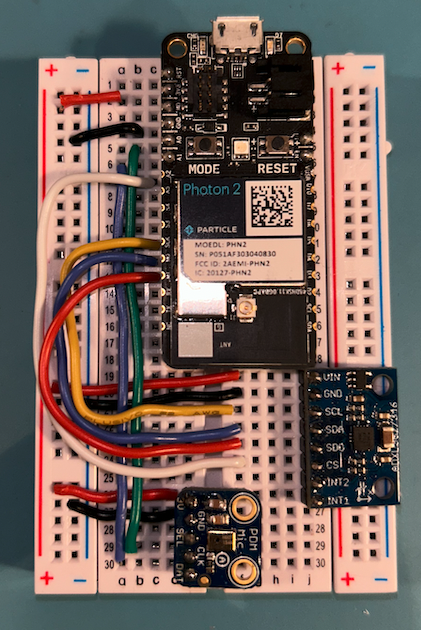
1. Connect the ADXL362 to the Photon 2 as follows:
| ADXL362 | Photon 2 |
| ---------- | ------------- |
| VCC | 3V3 |
| GND | GND |
| CS | D13/A2 |
| SCK | D17 |
| MISO (SDO) | D16 (MISO) |
| MOSI (SDA) | D15 (MOSI) |
| INT1 | not connected |
| INT2 | not connected |
2. Connect the microphone to the Photon 2 as follows:
| PDM Mic | Photon 2 |
| ------- | ------------- |
| VCC | 3V3 |
| GND | GND |
| SEL | Not connected |
| CLK | A0 |
| DAT | A1 |
### Installing dependencies
To set this device up in Edge Impulse, you will need to install the following software:
1. [Edge Impulse CLI](/tools/clis/edge-impulse-cli/installation)
2. [Particle CLI](https://docs.particle.io/getting-started/developer-tools/cli/)
3. [Particle Workbench](https://docs.particle.io/workbench/) (Optional, only required if deploying to Particle Library)
**Problems installing the CLI?**
See the [Installation and troubleshooting](/tools/clis/edge-impulse-cli/installation) guide.
#### Setup the Particle Photon 2 with the accelerometer and PDM microphone
1. Connect the ADXL362 to the Photon 2 as follows:
| ADXL362 | Photon 2 |
| ---------- | ------------- |
| VCC | 3V3 |
| GND | GND |
| CS | D13/A2 |
| SCK | D17 |
| MISO (SDO) | D16 (MISO) |
| MOSI (SDA) | D15 (MOSI) |
| INT1 | not connected |
| INT2 | not connected |
2. Connect the microphone to the Photon 2 as follows:
| PDM Mic | Photon 2 |
| ------- | ------------- |
| VCC | 3V3 |
| GND | GND |
| SEL | Not connected |
| CLK | A0 |
| DAT | A1 |
 3. Plug in the USB Cable to the device
### Connecting to Edge Impulse
Working directly with the device through the Particle Library deployment option involves the use of the Particle Workbench in VS Code, but if you simply want to start gathering data for a project you only need to install the Edge Impulse CLI and flash the following firmware to your device with your sensor(s) connected as described in the section below.
* [Particle Photon2 Firmware](https://cdn.edgeimpulse.com/firmware/particle-photon-2.zip).
Alternatively you can clone the [Particle Firmware](https://github.com/edgeimpulse/firmware-particle) repo and build the firmware locally.
### Deploying back to device
#### Flash a Particle Photon 2 Binary
Flashing your Particle device requires the Particle command line tool. Follow these [instructions](https://docs.particle.io/getting-started/developer-tools/cli/) to install the tools.
Navigate to the directory where your Photon2 firmware downloaded and decompress the zip file. Open a terminal and use the following command to flash your device:
```
particle flash --local firmware-particle.bin
```
#### Collecting Data from the Particle Photon 2
Before starting ingestion create an [Edge Impulse account](https://studio.edgeimpulse.com/signup) if you haven't already. Also, be sure to setup the device per the instructions above.
To collect data from the Photon 2 please follow these steps:
1. Create a new Edge Impulse Studio project, remember the name you create for it.
2. Connect your device to the Edge Impulse studio by running following command in a terminal:
```
edge-impulse-daemon --clean
```
3. After connecting, the Edge Impulse Daemon will ask to login to your account and select the project. Alternatively, you can copy the API Key from the Keys section of your project and use the --api-key flag instead of --clean.
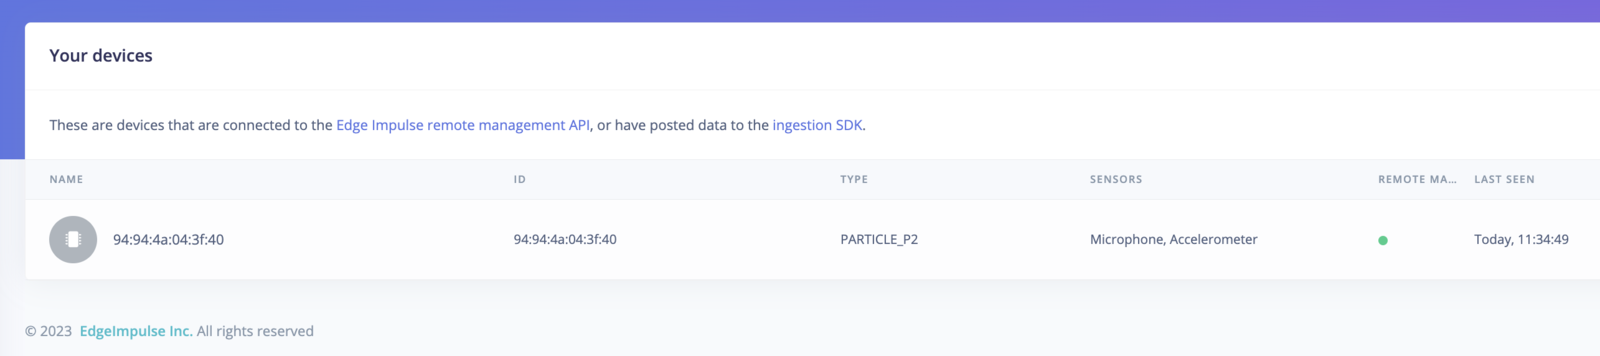
4. Open your Edge Impulse Studio Project and click on **Devices**. Verify that your device is listed here.
3. Plug in the USB Cable to the device
### Connecting to Edge Impulse
Working directly with the device through the Particle Library deployment option involves the use of the Particle Workbench in VS Code, but if you simply want to start gathering data for a project you only need to install the Edge Impulse CLI and flash the following firmware to your device with your sensor(s) connected as described in the section below.
* [Particle Photon2 Firmware](https://cdn.edgeimpulse.com/firmware/particle-photon-2.zip).
Alternatively you can clone the [Particle Firmware](https://github.com/edgeimpulse/firmware-particle) repo and build the firmware locally.
### Deploying back to device
#### Flash a Particle Photon 2 Binary
Flashing your Particle device requires the Particle command line tool. Follow these [instructions](https://docs.particle.io/getting-started/developer-tools/cli/) to install the tools.
Navigate to the directory where your Photon2 firmware downloaded and decompress the zip file. Open a terminal and use the following command to flash your device:
```
particle flash --local firmware-particle.bin
```
#### Collecting Data from the Particle Photon 2
Before starting ingestion create an [Edge Impulse account](https://studio.edgeimpulse.com/signup) if you haven't already. Also, be sure to setup the device per the instructions above.
To collect data from the Photon 2 please follow these steps:
1. Create a new Edge Impulse Studio project, remember the name you create for it.
2. Connect your device to the Edge Impulse studio by running following command in a terminal:
```
edge-impulse-daemon --clean
```
3. After connecting, the Edge Impulse Daemon will ask to login to your account and select the project. Alternatively, you can copy the API Key from the Keys section of your project and use the --api-key flag instead of --clean.
4. Open your Edge Impulse Studio Project and click on **Devices**. Verify that your device is listed here.
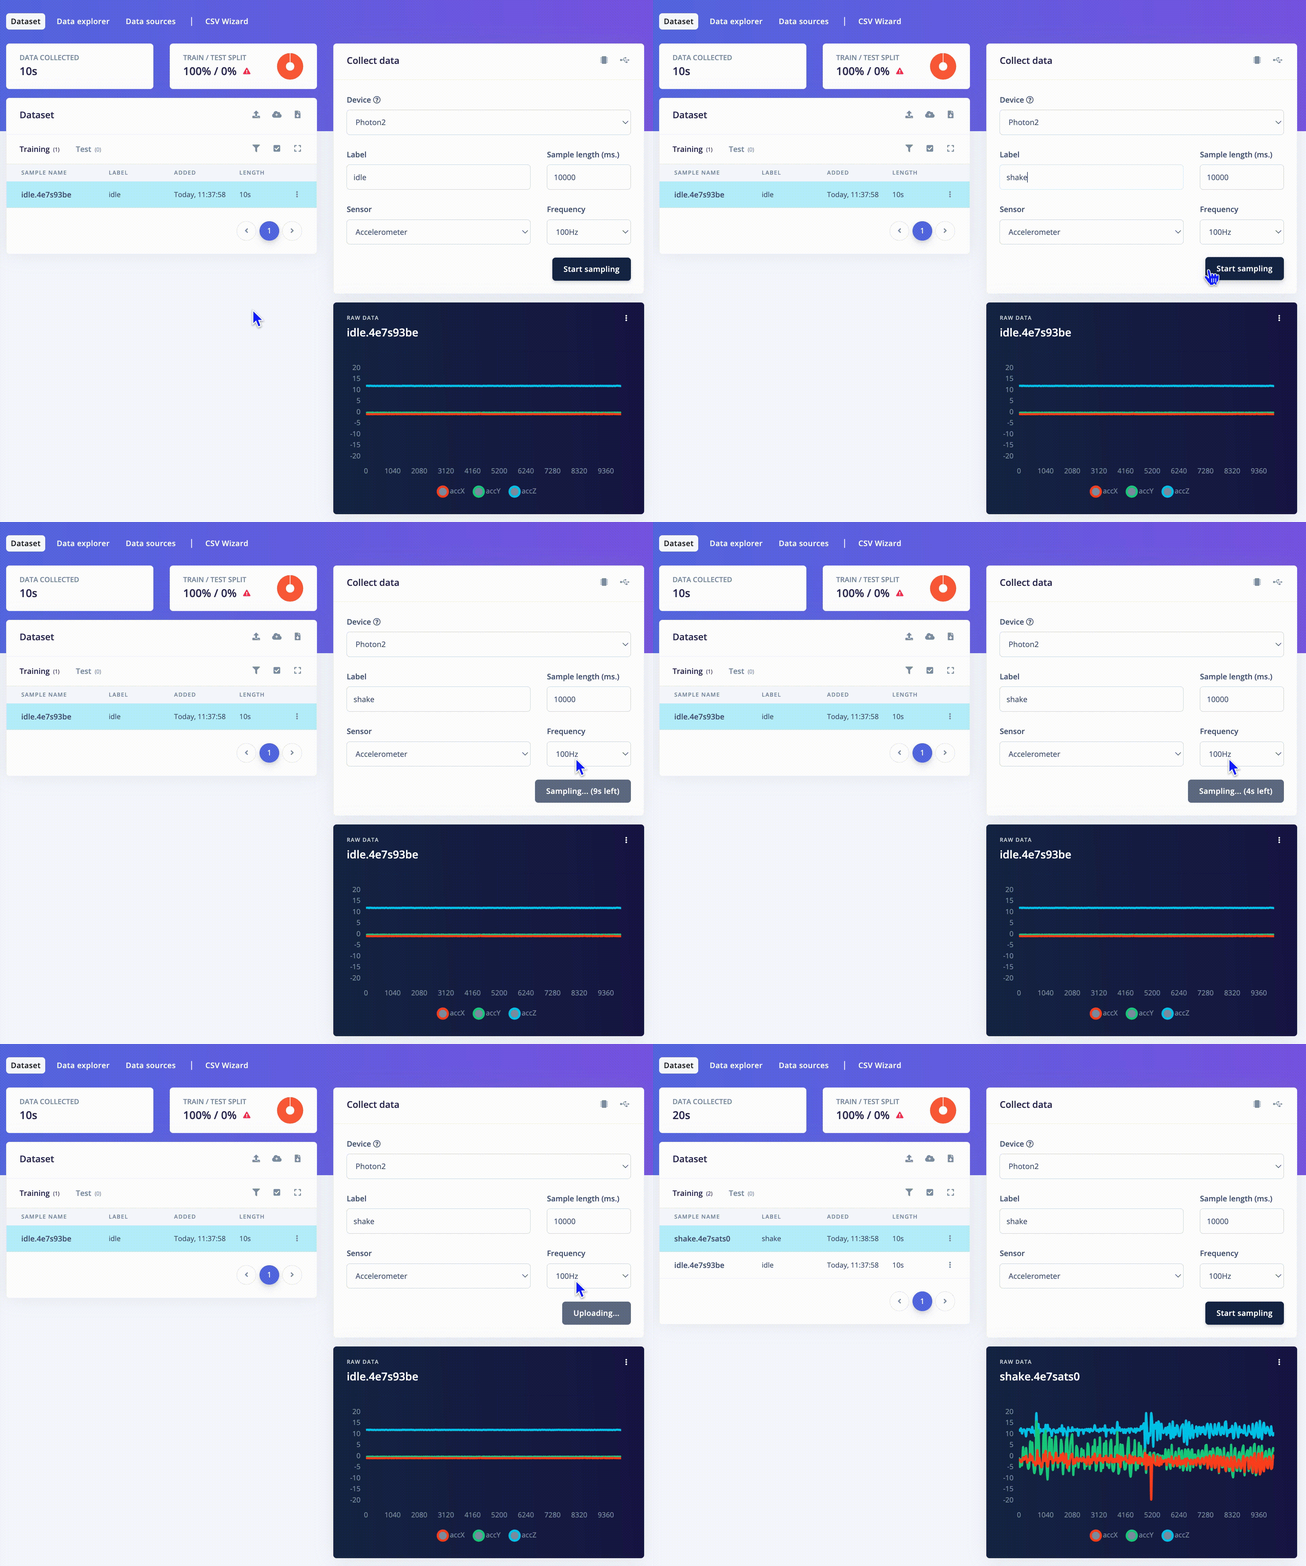
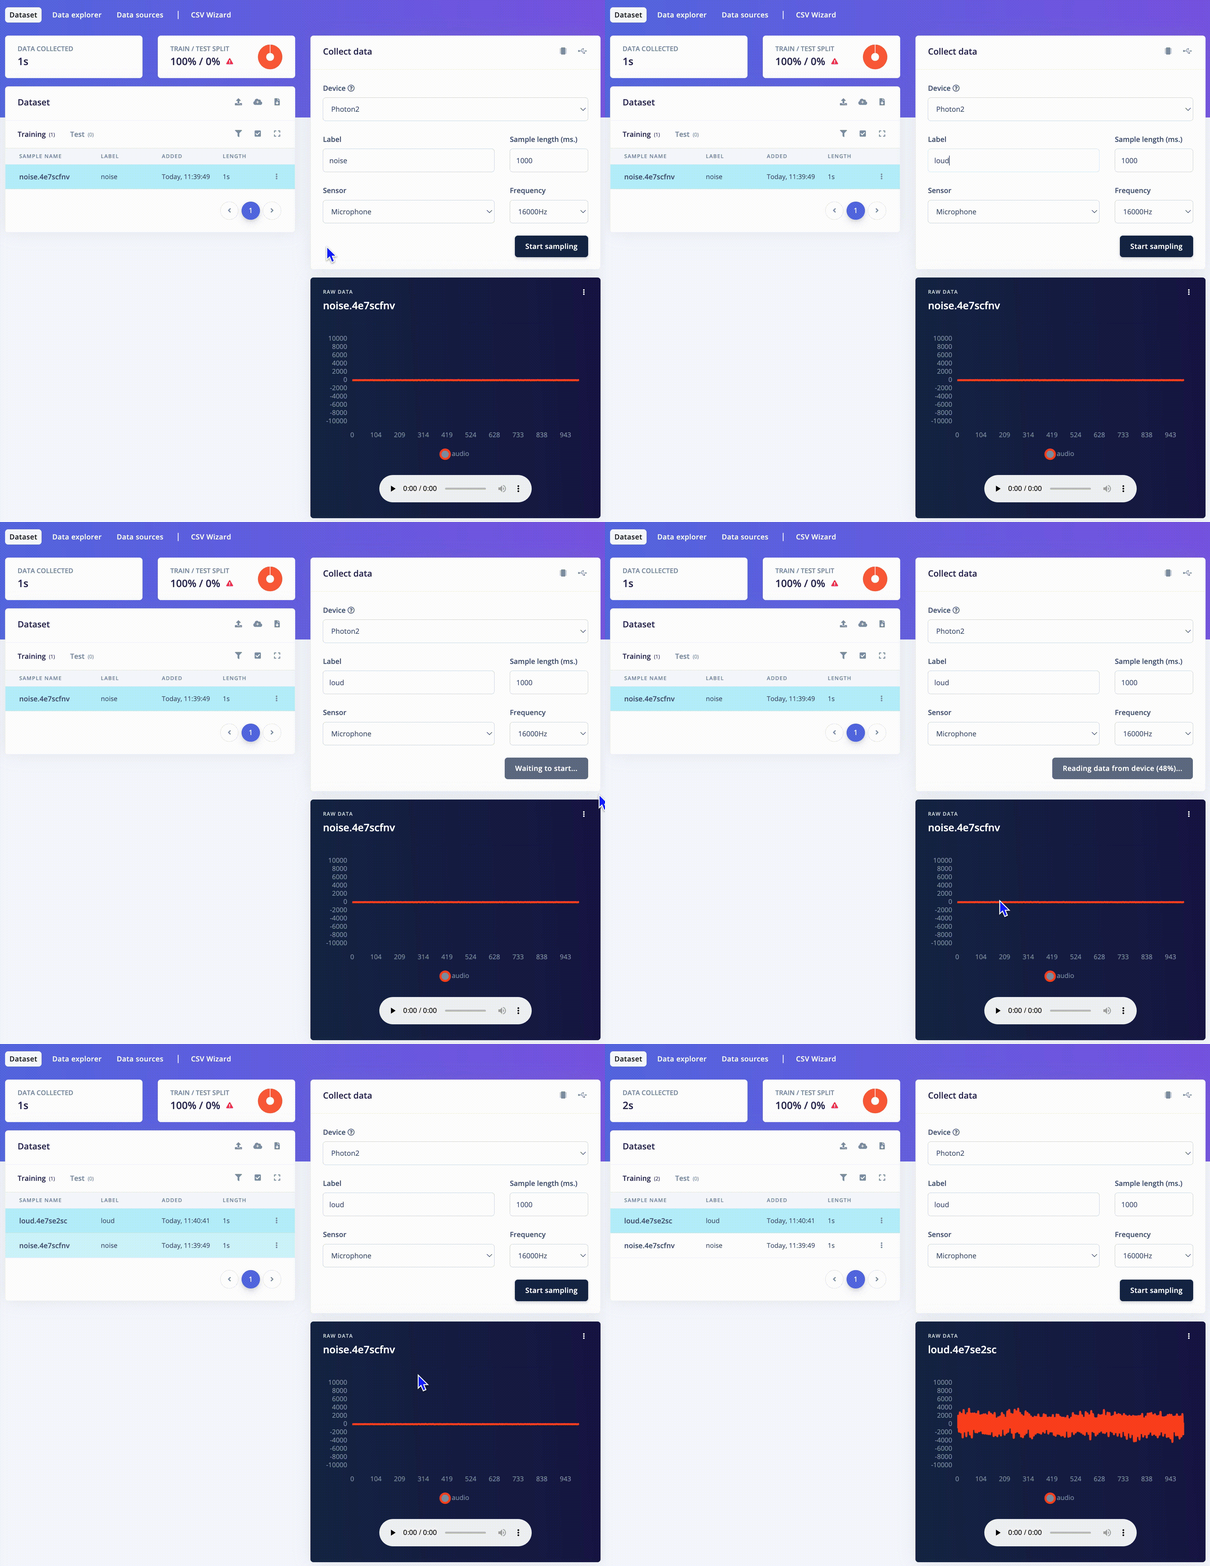
 5. Start gathering data by clicking on **Data acquisition**
 ### Next steps: building a machine learning model
With everything set up you can now build your first machine learning model with these tutorials:
* [Audio Event Detection with Particle Boards](/tutorials/hardware/particle-photon2-audio-even-detection) - [Particle Project: Doorbell SMS](https://docs.particle.io/getting-started/machine-learning/doorbell/)
* [Keyword spotting](/tutorials/end-to-end/keyword-spotting) - [Particle Project: You’re Muted](https://docs.particle.io/getting-started/machine-learning/youre-muted/)
* [Sound recognition](/tutorials/end-to-end/sound-recognition)
* [Recognize gestures from motion](/tutorials/end-to-end/motion-recognition)
* [Particle Energy Monitoring Demo](https://github.com/edgeimpulse/particle-energy-monitor)
Looking to connect different devices or sensors? The [Data forwarder](/tools/clis/edge-impulse-cli/data-forwarder) lets you easily send data from any sensor into Edge Impulse.
#### Advanced Deployment
##### Particle library deployment
If you choose to deploy your project to a Particle Library and not a binary follow these steps to flash the your firmware from Particle Workbench:
1. Open a new VS Code window, ensure that Particle Workbench has been installed (see above)
2. Use [VS Code Command Palette](https://code.visualstudio.com/docs/getstarted/userinterface#_command-palette) and type in **Particle: Import Project**
1. Select the `project.properties` file in the directory that you just downloaded and extracted from the section above.
3. Use [VS Code Command Palette](https://code.visualstudio.com/docs/getstarted/userinterface#_command-palette) and type in **Particle: Configure Project for Device**
1. Select **`deviceOS@5.5.0`**
2. Choose a target. (e.g. **P2** , this option is also used for the Photon 2).
4. It is sometimes needed to manually put your Device into DFU Mode. You may proceed to the next step, but if you get an error indicating that "No DFU capable USB device available" then please follow these step.
1. Hold down both the **RESET** and **MODE** buttons.
2. Release only the **RESET** button, while holding the **MODE** button.
3. Wait for the LED to start flashing yellow.
4. Release the **MODE** button.
5. Compile and Flash in one command with: **Particle: Flash application & DeviceOS (local)**
**Local Compile Only!** You cannot use the **Particle: Cloud Compile** or **Particle: Cloud Flash** options; local compilation is required.
The following video demonstrates how to collect raw data from an accelerometer and develop an application around the Edge Impulse inferencing library with the Photon 2.
#### Data ingestion via Particle webhook
If you would like to use the Particle webhook to send training data from your particle board directly to Edge Impulse, or indeed any other of our apis follow these steps:
1. **Access Particle Console**:
* Visit [Particle Console](https://console.particle.io).
* Log in with your Particle account credentials.
2. **Navigate to Integrations**:
* Click on the "Integrations" tab in the left-hand menu.
* Select "Webhooks" from the available options.
3. **Create a New Webhook**:
* Click "New Integration".
* Choose "Webhook".
4. **Webhook Configuration**:
* **Name**: Assign a descriptive name to your webhook.
* **Event Name**: Specify the event name that triggers the webhook (e.g., "edge/ingest").
* **URL**: Set this to the Edge Impulse ingestion API URL, typically something like `https://ingestion.edgeimpulse.com/api/training/data`.
* **Request Type**: Choose "POST".
* **Request Format**: Select "Custom".
5. **Custom Request Body**:
* Input the JSON structure required by Edge Impulse. This will vary based on your project's data schema.
6. **HTTP Headers**:
* Add necessary headers:
* `x-api-key`: Your Edge Impulse API key.
* `Content-Type`: "application/json".
* `x-file-name`: Use a dynamic data field like `{{PARTICLE_EVENT_NAME}}`.
7. **Advanced Settings**:
* **Response Topic**: Create a custom topic for webhook responses, e.g., `{{PARTICLE_DEVICE_ID}}/hook-response/{{PARTICLE_EVENT_NAME}}`.
* **Enforce SSL**: Choose "Yes" for secure transmission.
8. **Save the Webhook**:
* After entering all details, click "Save".
9. **Test the Webhook**:
* Use example device firmware to trigger the webhook.
* Observe the responses in the Particle Console.
10. **Debugging**:
* If errors occur, review the logs for detailed information.
* Ensure payload format aligns with Edge Impulse requirements.
* Verify the accuracy of your API key and other details.
#### Custom Template Example
If you have any trouble with the config you can copy and paste the following into the Custom Template section of the webhook:
```json theme={"system"}
{
"name": "edgeimpulse.com",
"event": "edge/ingest",
"responseTopic": "",
"disabled": true,
"url": "http://ingestion.edgeimpulse.com/api/training/data",
"requestType": "POST",
"noDefaults": true,
"rejectUnauthorized": false,
"headers": {
"x-api-key": "ei_1855db...",
"x-file-name": "{{PARTICLE_EVENT_NAME}}",
"x-label": "coffee"
},
"json": "{\n \"payload\": {\n \"device_name\": \"0a10a...\",\n \"device_type\": \"photon2\",\n \"interval_ms\": 20,\n \"sensors\": [\n {\n \"name\": \"volt\",\n \"units\": \"V\"\n },\n {\n \"name\": \"curr\",\n \"units\": \"A\"\n }\n ],\n \"values\": [\n{{{PARTICLE_EVENT_VALUE}}}\n ]\n },\n \"protected\": {\n \"alg\": \"none\",\n \"ver\": \"v1\"\n },\n \"signature\": \"00\"\n}"
}
```
#### Lifecycle management and OTA (over-the-air) updates
The Photon 2 is capable of OTA and updating to the latest model in your Edge Impulse project. [Follow this example that shows how to deploy updated impulses over-the-air (OTA) using the Particle Workbench](/tutorials/topics/lifecycle-management/ota-particle-workbench).
### Troubleshooting
Should you have any issues with your Particle device please review [Particle's Support & Troubleshooting](https://docs.particle.io/troubleshooting/troubleshooting/) page.
If you have issues with [Edge Impulse please reach out](https://edgeimpulse.com/contact)!
### Next steps: building a machine learning model
With everything set up you can now build your first machine learning model with these tutorials:
* [Audio Event Detection with Particle Boards](/tutorials/hardware/particle-photon2-audio-even-detection) - [Particle Project: Doorbell SMS](https://docs.particle.io/getting-started/machine-learning/doorbell/)
* [Keyword spotting](/tutorials/end-to-end/keyword-spotting) - [Particle Project: You’re Muted](https://docs.particle.io/getting-started/machine-learning/youre-muted/)
* [Sound recognition](/tutorials/end-to-end/sound-recognition)
* [Recognize gestures from motion](/tutorials/end-to-end/motion-recognition)
* [Particle Energy Monitoring Demo](https://github.com/edgeimpulse/particle-energy-monitor)
Looking to connect different devices or sensors? The [Data forwarder](/tools/clis/edge-impulse-cli/data-forwarder) lets you easily send data from any sensor into Edge Impulse.
#### Advanced Deployment
##### Particle library deployment
If you choose to deploy your project to a Particle Library and not a binary follow these steps to flash the your firmware from Particle Workbench:
1. Open a new VS Code window, ensure that Particle Workbench has been installed (see above)
2. Use [VS Code Command Palette](https://code.visualstudio.com/docs/getstarted/userinterface#_command-palette) and type in **Particle: Import Project**
1. Select the `project.properties` file in the directory that you just downloaded and extracted from the section above.
3. Use [VS Code Command Palette](https://code.visualstudio.com/docs/getstarted/userinterface#_command-palette) and type in **Particle: Configure Project for Device**
1. Select **`deviceOS@5.5.0`**
2. Choose a target. (e.g. **P2** , this option is also used for the Photon 2).
4. It is sometimes needed to manually put your Device into DFU Mode. You may proceed to the next step, but if you get an error indicating that "No DFU capable USB device available" then please follow these step.
1. Hold down both the **RESET** and **MODE** buttons.
2. Release only the **RESET** button, while holding the **MODE** button.
3. Wait for the LED to start flashing yellow.
4. Release the **MODE** button.
5. Compile and Flash in one command with: **Particle: Flash application & DeviceOS (local)**
**Local Compile Only!** You cannot use the **Particle: Cloud Compile** or **Particle: Cloud Flash** options; local compilation is required.
The following video demonstrates how to collect raw data from an accelerometer and develop an application around the Edge Impulse inferencing library with the Photon 2.
#### Data ingestion via Particle webhook
If you would like to use the Particle webhook to send training data from your particle board directly to Edge Impulse, or indeed any other of our apis follow these steps:
1. **Access Particle Console**:
* Visit [Particle Console](https://console.particle.io).
* Log in with your Particle account credentials.
2. **Navigate to Integrations**:
* Click on the "Integrations" tab in the left-hand menu.
* Select "Webhooks" from the available options.
3. **Create a New Webhook**:
* Click "New Integration".
* Choose "Webhook".
4. **Webhook Configuration**:
* **Name**: Assign a descriptive name to your webhook.
* **Event Name**: Specify the event name that triggers the webhook (e.g., "edge/ingest").
* **URL**: Set this to the Edge Impulse ingestion API URL, typically something like `https://ingestion.edgeimpulse.com/api/training/data`.
* **Request Type**: Choose "POST".
* **Request Format**: Select "Custom".
5. **Custom Request Body**:
* Input the JSON structure required by Edge Impulse. This will vary based on your project's data schema.
6. **HTTP Headers**:
* Add necessary headers:
* `x-api-key`: Your Edge Impulse API key.
* `Content-Type`: "application/json".
* `x-file-name`: Use a dynamic data field like `{{PARTICLE_EVENT_NAME}}`.
7. **Advanced Settings**:
* **Response Topic**: Create a custom topic for webhook responses, e.g., `{{PARTICLE_DEVICE_ID}}/hook-response/{{PARTICLE_EVENT_NAME}}`.
* **Enforce SSL**: Choose "Yes" for secure transmission.
8. **Save the Webhook**:
* After entering all details, click "Save".
9. **Test the Webhook**:
* Use example device firmware to trigger the webhook.
* Observe the responses in the Particle Console.
10. **Debugging**:
* If errors occur, review the logs for detailed information.
* Ensure payload format aligns with Edge Impulse requirements.
* Verify the accuracy of your API key and other details.
#### Custom Template Example
If you have any trouble with the config you can copy and paste the following into the Custom Template section of the webhook:
```json theme={"system"}
{
"name": "edgeimpulse.com",
"event": "edge/ingest",
"responseTopic": "",
"disabled": true,
"url": "http://ingestion.edgeimpulse.com/api/training/data",
"requestType": "POST",
"noDefaults": true,
"rejectUnauthorized": false,
"headers": {
"x-api-key": "ei_1855db...",
"x-file-name": "{{PARTICLE_EVENT_NAME}}",
"x-label": "coffee"
},
"json": "{\n \"payload\": {\n \"device_name\": \"0a10a...\",\n \"device_type\": \"photon2\",\n \"interval_ms\": 20,\n \"sensors\": [\n {\n \"name\": \"volt\",\n \"units\": \"V\"\n },\n {\n \"name\": \"curr\",\n \"units\": \"A\"\n }\n ],\n \"values\": [\n{{{PARTICLE_EVENT_VALUE}}}\n ]\n },\n \"protected\": {\n \"alg\": \"none\",\n \"ver\": \"v1\"\n },\n \"signature\": \"00\"\n}"
}
```
#### Lifecycle management and OTA (over-the-air) updates
The Photon 2 is capable of OTA and updating to the latest model in your Edge Impulse project. [Follow this example that shows how to deploy updated impulses over-the-air (OTA) using the Particle Workbench](/tutorials/topics/lifecycle-management/ota-particle-workbench).
### Troubleshooting
Should you have any issues with your Particle device please review [Particle's Support & Troubleshooting](https://docs.particle.io/troubleshooting/troubleshooting/) page.
If you have issues with [Edge Impulse please reach out](https://edgeimpulse.com/contact)!