> ## Documentation Index
> Fetch the complete documentation index at: https://docs.edgeimpulse.com/llms.txt
> Use this file to discover all available pages before exploring further.
# Nordic Semi nRF54LM20 DK
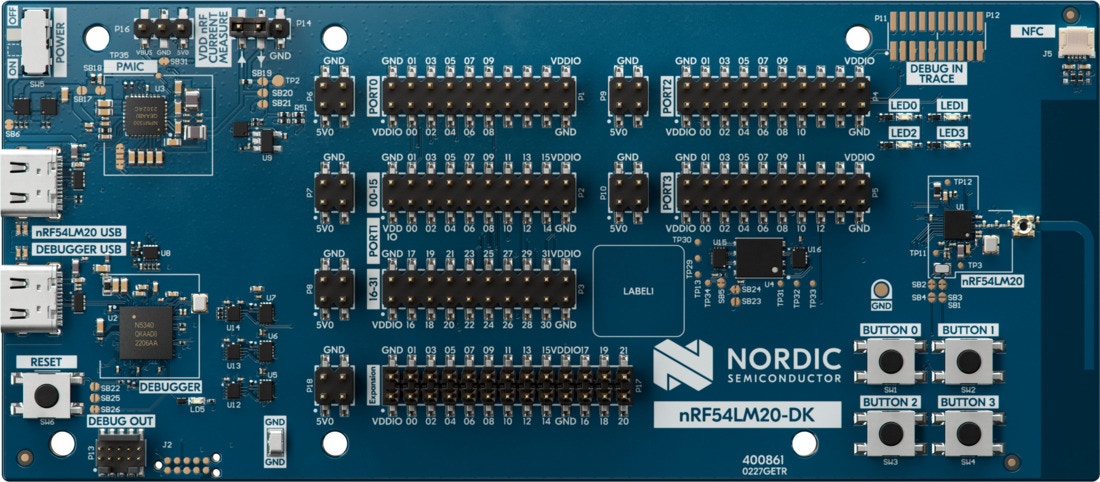
The Nordic Semiconductor nRF54LM20 DK is a development board based on the nRF54LM20 SoC. This is the first Edge Impulse-supported Nordic development board family with an integrated **Nordic Axon** NPU, enabling hardware-accelerated inference for supported models.
The nRF54LM20 DK is supported by Edge Impulse. You can collect sensor data, build and train machine learning models, and deploy them from Edge Impulse Studio.
This devkit does not include onboard sensors, so we recommend connecting it to a [X-NUCLEO-IKS02A1](https://www.st.com/en/ecosystems/x-nucleo-iks02a1.html) shield for accelerometer input.
> **Note:** This devkit does not support stacking the shield directly. You’ll need to manually wire the IKS02A1 shield to the DK.
If you prefer a different sensor, you can also use the [Data forwarder](/tools/clis/edge-impulse-cli/data-forwarder), or modify the example firmware (built with nRF Connect SDK and Zephyr RTOS) to support any Zephyr-compatible accelerometers.
For SoC details, see Nordic’s product page: [nRF54LM20B](https://www.nordicsemi.com/Products/nRF54LM20B).
 ### Connecting to Edge Impulse
#### Wiring the IKS02A1 MEMS sensor shield
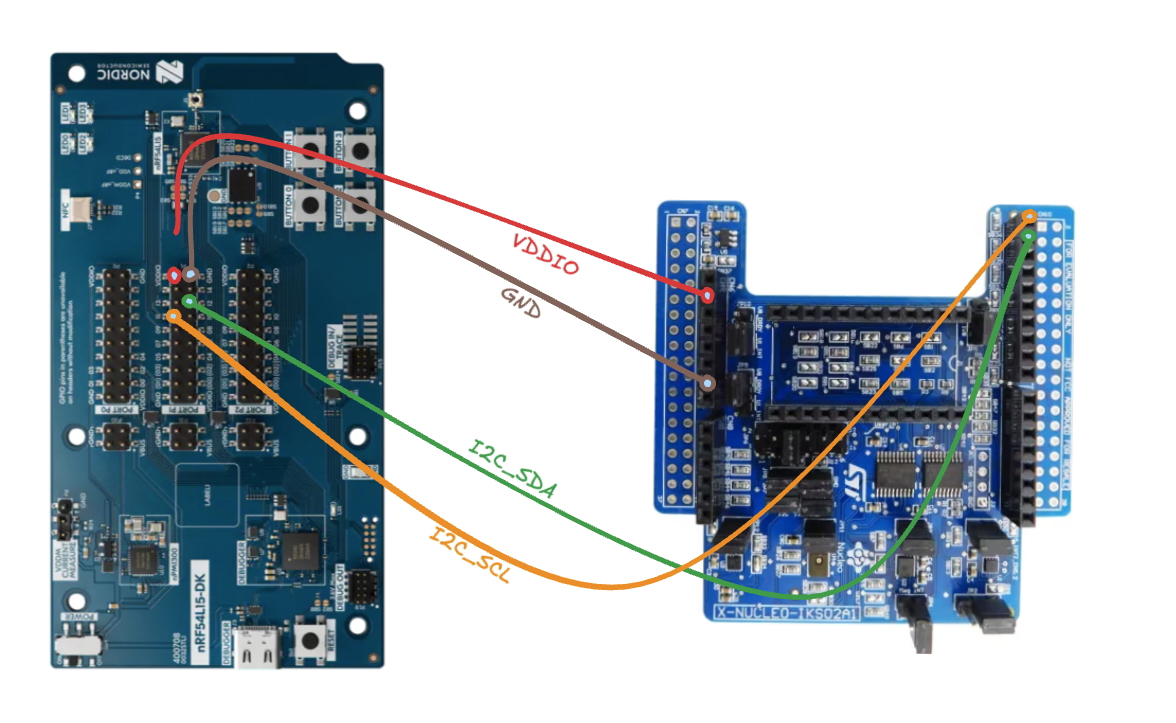
The nRF54LM20 DK does not support direct stacking with the IKS02A1 shield. You must wire it manually.
Use the following connections (select an I2C `SDA`/`SCL` pair that is available on your nRF54LM20 DK header and matches your firmware configuration):
| nRF54LM20 DK | IKS02A1 Pin | Description |
| ------------ | ----------- | ----------- |
| VDDIO (1.8V) | VIO | Power |
| GND | GND | Ground |
| I2C SDA | SDA | I2C data |
| I2C SCL | SCL | I2C clock |
### Connecting to Edge Impulse
#### Wiring the IKS02A1 MEMS sensor shield
The nRF54LM20 DK does not support direct stacking with the IKS02A1 shield. You must wire it manually.
Use the following connections (select an I2C `SDA`/`SCL` pair that is available on your nRF54LM20 DK header and matches your firmware configuration):
| nRF54LM20 DK | IKS02A1 Pin | Description |
| ------------ | ----------- | ----------- |
| VDDIO (1.8V) | VIO | Power |
| GND | GND | Ground |
| I2C SDA | SDA | I2C data |
| I2C SCL | SCL | I2C clock |
 #### 1. Connect the development board to your computer
Use a USB cable to connect the board to your computer.
#### 2. Download the latest Edge Impulse firmware
Download the latest [Edge Impulse Nordic Semi nRF54LM20 DK firmware](https://cdn.edgeimpulse.com/firmware/nrf54lm20-dk.zip).
#### 3. Flash the Edge Impulse firmware
1. Connect the board over USB and ensure it appears as a JLINK USB device.
2. Install and open the [nRF Connect for Desktop](https://www.nordicsemi.com/Products/Development-tools/nRF-Connect-for-Desktop) and open the Programmer application.
3. Drag and drop the `nrf54lm20-dk-full.hex` firmware from the downloaded zip into the Programmer application.
4. Click **Erase & Write** and wait for the device to boot.
#### 4. Link the device to your Edge Impulse project
Open a terminal and run:
```bash theme={"system"}
edge-impulse-daemon
```
Log in when prompted and select your Edge Impulse project.
You may be asked to select a UART interface. Choose a SEGGER option:
```
? Which device do you want to connect to?
❯ /dev/tty.usbmodemXXXXXX (SEGGER)
/dev/tty.usbmodemXXXXXX (SEGGER)
```
### Deploying with Nordic Axon (nRF54LM20)
For this device family, Edge Impulse supports multiple deployment artifacts depending on how you want to run your model:
* **Nordic Axon NPU library:** A zip with source files containing the Axon compiler output to run your model on Nordic Axon-enabled devices.
* **Nordic Axon Linux CLI:** A Linux binary containing both the Axon compiler output and a CLI to run the model on a simulator.
* **Nordic nRF54LM20 DK:** A firmware binary containing both the Edge Impulse data acquisition client and your full impulse.
#### Integrating the Nordic Axon NPU library (Zephyr/CMake)
1. Extract the deployment zip into a folder in your application (e.g. `ei-model` at the root of your project).
2. Ensure your `CMakeLists.txt` contains the following lines:
```cmake theme={"system"}
set(EXTRA_CONF_FILE
./ei-model/conf_overlay.conf
)
add_subdirectory(ei-model/edge-impulse-sdk/cmake/zephyr)
target_include_directories(app PRIVATE ei-model)
zephyr_include_directories(ei-model/nordic-axon-model)
```
The example above assumes the generated model files are in `ei-model/nordic-axon-model`. Adjust the paths as necessary based on where you copied the files.
### Next steps: build your ML model
Now that you're connected:
* [Build a continuous motion recognition system](/tutorials/end-to-end/motion-recognition)
* [Recognize sounds from audio](/tutorials/end-to-end/sound-recognition)
* [Detect keywords in speech](/tutorials/end-to-end/keyword-spotting)
Looking to use other sensors? Use the [Data forwarder](/tools/clis/edge-impulse-cli/data-forwarder) to stream data from any microcontroller or sensor.
#### 1. Connect the development board to your computer
Use a USB cable to connect the board to your computer.
#### 2. Download the latest Edge Impulse firmware
Download the latest [Edge Impulse Nordic Semi nRF54LM20 DK firmware](https://cdn.edgeimpulse.com/firmware/nrf54lm20-dk.zip).
#### 3. Flash the Edge Impulse firmware
1. Connect the board over USB and ensure it appears as a JLINK USB device.
2. Install and open the [nRF Connect for Desktop](https://www.nordicsemi.com/Products/Development-tools/nRF-Connect-for-Desktop) and open the Programmer application.
3. Drag and drop the `nrf54lm20-dk-full.hex` firmware from the downloaded zip into the Programmer application.
4. Click **Erase & Write** and wait for the device to boot.
#### 4. Link the device to your Edge Impulse project
Open a terminal and run:
```bash theme={"system"}
edge-impulse-daemon
```
Log in when prompted and select your Edge Impulse project.
You may be asked to select a UART interface. Choose a SEGGER option:
```
? Which device do you want to connect to?
❯ /dev/tty.usbmodemXXXXXX (SEGGER)
/dev/tty.usbmodemXXXXXX (SEGGER)
```
### Deploying with Nordic Axon (nRF54LM20)
For this device family, Edge Impulse supports multiple deployment artifacts depending on how you want to run your model:
* **Nordic Axon NPU library:** A zip with source files containing the Axon compiler output to run your model on Nordic Axon-enabled devices.
* **Nordic Axon Linux CLI:** A Linux binary containing both the Axon compiler output and a CLI to run the model on a simulator.
* **Nordic nRF54LM20 DK:** A firmware binary containing both the Edge Impulse data acquisition client and your full impulse.
#### Integrating the Nordic Axon NPU library (Zephyr/CMake)
1. Extract the deployment zip into a folder in your application (e.g. `ei-model` at the root of your project).
2. Ensure your `CMakeLists.txt` contains the following lines:
```cmake theme={"system"}
set(EXTRA_CONF_FILE
./ei-model/conf_overlay.conf
)
add_subdirectory(ei-model/edge-impulse-sdk/cmake/zephyr)
target_include_directories(app PRIVATE ei-model)
zephyr_include_directories(ei-model/nordic-axon-model)
```
The example above assumes the generated model files are in `ei-model/nordic-axon-model`. Adjust the paths as necessary based on where you copied the files.
### Next steps: build your ML model
Now that you're connected:
* [Build a continuous motion recognition system](/tutorials/end-to-end/motion-recognition)
* [Recognize sounds from audio](/tutorials/end-to-end/sound-recognition)
* [Detect keywords in speech](/tutorials/end-to-end/keyword-spotting)
Looking to use other sensors? Use the [Data forwarder](/tools/clis/edge-impulse-cli/data-forwarder) to stream data from any microcontroller or sensor.