> ## Documentation Index
> Fetch the complete documentation index at: https://docs.edgeimpulse.com/llms.txt
> Use this file to discover all available pages before exploring further.
# Nordic Semi nRF52840 DK
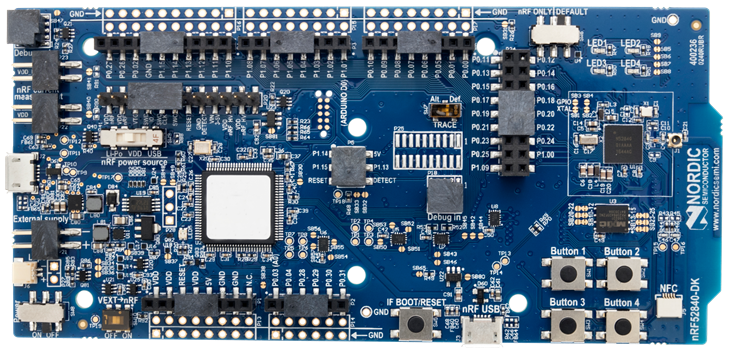
The Nordic Semiconductor nRF52840 DK is a development board with a Cortex-M4 microcontroller, QSPI flash, and an integrated BLE radio - and it's fully supported by Edge Impulse. You'll be able to sample raw data, build models, and deploy trained machine learning models directly from the studio. As the nRF52840 DK does not have any built-in sensors we recommend you to pair this development board with the [X-NUCLEO-IKS02A1](https://www.st.com/en/ecosystems/x-nucleo-iks02a1.html) shield (with a MEMS accelerometer and a MEMS microphone).
If you don't have the X-NUCLEO-IKS02A1 shield you can use the [Data forwarder](/tools/clis/edge-impulse-cli/data-forwarder) to capture data from any other sensor, and then follow the [Run on Zephyr-based Nordic Semiconductor development boards](/hardware/deployments/run-cpp-zephyr-nordic) tutorial to run your impulse. Or, you can modify the example firmware (based on nRF Connect) to interact with other accelerometers or PDM microphones that are supported by Zephyr.
The Edge Impulse firmware for this development board is open source and hosted on GitHub: [edgeimpulse/firmware-nrf52840-5340](https://github.com/edgeimpulse/firmware-nrf52840-5340).
 ### Installing dependencies
To set this device up in Edge Impulse, you will need to install the following software:
1. [Edge Impulse CLI](/tools/clis/edge-impulse-cli/installation).
2. On Linux:
* GNU Screen: install for example via `sudo apt install screen`.
**Problems installing the CLI?**
See the [Installation and troubleshooting](/tools/clis/edge-impulse-cli/installation) guide.
### Connecting to Edge Impulse
With all the software in place it's time to connect the development board to Edge Impulse.
#### 1. Plugging in the X-NUCLEO-IKS02A1 MEMS expansion shield
Remove the pin header protectors on the nRF52840 DK and plug the X-NUCLEO-IKS02A1 shield into the development board.
### Installing dependencies
To set this device up in Edge Impulse, you will need to install the following software:
1. [Edge Impulse CLI](/tools/clis/edge-impulse-cli/installation).
2. On Linux:
* GNU Screen: install for example via `sudo apt install screen`.
**Problems installing the CLI?**
See the [Installation and troubleshooting](/tools/clis/edge-impulse-cli/installation) guide.
### Connecting to Edge Impulse
With all the software in place it's time to connect the development board to Edge Impulse.
#### 1. Plugging in the X-NUCLEO-IKS02A1 MEMS expansion shield
Remove the pin header protectors on the nRF52840 DK and plug the X-NUCLEO-IKS02A1 shield into the development board.
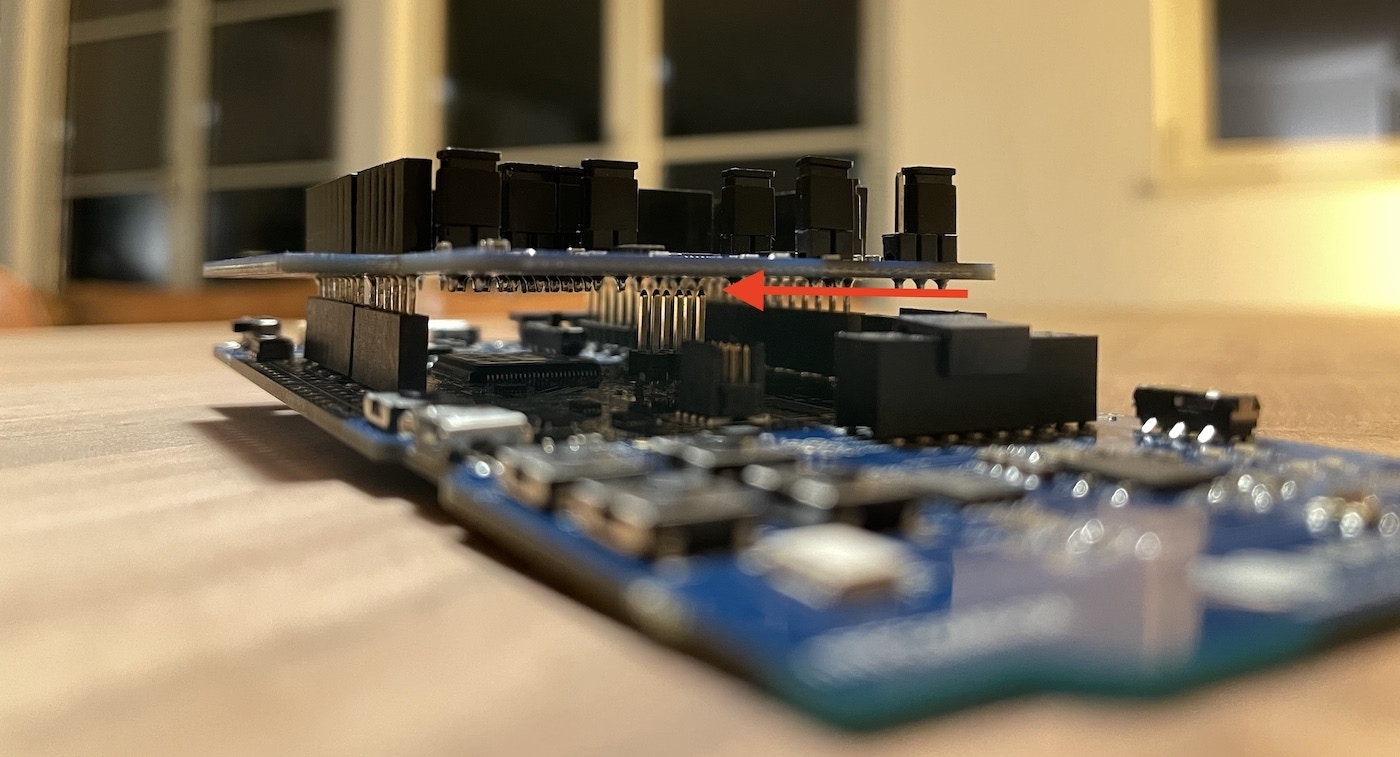
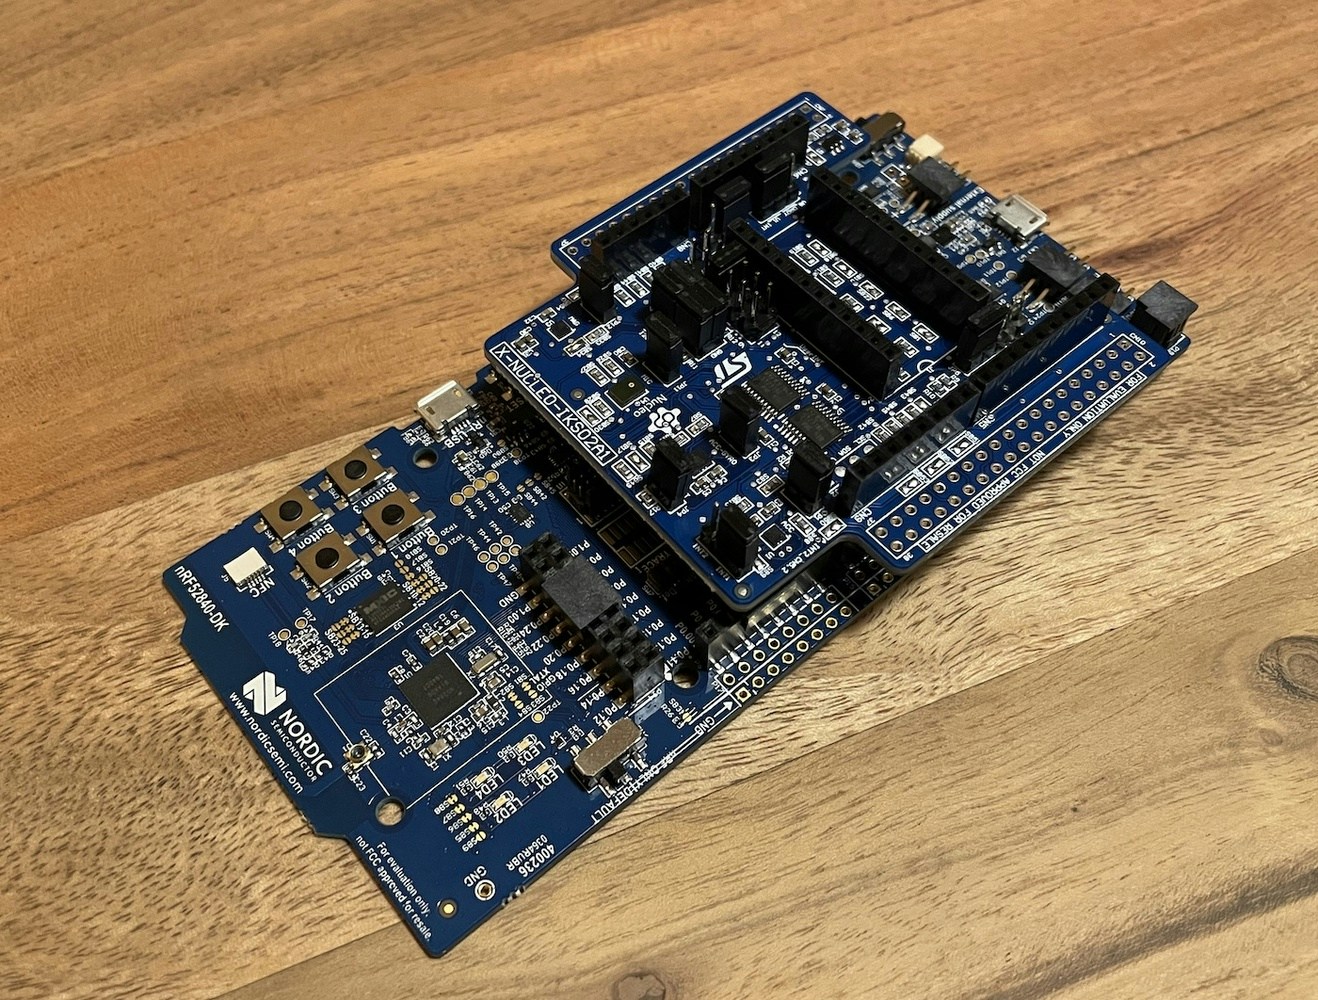 **Note:** Make sure that the shield does not touch any of the pins in the middle of the development board. This might cause issues when flashing the board or running applications.
 #### 2. Connect the development board to your computer
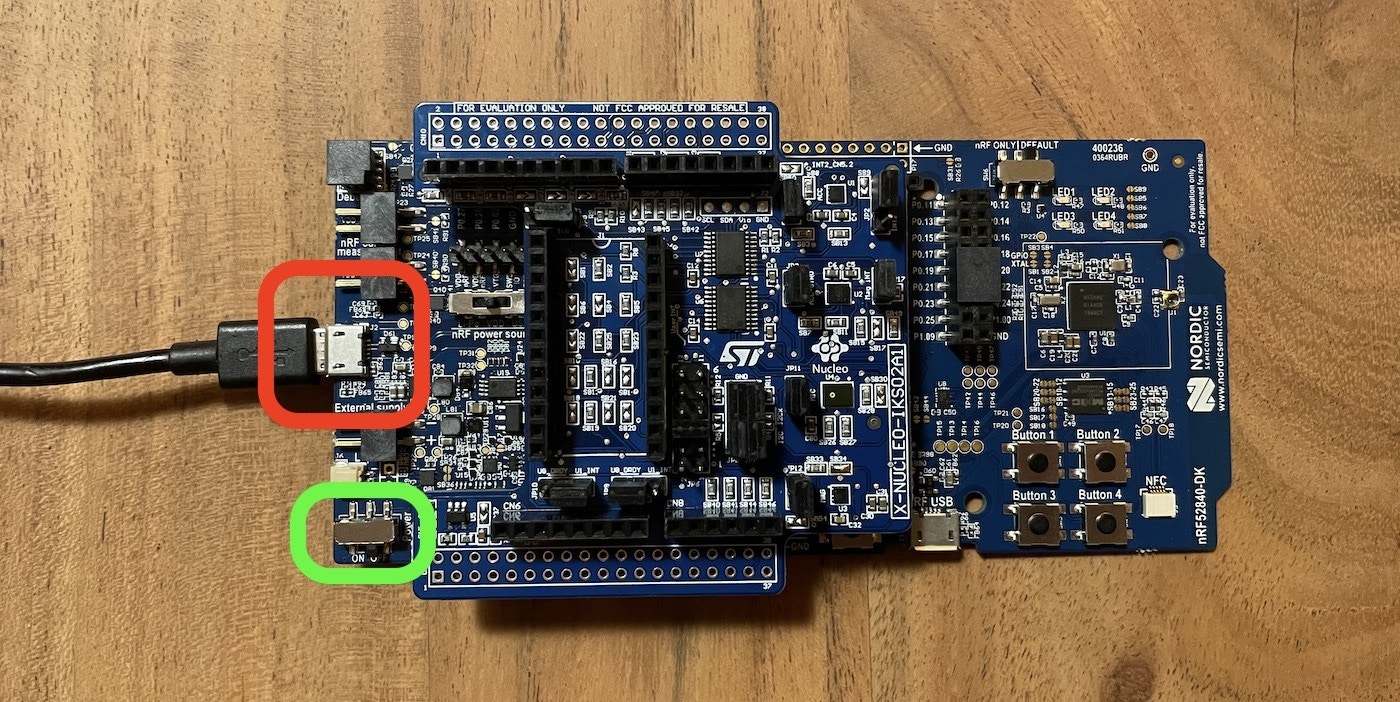
Use a micro-USB cable to connect the development board to your computer. There are two USB ports on the development board, use the one on the *short* side of the board. Then, set the power switch to 'on'.
#### 2. Connect the development board to your computer
Use a micro-USB cable to connect the development board to your computer. There are two USB ports on the development board, use the one on the *short* side of the board. Then, set the power switch to 'on'.
 #### 3. Update the firmware
The development board does not come with the right firmware yet. To update the firmware:
1. The development board is mounted as a USB mass-storage device (like a USB flash drive), with the name `JLINK`. Make sure you can see this drive.
* If this is not the case, see [No JLINK drive](/hardware/boards/nordic-semi-nrf52840-dk#no-jlink-drive) at the bottom of this page.
2. [Download the latest Edge Impulse firmware](https://cdn.edgeimpulse.com/firmware/nrf52840-dk.zip).
3. Drag the `nrf52840-dk.bin` file to the `JLINK` drive.
4. Wait 20 seconds and press the **BOOT/RESET** button.
#### 4. Setting keys
From a command prompt or terminal, run:
```
edge-impulse-daemon
```
This will start a wizard which will ask you to log in and choose an Edge Impulse project. If you want to switch projects run the command with `--clean`.
Alternatively, recent versions of Google Chrome and Microsoft Edge can collect data directly from your development board, without the need for the Edge Impulse CLI. See [this blog post](https://edgeimpulse.com/blog/collect-sensor-data-straight-from-your-web-browser) for more information.
#### 5. Verifying that the device is connected
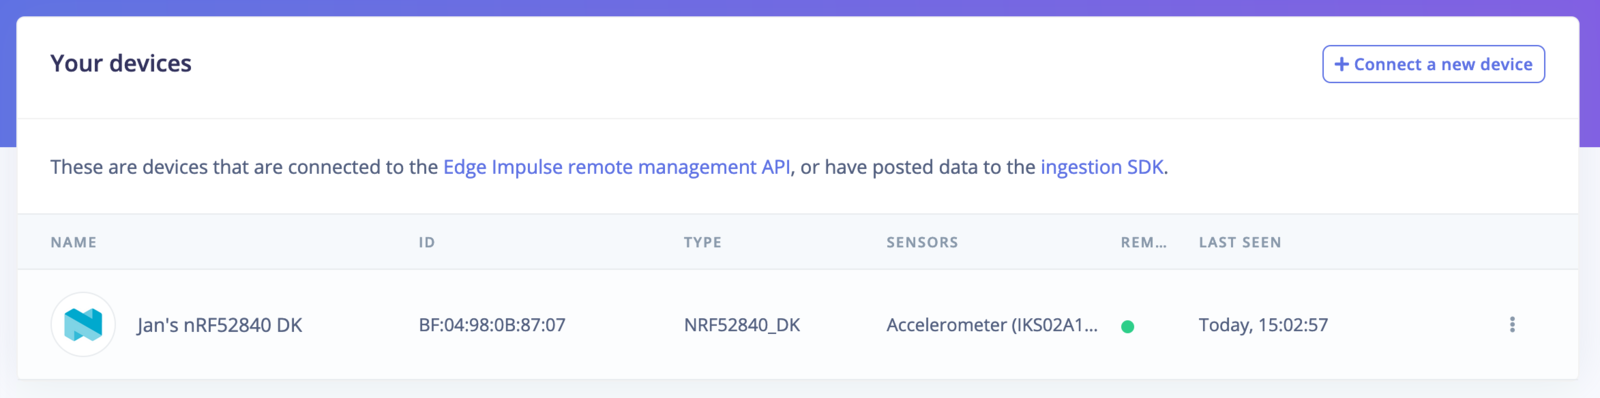
That's all! Your device is now connected to Edge Impulse. To verify this, go to [your Edge Impulse project](https://studio.edgeimpulse.com/studio/profile/projects), and click **Devices**. The device will be listed here.
#### 3. Update the firmware
The development board does not come with the right firmware yet. To update the firmware:
1. The development board is mounted as a USB mass-storage device (like a USB flash drive), with the name `JLINK`. Make sure you can see this drive.
* If this is not the case, see [No JLINK drive](/hardware/boards/nordic-semi-nrf52840-dk#no-jlink-drive) at the bottom of this page.
2. [Download the latest Edge Impulse firmware](https://cdn.edgeimpulse.com/firmware/nrf52840-dk.zip).
3. Drag the `nrf52840-dk.bin` file to the `JLINK` drive.
4. Wait 20 seconds and press the **BOOT/RESET** button.
#### 4. Setting keys
From a command prompt or terminal, run:
```
edge-impulse-daemon
```
This will start a wizard which will ask you to log in and choose an Edge Impulse project. If you want to switch projects run the command with `--clean`.
Alternatively, recent versions of Google Chrome and Microsoft Edge can collect data directly from your development board, without the need for the Edge Impulse CLI. See [this blog post](https://edgeimpulse.com/blog/collect-sensor-data-straight-from-your-web-browser) for more information.
#### 5. Verifying that the device is connected
That's all! Your device is now connected to Edge Impulse. To verify this, go to [your Edge Impulse project](https://studio.edgeimpulse.com/studio/profile/projects), and click **Devices**. The device will be listed here.
 ### Next steps: building a machine learning model
With everything set up you can now build your first machine learning model with these tutorials:
* [Building a continuous motion recognition system](/tutorials/end-to-end/motion-recognition).
* [Recognizing sounds from audio](/tutorials/end-to-end/sound-recognition).
* [Keyword spotting](/tutorials/end-to-end/keyword-spotting).
*
Looking to connect different sensors? The [Data forwarder](/tools/clis/edge-impulse-cli/data-forwarder) lets you easily send data from any sensor into Edge Impulse.
### Troubleshooting
#### No JLINK drive
If you don't see the `JLINK` drive show up when you connect your nRF52840 DK you'll have to update the interface firmware.
1. Set the power switch to 'off'.
2. Hold **BOOT/RESET** while you set the power switch to 'on'.
3. Your development board should be mounted as `BOOTLOADER`.
4. Download the latest [Interface MCU firmware](https://www.nordicsemi.com/Software-and-Tools/Development-Kits/nRF52840-DK/Download#infotabs) and drag the `.bin` file onto the `BOOTLOADER` drive.
5. After 20 seconds disconnect the USB cable, and plug the cable back in.
6. The development board should now be mounted as `JLINK`.
#### Failed to flash
If your board fails to flash new firmware (a `FAIL.txt` file might appear on the `JLINK` drive) you can also flash using `nrfjprog`.
1. Install the [nRF Command Line Tools](https://www.nordicsemi.com/Software-and-tools/Development-Tools/nRF-Command-Line-Tools/Download).
2. Flash new firmware via:
```
nrfjprog --program path-to-your.bin -f NRF52 --sectoranduicrerase
```
### Next steps: building a machine learning model
With everything set up you can now build your first machine learning model with these tutorials:
* [Building a continuous motion recognition system](/tutorials/end-to-end/motion-recognition).
* [Recognizing sounds from audio](/tutorials/end-to-end/sound-recognition).
* [Keyword spotting](/tutorials/end-to-end/keyword-spotting).
*
Looking to connect different sensors? The [Data forwarder](/tools/clis/edge-impulse-cli/data-forwarder) lets you easily send data from any sensor into Edge Impulse.
### Troubleshooting
#### No JLINK drive
If you don't see the `JLINK` drive show up when you connect your nRF52840 DK you'll have to update the interface firmware.
1. Set the power switch to 'off'.
2. Hold **BOOT/RESET** while you set the power switch to 'on'.
3. Your development board should be mounted as `BOOTLOADER`.
4. Download the latest [Interface MCU firmware](https://www.nordicsemi.com/Software-and-Tools/Development-Kits/nRF52840-DK/Download#infotabs) and drag the `.bin` file onto the `BOOTLOADER` drive.
5. After 20 seconds disconnect the USB cable, and plug the cable back in.
6. The development board should now be mounted as `JLINK`.
#### Failed to flash
If your board fails to flash new firmware (a `FAIL.txt` file might appear on the `JLINK` drive) you can also flash using `nrfjprog`.
1. Install the [nRF Command Line Tools](https://www.nordicsemi.com/Software-and-tools/Development-Tools/nRF-Command-Line-Tools/Download).
2. Flash new firmware via:
```
nrfjprog --program path-to-your.bin -f NRF52 --sectoranduicrerase
```