> ## Documentation Index
> Fetch the complete documentation index at: https://docs.edgeimpulse.com/llms.txt
> Use this file to discover all available pages before exploring further.
# Microchip SAMA7G54
The SAMA7G54 is a high-performance, Arm Cortex-A7 CPU-based embedded microprocessor (MPU) running up to 1 GHz. It supports multiple memories such as 16-bit DDR2, DDR3, DDR3L, LPDDR2, LPDDR3 with flexible boot options from octal/quad SPI, SD/eMMC as well as 8-bit SLC/MLC NAND Flash.
The SAMA7G54 integrates complete imaging and audio subsystems with 12-bit parallel and/or MIPI-CSI2 camera interfaces supporting up to 8 Mpixels and 720p @ 60 fps, up to four I2S, one SPDIF transmitter and receiver and a 4-stereo channel audio sample rate converter.
The device also features a large number of connectivity options including Dual Ethernet (one Gigabit Ethernet and one 10/100 Ethernet), six CAN-FD and three high-speed USB. Advanced security functions like secure boot, secure key storage, high-performance crypto accelerators for AES, SHA, RSA and ECC are also supported.
Microchip provides an optimized power management solution for the SAMA7G54. The MCP16502 has been fully tested and optimized to provide the best power vs. performance for the SAMA7G54.
### Installing dependencies
#### 1. Hardware Setup
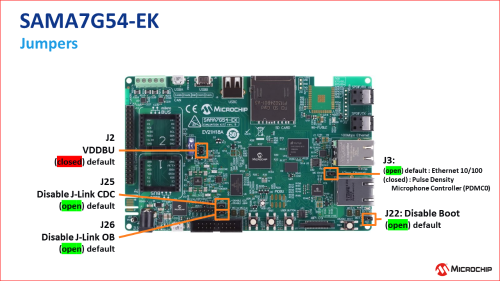
Set [these jumpers](https://developerhelp.microchip.com/xwiki/bin/view/software-tools/32-bit-kits/sama7g54-ek/features/#jumpers) to the default settings:
 Provide power to the board [as described in the Microchip documentation](https://developerhelp.microchip.com/xwiki/bin/view/software-tools/32-bit-kits/sama7g54-ek/features/#power).
#### 2. Software Setup
##### Use pre-built images:
* [Buildroot](https://cdn.edgeimpulse.com/build-system/microchip.sama7.100724.sdcard.img.zip) - This has edge-impulse-linux preinstalled
* [Yocto](https://cdn.edgeimpulse.com/build-system/microchip.sama7.yocto.zip) - Just run `npm install -g edge-impulse-linux` after logging in as root
**OR**
##### Use Docker
Choose between [Buildroot](https://github.com/edgeimpulse/example-microchip-sama7g54) or [Yocto](https://github.com/edgeimpulse/example-microchip-sama7g54-yocto) to build your own custom image by following the Readme instructions in the linked repositories and then use a tool like [BalenaEtcher](https://etcher.balena.io/) to flash the resulting .img or .wic file to an SD card.
The Microchip Developer Help portal has documentation for [serial communications to the SAMA7G54-EK](https://developerhelp.microchip.com/xwiki/bin/view/software-tools/32-bit-kits/sama7g54-ek/console_serial_communications/). Once your serial terminal is connected make sure the device has power and press the `nStart` button, you should see messages appearing over the serial console.
For Buildroot login with `root` user and `edgeimpulse` password, otherwise for Yocto login as root with no password.
If you are using Buildroot and would like to use SSH to connect to the board, some additional steps are necessary:
1. `cd /etc/ssh/`
2. `nano sshd_config`
3. Uncomment and change `PermitRootLogin prohibit-password` to `PermitRootLogin yes`
4. Uncomment `PasswordAuthentication yes`
5. `CTRL+X` then `Y` then `Enter`
6. `reboot` to restart SSH
7. `ifconfig` to get IP address
8. On your host machine `ssh root@www.xxx.yyy.zzz`
### Connecting to Edge Impulse
With all software set up, connect your web-camera to your operating system and run:
```
edge-impulse-linux
```
This will start a wizard which will ask you to log in, and choose an Edge Impulse project. If you want to switch projects run the command with `--clean`.
Provide power to the board [as described in the Microchip documentation](https://developerhelp.microchip.com/xwiki/bin/view/software-tools/32-bit-kits/sama7g54-ek/features/#power).
#### 2. Software Setup
##### Use pre-built images:
* [Buildroot](https://cdn.edgeimpulse.com/build-system/microchip.sama7.100724.sdcard.img.zip) - This has edge-impulse-linux preinstalled
* [Yocto](https://cdn.edgeimpulse.com/build-system/microchip.sama7.yocto.zip) - Just run `npm install -g edge-impulse-linux` after logging in as root
**OR**
##### Use Docker
Choose between [Buildroot](https://github.com/edgeimpulse/example-microchip-sama7g54) or [Yocto](https://github.com/edgeimpulse/example-microchip-sama7g54-yocto) to build your own custom image by following the Readme instructions in the linked repositories and then use a tool like [BalenaEtcher](https://etcher.balena.io/) to flash the resulting .img or .wic file to an SD card.
The Microchip Developer Help portal has documentation for [serial communications to the SAMA7G54-EK](https://developerhelp.microchip.com/xwiki/bin/view/software-tools/32-bit-kits/sama7g54-ek/console_serial_communications/). Once your serial terminal is connected make sure the device has power and press the `nStart` button, you should see messages appearing over the serial console.
For Buildroot login with `root` user and `edgeimpulse` password, otherwise for Yocto login as root with no password.
If you are using Buildroot and would like to use SSH to connect to the board, some additional steps are necessary:
1. `cd /etc/ssh/`
2. `nano sshd_config`
3. Uncomment and change `PermitRootLogin prohibit-password` to `PermitRootLogin yes`
4. Uncomment `PasswordAuthentication yes`
5. `CTRL+X` then `Y` then `Enter`
6. `reboot` to restart SSH
7. `ifconfig` to get IP address
8. On your host machine `ssh root@www.xxx.yyy.zzz`
### Connecting to Edge Impulse
With all software set up, connect your web-camera to your operating system and run:
```
edge-impulse-linux
```
This will start a wizard which will ask you to log in, and choose an Edge Impulse project. If you want to switch projects run the command with `--clean`.
 Alternatively, you can access the project API Key as shown below by navigating to the **Dashboard** section on the left pane of your Studio project and select the **Keys** tab, then click the copy/paste icon next to the API Key to copy the entire text to your clipboard, then run:
```
edge-impulse-linux --api-key [paste your key here]
```
Alternatively, you can access the project API Key as shown below by navigating to the **Dashboard** section on the left pane of your Studio project and select the **Keys** tab, then click the copy/paste icon next to the API Key to copy the entire text to your clipboard, then run:
```
edge-impulse-linux --api-key [paste your key here]
```
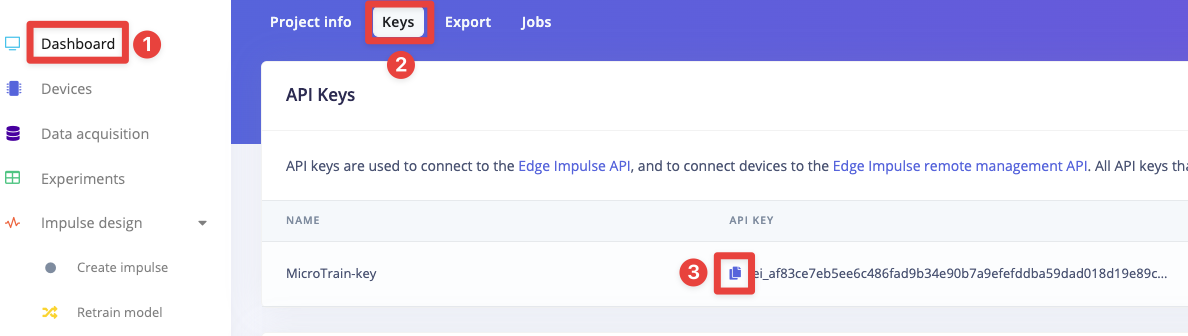 This `--api-key` flag also functions the same way with the `edge-impulse-linux-runner` command when deploying impulses onto devices.
#### Verifying that your device is connected
That's all! Your machine is now connected to Edge Impulse. To verify this, go to [your Edge Impulse project](https://studio.edgeimpulse.com/studio/profile/projects), and click **Devices**. The device will be listed here.
This `--api-key` flag also functions the same way with the `edge-impulse-linux-runner` command when deploying impulses onto devices.
#### Verifying that your device is connected
That's all! Your machine is now connected to Edge Impulse. To verify this, go to [your Edge Impulse project](https://studio.edgeimpulse.com/studio/profile/projects), and click **Devices**. The device will be listed here.
 ### Next steps: building a machine learning model
With everything set up you can now build your first machine learning model with these tutorials:
* [Image classification](/tutorials/end-to-end/image-classification)
* [Object detection with bounding boxes](/tutorials/end-to-end/object-detection-bounding-boxes)
* [Object detection with centroids (FOMO)](/tutorials/end-to-end/object-detection-centroids)
Looking to connect different sensors? Our [Linux SDK](/tools/libraries/sdks/inference/linux) lets you easily send data from any sensor and any programming language (with examples in Node.js, Python, Go and C++) into Edge Impulse.
### Deploying back to device
To run your impulse locally run on your Linux platform:
```
edge-impulse-linux-runner
```
This will automatically compile your model with full hardware acceleration, download the model to your local machine, and then start classifying. Our [Linux SDK](/tools/libraries/sdks/inference/linux) has examples on how to integrate the model with your favourite programming language.
Another option is to download the .eim file directly from Studio, copy it to the device filesystem and run it with the --model-file argument. In this case `chmod +x` will be required to give the .eim executable permissions.
### Enabling and running example-standalone-inferencing-linux
The main route for deploying en Edge Impulse project with SAMA7G54-EK Evaluation Kit is through using .eim. However it is also possible to build example-standalone-inferencing-linux package and run it on the device.
To do that run `make menuconfig`
Go to Target packages -> Miscellaneous and choose Example Standalone Inferencing Linux package. Paste the project deployment files (edge-impulse-sdk, model-parameters, tflite-model)
into buildroot-microchip/buildroot-at91/package/example-standalone-inferencing-linux folder.
Proceed to building the image with
``make -j $((`nproc` - 1))``
You will be able to find `custom` application file in /home on your target. Run it with
`./custom features.txt`,
where features.txt is a file with raw features.
Note: When using the .eim method it's important to ensure the file has appropriate permissions, so use `chmod` to set these if needed.
### Next steps: building a machine learning model
With everything set up you can now build your first machine learning model with these tutorials:
* [Image classification](/tutorials/end-to-end/image-classification)
* [Object detection with bounding boxes](/tutorials/end-to-end/object-detection-bounding-boxes)
* [Object detection with centroids (FOMO)](/tutorials/end-to-end/object-detection-centroids)
Looking to connect different sensors? Our [Linux SDK](/tools/libraries/sdks/inference/linux) lets you easily send data from any sensor and any programming language (with examples in Node.js, Python, Go and C++) into Edge Impulse.
### Deploying back to device
To run your impulse locally run on your Linux platform:
```
edge-impulse-linux-runner
```
This will automatically compile your model with full hardware acceleration, download the model to your local machine, and then start classifying. Our [Linux SDK](/tools/libraries/sdks/inference/linux) has examples on how to integrate the model with your favourite programming language.
Another option is to download the .eim file directly from Studio, copy it to the device filesystem and run it with the --model-file argument. In this case `chmod +x` will be required to give the .eim executable permissions.
### Enabling and running example-standalone-inferencing-linux
The main route for deploying en Edge Impulse project with SAMA7G54-EK Evaluation Kit is through using .eim. However it is also possible to build example-standalone-inferencing-linux package and run it on the device.
To do that run `make menuconfig`
Go to Target packages -> Miscellaneous and choose Example Standalone Inferencing Linux package. Paste the project deployment files (edge-impulse-sdk, model-parameters, tflite-model)
into buildroot-microchip/buildroot-at91/package/example-standalone-inferencing-linux folder.
Proceed to building the image with
``make -j $((`nproc` - 1))``
You will be able to find `custom` application file in /home on your target. Run it with
`./custom features.txt`,
where features.txt is a file with raw features.
Note: When using the .eim method it's important to ensure the file has appropriate permissions, so use `chmod` to set these if needed.