> ## Documentation Index
> Fetch the complete documentation index at: https://docs.edgeimpulse.com/llms.txt
> Use this file to discover all available pages before exploring further.
# BrainChip AKD1000
Akida™ is a neural processor platform inspired by the brain’s cognitive capabilities and energy efficiency. It delivers low-power, real-time AI processing at the edge using neuromorphic principles for applications like vision, audio, and sensor fusion. Application serviced include Smart City, Smart Health, Smart Home and Smart Transportation. Linux machines with Akida™ are supported by Edge Impulse so that you can sample raw data, build models, and deploy trained embedded machine learning models directly from the Edge Impulse studio to create the next generation of low-power, high-performance ML applications. You can purchase Akida™ supported devices at Brainchip's [shop](https://shop.brainchipinc.com/).
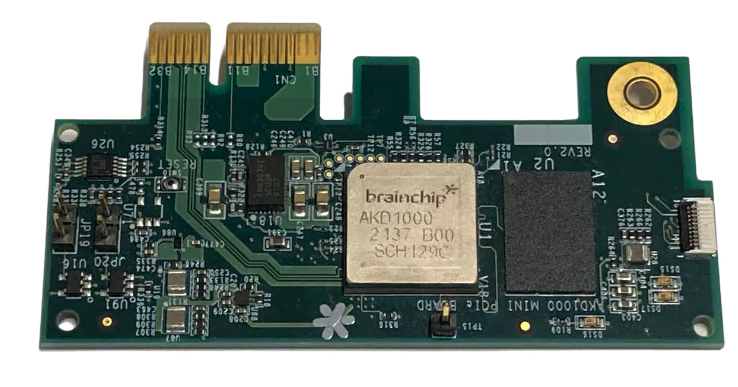 The [AKD1000-powered PCIe boards](https://shop.brainchipinc.com/products/akida%E2%84%A2-development-kit-pcie-board) can be plugged into a developer’s existing linux system to unlock capabilities for a wide array of edge AI applications
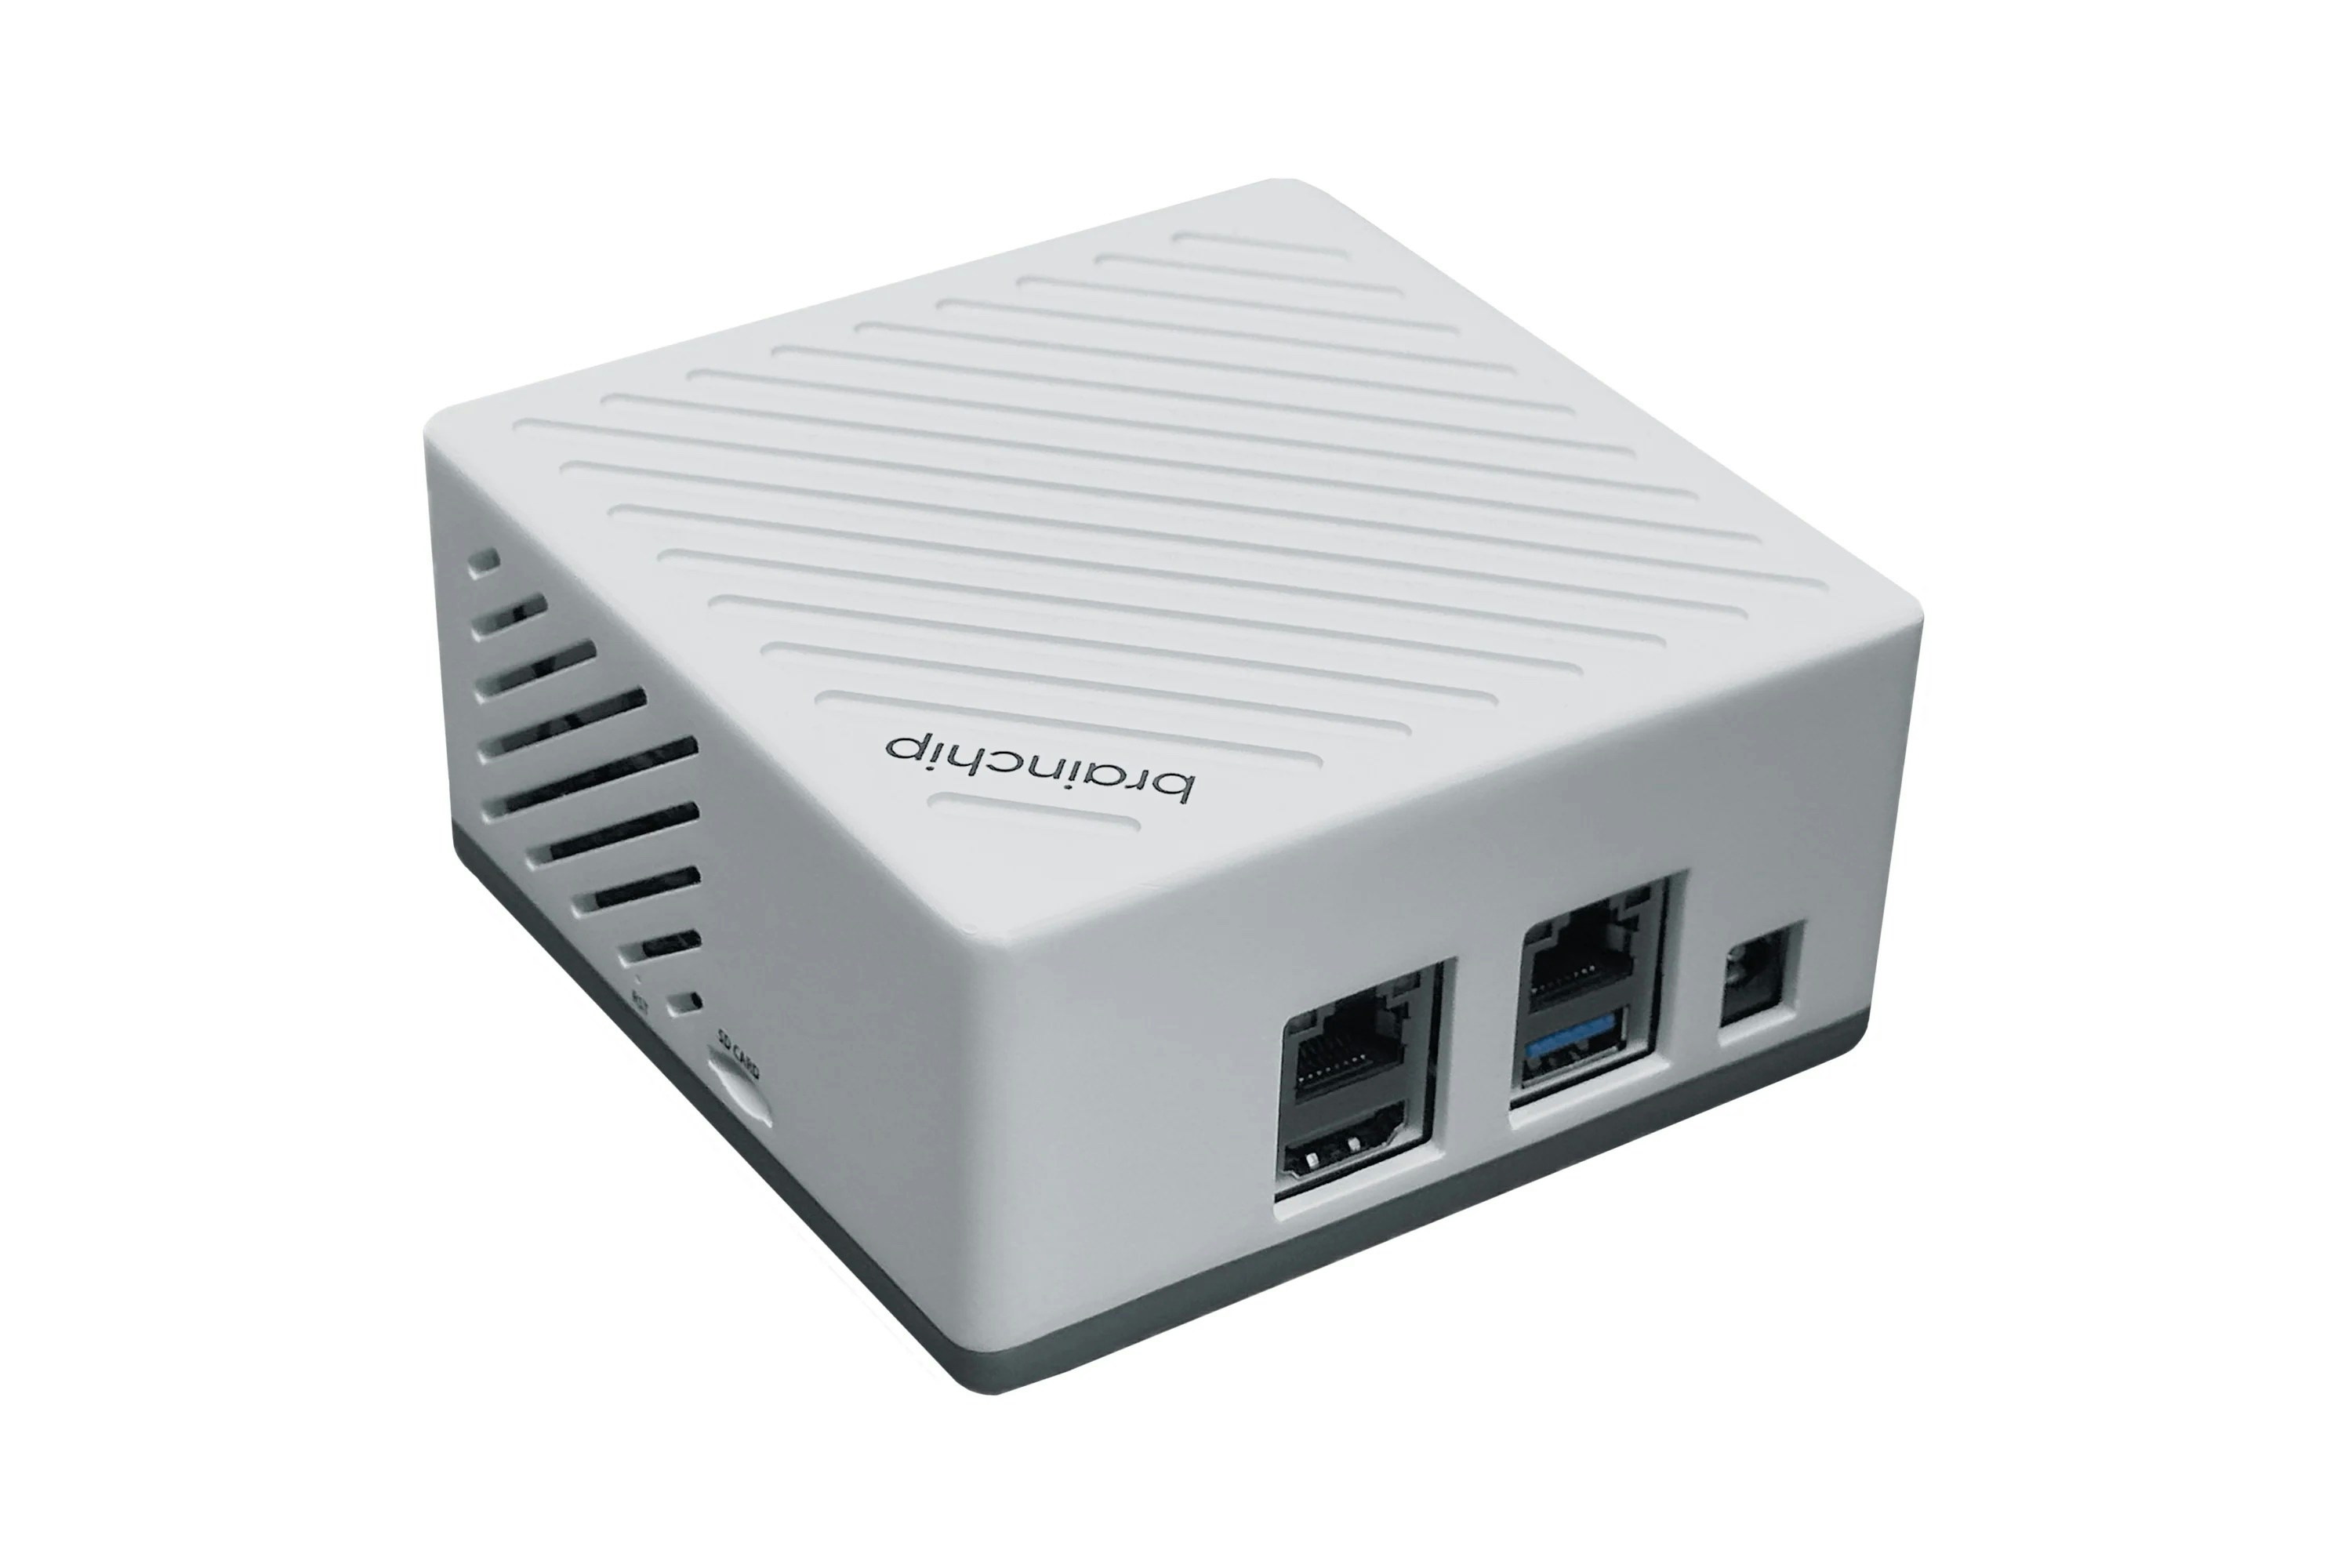 The [Edge AI Box](https://shop.brainchipinc.com/products/akida%E2%84%A2-edge-ai-box) is a reference design that comes preinstalled with Akida™ M.2 devices and has the software needed to get started with Edge Impulse.
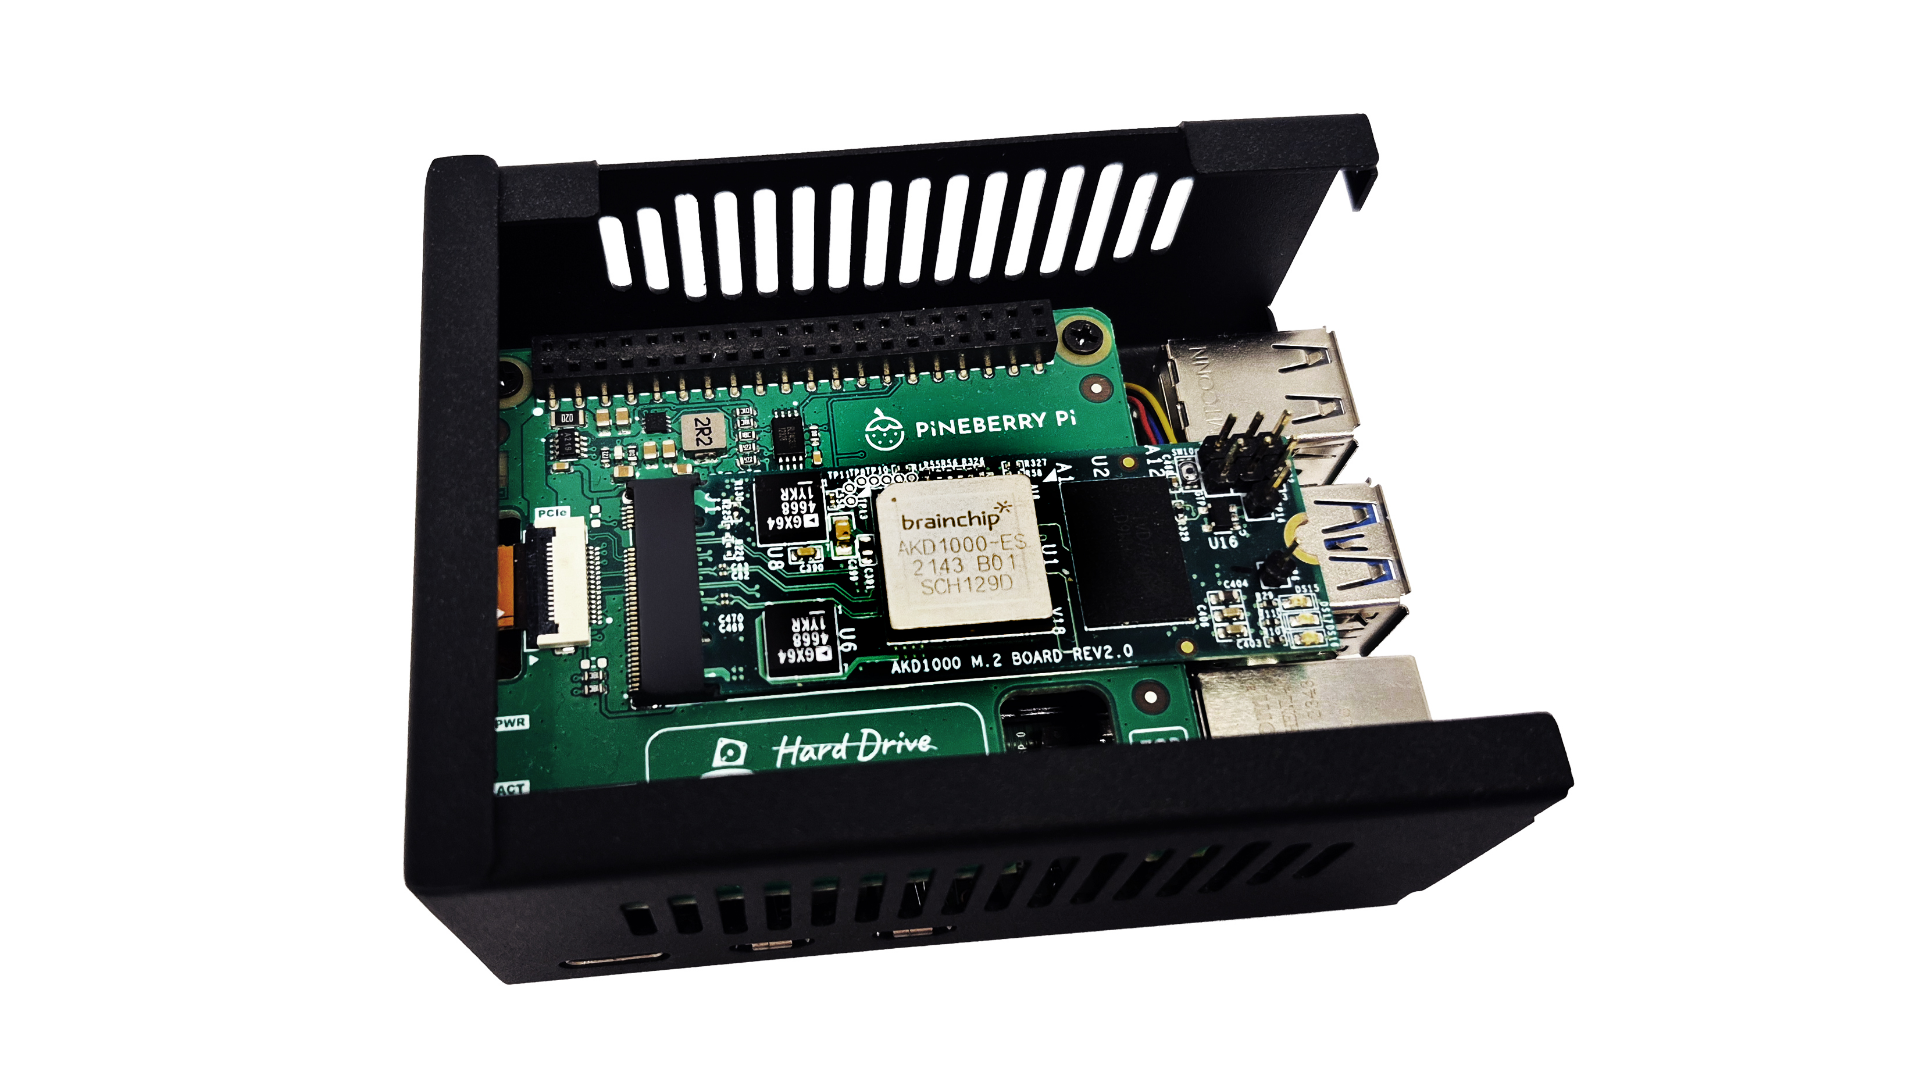 The [Raspberry Pi 5 with Akida™ M.2 Neuromorphic Processor](https://brainchip.com/upgrade-the-raspberry-pi-for-ai-with-a-neuromorphic-processor/) provides a familiar platform to learn and prototype with Akida™.
To learn more about BrainChip technology please visit BrainChip's website: [https://brainchip.com/product/](https://brainchip.com/product/)
### Installing dependencies
To enable this device for Edge Impulse deployments you must install the following dependencies on your Linux target that has an Akida PCIe board attached.
* [Python 3.8](https://www.python.org/downloads/): Python 3.8 is required for deployments via the [Edge Impulse CLI](/tools/clis/edge-impulse-linux-cli) or [AKD1000 deployment blocks](/hardware/boards/brainchip-akd1000#akd1000-deployment-block) because the binary file that is generated is reliant on specific paths generated for the combination of Python 3.8 and Python Akida™ Library 2.3.3 installations. Alternatively, if you intend to write your own code with the [Python Akida™ Library](https://pypi.org/project/akida) or the [Edge Impulse SDK](/tools/libraries/sdks/inference/linux) via the [BrainChip MetaTF Deployment Block](/hardware/boards/brainchip-akd1000#brainchip-metatf-deployment-block) option you may use Python 3.7 - 3.10.
* [Python Akida™ Library 2.3.3](https://pypi.org/project/akida/2.3.3/): A python package for quick and easy model development, testing, simulation, and deployment for BrainChip devices
* [Akida™ PCIe drivers](https://brainchip.com/wp-content/uploads/2022/06/Akida-PCIe-Driver-Installation-Guide.pdf): This will build and install the driver on your system to communicate with the above AKD1000 reference PCIe board
* Edge Impulse Linux: This will enable you to connect your development system directly to Edge Impulse Studio. For all Brainchip target systems please follow the x86\_64 Linux guide as it is the most generic and applicable: [https://docs.edgeimpulse.com/hardware/devices/linux-x86\_64](https://docs.edgeimpulse.com/hardware/devices/linux-x86_64)
### Connecting to Edge Impulse
With all software set up, connect your camera or microphone to your operating system and run:
```
$ edge-impulse-linux
```
This will start a wizard which will ask you to log in, and choose an Edge Impulse project. If you want to switch projects run the command with `--clean`.
#### Verifying that your device is connected
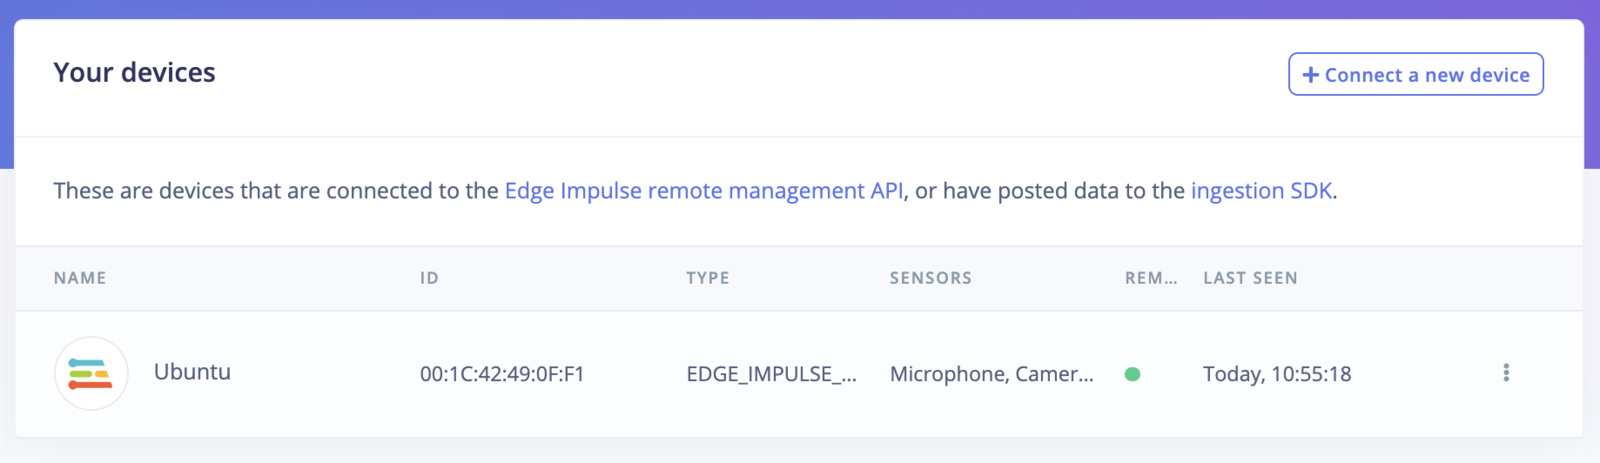
That's all! Your machine is now connected to Edge Impulse. To verify this, go to [your Edge Impulse project](https://studio.edgeimpulse.com/studio/profile/projects), and click **Devices**. The device will be listed here.
The [Raspberry Pi 5 with Akida™ M.2 Neuromorphic Processor](https://brainchip.com/upgrade-the-raspberry-pi-for-ai-with-a-neuromorphic-processor/) provides a familiar platform to learn and prototype with Akida™.
To learn more about BrainChip technology please visit BrainChip's website: [https://brainchip.com/product/](https://brainchip.com/product/)
### Installing dependencies
To enable this device for Edge Impulse deployments you must install the following dependencies on your Linux target that has an Akida PCIe board attached.
* [Python 3.8](https://www.python.org/downloads/): Python 3.8 is required for deployments via the [Edge Impulse CLI](/tools/clis/edge-impulse-linux-cli) or [AKD1000 deployment blocks](/hardware/boards/brainchip-akd1000#akd1000-deployment-block) because the binary file that is generated is reliant on specific paths generated for the combination of Python 3.8 and Python Akida™ Library 2.3.3 installations. Alternatively, if you intend to write your own code with the [Python Akida™ Library](https://pypi.org/project/akida) or the [Edge Impulse SDK](/tools/libraries/sdks/inference/linux) via the [BrainChip MetaTF Deployment Block](/hardware/boards/brainchip-akd1000#brainchip-metatf-deployment-block) option you may use Python 3.7 - 3.10.
* [Python Akida™ Library 2.3.3](https://pypi.org/project/akida/2.3.3/): A python package for quick and easy model development, testing, simulation, and deployment for BrainChip devices
* [Akida™ PCIe drivers](https://brainchip.com/wp-content/uploads/2022/06/Akida-PCIe-Driver-Installation-Guide.pdf): This will build and install the driver on your system to communicate with the above AKD1000 reference PCIe board
* Edge Impulse Linux: This will enable you to connect your development system directly to Edge Impulse Studio. For all Brainchip target systems please follow the x86\_64 Linux guide as it is the most generic and applicable: [https://docs.edgeimpulse.com/hardware/devices/linux-x86\_64](https://docs.edgeimpulse.com/hardware/devices/linux-x86_64)
### Connecting to Edge Impulse
With all software set up, connect your camera or microphone to your operating system and run:
```
$ edge-impulse-linux
```
This will start a wizard which will ask you to log in, and choose an Edge Impulse project. If you want to switch projects run the command with `--clean`.
#### Verifying that your device is connected
That's all! Your machine is now connected to Edge Impulse. To verify this, go to [your Edge Impulse project](https://studio.edgeimpulse.com/studio/profile/projects), and click **Devices**. The device will be listed here.
 ### Next steps: building a machine learning model
With everything set up you can now build your first machine learning model with these tutorials:
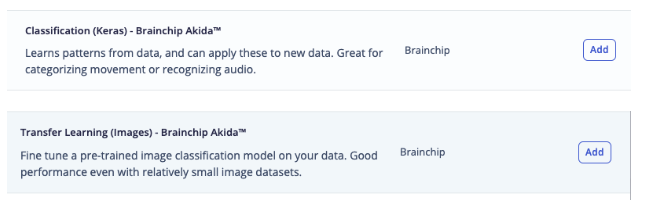
#### Design an Impulse with BrainChip Akida™ Learning Blocks
After adding data via [Data acquisition](/studio/projects/data-acquisition) starting an [Impulse Design](/studio/projects/impulse-design) you can add BrainChip Akida™ [Learning Block](/studio/projects/learning-blocks). The type of Learning Blocks visible depend on the type of data collected. Using BrainChip Akida™ Learning Blocks will ensure that models generated for deployment will be compatible with BrainChip Akida™ devices.
### Next steps: building a machine learning model
With everything set up you can now build your first machine learning model with these tutorials:
#### Design an Impulse with BrainChip Akida™ Learning Blocks
After adding data via [Data acquisition](/studio/projects/data-acquisition) starting an [Impulse Design](/studio/projects/impulse-design) you can add BrainChip Akida™ [Learning Block](/studio/projects/learning-blocks). The type of Learning Blocks visible depend on the type of data collected. Using BrainChip Akida™ Learning Blocks will ensure that models generated for deployment will be compatible with BrainChip Akida™ devices.
 #### Training a BrainChip Akida™ Compatible Model
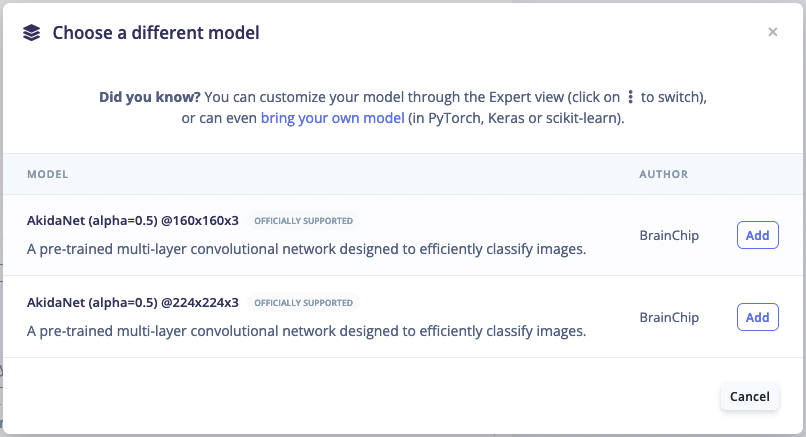
In the [Learning Block](/studio/projects/learning-blocks) of the Impulse Design one can compare between Float, Quantized, and Akida™ versions of a model. If you added a [Processing Block](/studio/projects/processing-blocks) to your [Impulse Design](/studio/projects/impulse-design) you will need to generate features before you can train your model. If the project uses a [transfer learning block](/studio/projects/learning-blocks/blocks/transfer-learning-images) you may be able to select a base model from [BrainChip’s Model zoo](https://doc.brainchipinc.com/user_guide/akida_models.html) to transfer learn from. More models will be available in the future, but if you have a specific request please let us know via the [Edge Impulse forums](https://forum.edgeimpulse.com/).
#### Training a BrainChip Akida™ Compatible Model
In the [Learning Block](/studio/projects/learning-blocks) of the Impulse Design one can compare between Float, Quantized, and Akida™ versions of a model. If you added a [Processing Block](/studio/projects/processing-blocks) to your [Impulse Design](/studio/projects/impulse-design) you will need to generate features before you can train your model. If the project uses a [transfer learning block](/studio/projects/learning-blocks/blocks/transfer-learning-images) you may be able to select a base model from [BrainChip’s Model zoo](https://doc.brainchipinc.com/user_guide/akida_models.html) to transfer learn from. More models will be available in the future, but if you have a specific request please let us know via the [Edge Impulse forums](https://forum.edgeimpulse.com/).
 ### Deploying back to device
In order to achieve full hardware acceleration models must be converted from their original format to run on an AKD1000. This can be done by selecting the BrainChip MetaTF Block from the Deployment Screen. This will generate a .zip file with models that can be used in your application for the AKD1000. The block uses the [CNN2SNN toolkit](https://doc.brainchipinc.com/user_guide/cnn2snn.html?highlight=cnn2snn#cnn2snn-toolkit) to convert quantized models to SNN models compatible for the AKD1000. One can then develop an application using the Akida™ python package that will call the Akida™ formatted model found inside the .zip file.
#### BrainChip MetaTF Deployment Block
### Deploying back to device
In order to achieve full hardware acceleration models must be converted from their original format to run on an AKD1000. This can be done by selecting the BrainChip MetaTF Block from the Deployment Screen. This will generate a .zip file with models that can be used in your application for the AKD1000. The block uses the [CNN2SNN toolkit](https://doc.brainchipinc.com/user_guide/cnn2snn.html?highlight=cnn2snn#cnn2snn-toolkit) to convert quantized models to SNN models compatible for the AKD1000. One can then develop an application using the Akida™ python package that will call the Akida™ formatted model found inside the .zip file.
#### BrainChip MetaTF Deployment Block
 Alternatively, you can use the AKD1000 Block to generate a [pre-built binary](/tools/libraries/sdks/inference/linux) that can be used by the [Edge Impulse Linux CLI](https://github.com/edgeimpulse/edge-impulse-linux-cli) to run on your Linux installation with a AKD1000 Mini PCIe present.
#### AKD1000 Deployment Block
Alternatively, you can use the AKD1000 Block to generate a [pre-built binary](/tools/libraries/sdks/inference/linux) that can be used by the [Edge Impulse Linux CLI](https://github.com/edgeimpulse/edge-impulse-linux-cli) to run on your Linux installation with a AKD1000 Mini PCIe present.
#### AKD1000 Deployment Block
 The output from this Block is an .eim file that, once saved onto the computer containing the AKD1000, can be run with the following command:
```
edge-impulse-linux-runner --model-file
```
Alternatively one can use CLI to build, download, and run the model on your x86 or aarch64 devices with this command format
```
edge-impulse-linux-runner --force-target runner-linux-aarch64-akd1000
```
### Akida™ Edge Learning
The AKD1000 has a unique ability to conduct training on the edge device. This means that new classification features can be added or completely replace the existing classes in a model. A model must be specifically configured and compiled with MetaTF to access the ability of the AKD1000. To enable the Edge Learning features in Edge Impulse Studio please follow these steps:
1. Select a *BrainChip Akida™ Learning Block* in your **Impulse design**
2. In the **Impulse design** of the learning block, enable *Create Edge Learning model* under **Akida Edge Learning options**
The output from this Block is an .eim file that, once saved onto the computer containing the AKD1000, can be run with the following command:
```
edge-impulse-linux-runner --model-file
```
Alternatively one can use CLI to build, download, and run the model on your x86 or aarch64 devices with this command format
```
edge-impulse-linux-runner --force-target runner-linux-aarch64-akd1000
```
### Akida™ Edge Learning
The AKD1000 has a unique ability to conduct training on the edge device. This means that new classification features can be added or completely replace the existing classes in a model. A model must be specifically configured and compiled with MetaTF to access the ability of the AKD1000. To enable the Edge Learning features in Edge Impulse Studio please follow these steps:
1. Select a *BrainChip Akida™ Learning Block* in your **Impulse design**
2. In the **Impulse design** of the learning block, enable *Create Edge Learning model* under **Akida Edge Learning options**
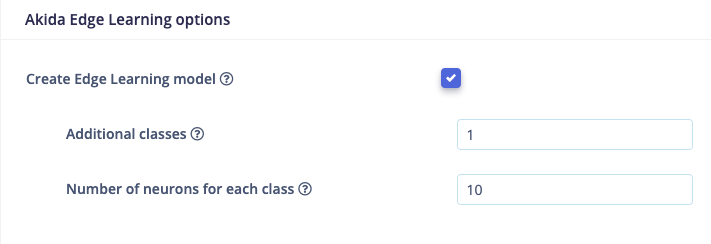 3. Set the *Additional classes* and *Number of neurons for each class* and train the model. For more information about these parameters please visit [BrainChip's documentation of the parameters](https://doc.brainchipinc.com/user_guide/akida.html#id1). Note that Edge Learning compatible models require a specific setup for the feature extractor and classification head of the model. You can view how a model is configured by switching to *Keras (expert) mode* in the **Neural Network settings** and searching for "Feature Extractor" and "Build edge learning compatible model" comments in the Keras code.
Once the model is trained you may download the Edge Learning compatible model from either the project's **Dashboard** or the **BrainChip MetaTF Model** deployment block.
A public project with Edge Learning options is available in the Public Projects section of this documentation below. To learn more about BrainChip's Edge Learning features and to find examples of its usage please visit [BrainChip's documentation for Edge Learning](https://doc.brainchipinc.com/user_guide/akida.html#id1).
### Public projects using Akida™ learning blocks
We have multiple projects that are available to clone immediately to quickly train and deploy models for the AKD1000.
* [FOMO project using BrainChip MetaTF and Akidanet models](https://studio.edgeimpulse.com/studio/148833)
* [Image Classification project using BrainChip MetaTF and Akidanet models](https://studio.edgeimpulse.com/studio/115634)
* [Image Classification - Deck of Cards - BrainChip Akida - Edge Learning](https://studio.edgeimpulse.com/studio/181349)
#### Image model?
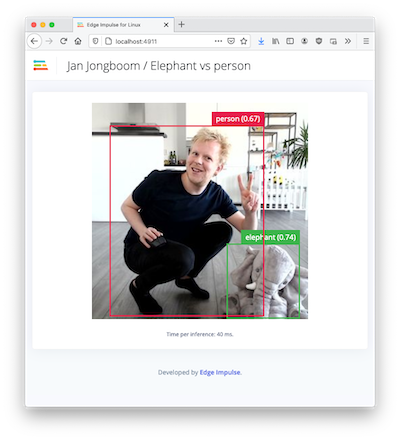
If you have an image model then you can get a peek of what your device sees by being on the same network as your device, and finding the 'Want to see a feed of the camera and live classification in your browser' message in the console. Open the URL in a browser and both the camera feed and the classification are shown:
3. Set the *Additional classes* and *Number of neurons for each class* and train the model. For more information about these parameters please visit [BrainChip's documentation of the parameters](https://doc.brainchipinc.com/user_guide/akida.html#id1). Note that Edge Learning compatible models require a specific setup for the feature extractor and classification head of the model. You can view how a model is configured by switching to *Keras (expert) mode* in the **Neural Network settings** and searching for "Feature Extractor" and "Build edge learning compatible model" comments in the Keras code.
Once the model is trained you may download the Edge Learning compatible model from either the project's **Dashboard** or the **BrainChip MetaTF Model** deployment block.
A public project with Edge Learning options is available in the Public Projects section of this documentation below. To learn more about BrainChip's Edge Learning features and to find examples of its usage please visit [BrainChip's documentation for Edge Learning](https://doc.brainchipinc.com/user_guide/akida.html#id1).
### Public projects using Akida™ learning blocks
We have multiple projects that are available to clone immediately to quickly train and deploy models for the AKD1000.
* [FOMO project using BrainChip MetaTF and Akidanet models](https://studio.edgeimpulse.com/studio/148833)
* [Image Classification project using BrainChip MetaTF and Akidanet models](https://studio.edgeimpulse.com/studio/115634)
* [Image Classification - Deck of Cards - BrainChip Akida - Edge Learning](https://studio.edgeimpulse.com/studio/181349)
#### Image model?
If you have an image model then you can get a peek of what your device sees by being on the same network as your device, and finding the 'Want to see a feed of the camera and live classification in your browser' message in the console. Open the URL in a browser and both the camera feed and the classification are shown:
 ### Troubleshooting
#### Error: Classifying failed, error code was -23 (missing Python `akida` library)
It is mainly related to initialization of the Akida™ NSoC and model and is could be caused by lack of Akida Python libraries. Please check if you have an Akida™ Python library installed:
```
$ pip show akida
```
Example output:
```
Name: akida
Version: 2.3.3
Summary: Akida Execution Engine
Home-page: https://doc.brainchipinc.com
Author: xxxx
Author-email: xxxx
License: Proprietary
Location: /home/user/.local/lib/python3.8/site-packages
Requires: numpy
Required-by: cnn2snn
```
If you don't have the library (`WARNING: Package(s) not found: akida`) then install it:
```
$ pip install akida==2.3.3
```
If you have the library, then check if the EIM artifact is looking for the library in the correct place. First, download your EIM model using Edge Impulse Linux CLI tools:
```
$ edge-impulse-linux-runner --download model.eim
```
Then run the EIM model with `debug` option:
```
$ chmod +x model.eim
$ ./model.eim debug
DEBUG: sys.path:
/usr/lib64/python38.zip
/usr/lib64/python3.8
/usr/lib64/python3.8/lib-dynload
/usr/lib64/python3.8/site-packages
/usr/lib/python3.8/site-packages
```
Now check if your `Location` directory from `pip show akida` command is listed in your `sys.path` output. If not (usually it happens if you are using Python virtual environments), then export `PYTHONPATH`:
```
$ export PYTHONPATH=/home/user/.local/lib/python3.8/site-packages
```
And try to run the model with `edge-impulse-linux-runner` once again.
#### Error: Classifying failed, error code was -23 (other issues)
If the previous step didn't help, try to get additional debug data. With your EIM model downloaded, open one terminal window and do:
```
$ ./model.eim /tmp/ei.socket
```
Then in another terminal:
```
$ edge-impulse-linux-runner --model-file /tmp/ei.socket
```
This should give you additional info in the first terminal about the possible root of your issue.
#### Failed to run impulse Capture process failed with code 1
This error could mean that your camera is in use by another process. Check if you don't have any application open that is using the camera. This error could all exists when your previous attempt to run `edge-impulse-linux-runner` failed with exception. In that case, check if you have a `gst-launch-1.0` process running. For example:
```
$ ps aux | grep gst-launch-1.0
5615 pts/0 00:01:52 gst-launch-1.0
```
In this case, the first number (here `5615`) is a process ID. Kill the process:
```
$ kill -9 5615
```
And try to run the model with `edge-impulse-linux-runner` once again.
### End User License Agreement
In order to work with Brainchip models on Edge Impulse you will be asked to accept this [End User License Agreement (EULA)](https://cdn.edgeimpulse.com/eula/brainchip-ei-eula-2025-09-12.pdf) inside your Edge Impulse Project.
### Troubleshooting
#### Error: Classifying failed, error code was -23 (missing Python `akida` library)
It is mainly related to initialization of the Akida™ NSoC and model and is could be caused by lack of Akida Python libraries. Please check if you have an Akida™ Python library installed:
```
$ pip show akida
```
Example output:
```
Name: akida
Version: 2.3.3
Summary: Akida Execution Engine
Home-page: https://doc.brainchipinc.com
Author: xxxx
Author-email: xxxx
License: Proprietary
Location: /home/user/.local/lib/python3.8/site-packages
Requires: numpy
Required-by: cnn2snn
```
If you don't have the library (`WARNING: Package(s) not found: akida`) then install it:
```
$ pip install akida==2.3.3
```
If you have the library, then check if the EIM artifact is looking for the library in the correct place. First, download your EIM model using Edge Impulse Linux CLI tools:
```
$ edge-impulse-linux-runner --download model.eim
```
Then run the EIM model with `debug` option:
```
$ chmod +x model.eim
$ ./model.eim debug
DEBUG: sys.path:
/usr/lib64/python38.zip
/usr/lib64/python3.8
/usr/lib64/python3.8/lib-dynload
/usr/lib64/python3.8/site-packages
/usr/lib/python3.8/site-packages
```
Now check if your `Location` directory from `pip show akida` command is listed in your `sys.path` output. If not (usually it happens if you are using Python virtual environments), then export `PYTHONPATH`:
```
$ export PYTHONPATH=/home/user/.local/lib/python3.8/site-packages
```
And try to run the model with `edge-impulse-linux-runner` once again.
#### Error: Classifying failed, error code was -23 (other issues)
If the previous step didn't help, try to get additional debug data. With your EIM model downloaded, open one terminal window and do:
```
$ ./model.eim /tmp/ei.socket
```
Then in another terminal:
```
$ edge-impulse-linux-runner --model-file /tmp/ei.socket
```
This should give you additional info in the first terminal about the possible root of your issue.
#### Failed to run impulse Capture process failed with code 1
This error could mean that your camera is in use by another process. Check if you don't have any application open that is using the camera. This error could all exists when your previous attempt to run `edge-impulse-linux-runner` failed with exception. In that case, check if you have a `gst-launch-1.0` process running. For example:
```
$ ps aux | grep gst-launch-1.0
5615 pts/0 00:01:52 gst-launch-1.0
```
In this case, the first number (here `5615`) is a process ID. Kill the process:
```
$ kill -9 5615
```
And try to run the model with `edge-impulse-linux-runner` once again.
### End User License Agreement
In order to work with Brainchip models on Edge Impulse you will be asked to accept this [End User License Agreement (EULA)](https://cdn.edgeimpulse.com/eula/brainchip-ei-eula-2025-09-12.pdf) inside your Edge Impulse Project.