> ## Documentation Index
> Fetch the complete documentation index at: https://docs.edgeimpulse.com/llms.txt
> Use this file to discover all available pages before exploring further.
# Arduino UNO Q
The Arduino® UNO™ Q is a Linux development board based on the Qualcomm Dragonwing™ QRB2210, which has 4 Arm Cortex-A cores and an Adreno 702 GPU. There are 2GB and 4GB RAM versions available, and with 16GB or 32GB of flash memory on eMMC. There is also an MCU on the board, based on the STM32U585 Microcontroller with a Cortex M33 running on Zephyr OS ready to deploy sketches.
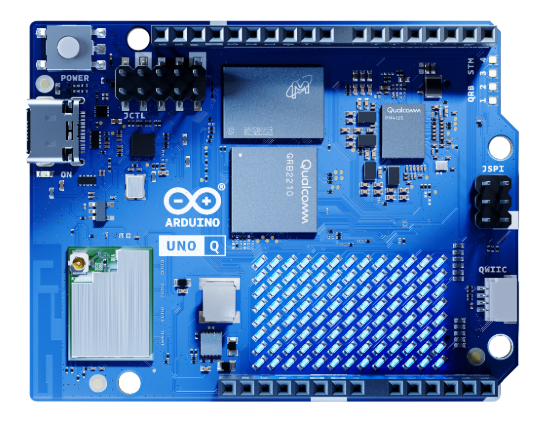 The UNO Q has the same form-factor as the classic Arduino UNO, including the GPIO headers for connecting sensors and actuators.
It includes a USB-C port that supports a USB hub (with power delivery input). Use this port to provide power (via USB-C) and connect peripherals like a keyboard, mouse, HDMI display, or a USB webcam/microphone.
This tutorial assumes your UNO Q has the base OS installed. If you need to flash your board, check out the [Arduino documentation](https://docs.arduino.cc/hardware/uno-q/) first.
Here's a video overview of the UNO Q and how to set it up with Edge Impulse:
If you want to explore the Zephyr side of the UNO Q, check out our [UNO Q - Zephyr Module](/tutorials/topics/zephyr/arduino-unoq-zephyr) tutorial.
## Setting up headless
Set up your UNO Q without a monitor. If you prefer to use a screen, skip to the [Setting up with a screen](/hardware/boards/arduino-uno-q#setting-up-with-a-screen) section.
Being setup. Use a USB-C cable to connect your UNO Q directly to your local machine (do not use the USB hub for now).
Wait for boot. After powering on your UNO Q, wait about 30 seconds for the board to finish booting.
### Use the Arduino App Lab
Install the [Arduino® App Lab](https://docs.arduino.cc/software/app-lab/) on your local computer.
The Arduino App Lab will take care of connecting to the WiFi your UNO Q, as well as configuring the SSH.
### Use the Terminal
Find the device. Check for the device's connection by opening a terminal and typing:
```
ls /dev/tty.*
```
You should see the device listed there. Remember that the board can take about 30 seconds to boot.
Now install the Android Debug Bridge (`adb`). This command-line tool is part of the Android SDK and lets you communicate with your UNO Q via serial for headless setup.
If you don't have `adb`, use the following link to [download SDK Platform-Tools for Windows, Mac, or Linux](https://developer.android.com/tools/releases/platform-tools#downloads).
Once installed, confirm your UNO Q is connected by running:
```
adb devices
```
If the device appears in the list, you can log in directly:
```
adb shell
```
Now you can connect your UNO Q to your WiFi network right from the terminal. Be sure to replace `` and `` with your actual network details:
```
sudo nmcli dev wifi connect password
```
Finally, get the local IP address with the `nmcli` command or `hostname -I`. Then use that IP to access your UNO Q via [SSH from your computer](/hardware/boards/arduino-uno-q#starting-the-ssh-server).
## Setting up with a screen
The UNO Q is a small device, and as such only has a single multi-function USB-C port. To use a screen, you'll need a USB hub with a power delivery input (via USB-C). Plug your hub in to provide power, and then connect your keyboard, mouse, and HDMI display.
If you don't have a USB hub with power delivery, use the headless setup instructions to connect via SSH from your computer.
If you have the USB hub, follow these steps to set up your UNO Q with a screen, keyboard, and mouse:
* Flash your board with the latest OS.
* Connect to screen using HDMI and login username password: `arduino` / `arduino`
* Connect your board to WiFi or Ethernet following the Linux graphical interface instructions or by running in the Terminal:
```
sudo nmcli dev wifi connect password
```
After connecting, run `nmcli` or `hostname -I` to find the local IP address if you want to access the board via SSH later. Otherwise, you can continue working directly in the terminal.
Usually your IP address is defined as `inet4` on `wlan0` or similar and in general it starts with 192.168.x.x but this may change. Alternatively, to access to the UNO Q you can use through the hostname `arduino@.local`.
## Starting the SSH server
Once you have the board's local IP address, install and start the SSH server to enable remote access. You can run these commands from your screen's terminal or by using the adb shell from the headless setup:
```
sudo apt install openssh-server -y
sudo systemctl enable ssh
sudo systemctl stop sshd
sudo ssh-keygen -A
sudo systemctl start sshd
```
Now you're ready to connect from your local machine using the terminal:
```
ssh arduino@
```
The default password of the UNO Q is `arduino`.
You can also use the VS Code Remote - SSH Extension to connect to the UNO Q as a host. If you choose this method, go to the Extensions view in VS Code and disable any installed extensions such as GitHub Copilot to avoid potential memory issues on the board that these extensions generate.
## Installing Edge Impulse dependencies
To set this device up in Edge Impulse, run the following commands from the UNO Q Terminal or via adb:
```
sudo apt update
curl -sL https://deb.nodesource.com/setup_20.x | sudo bash -
sudo apt install -y gcc g++ make build-essential nodejs sox gstreamer1.0-tools gstreamer1.0-plugins-good gstreamer1.0-plugins-base gstreamer1.0-plugins-base-apps
sudo npm install edge-impulse-linux -g --unsafe-perm
```
## Connecting to Edge Impulse
With all software set up, connect the USB camera or microphone to your UNO Q and run:
```
edge-impulse-linux
```
This will start a wizard which will ask you to log in, and choose an Edge Impulse project. If you want to switch projects, run the command with `--clean`.
### Verifying that your device is connected
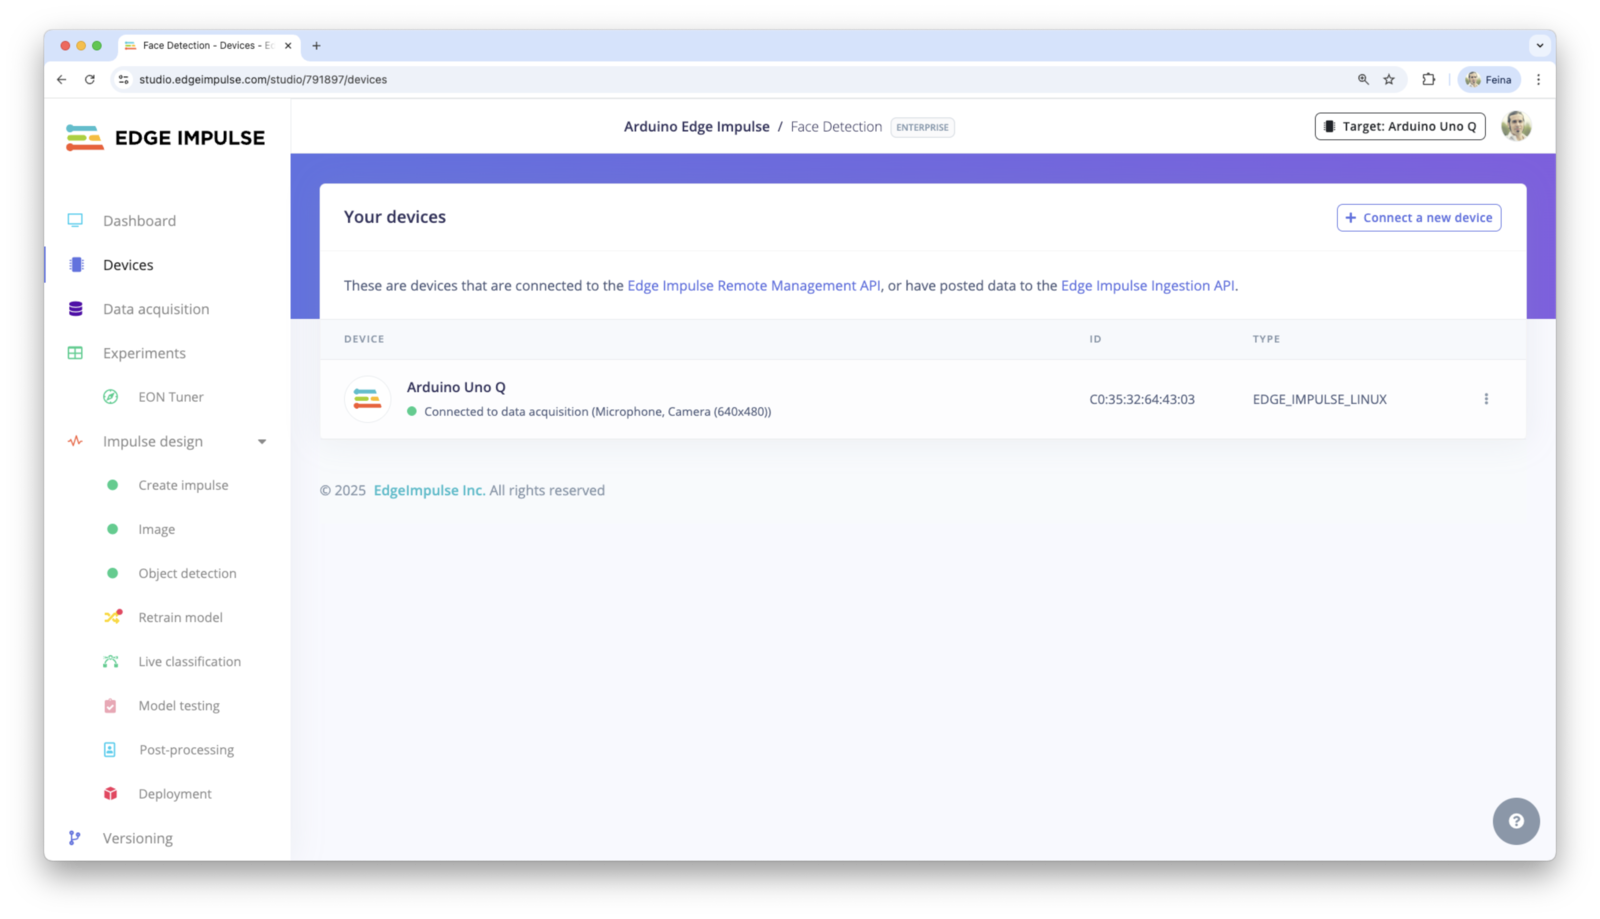
That’s all! Your device is now connected to Edge Impulse. To verify this, go to your Edge Impulse project, and click Devices. The device will be listed here.
The UNO Q has the same form-factor as the classic Arduino UNO, including the GPIO headers for connecting sensors and actuators.
It includes a USB-C port that supports a USB hub (with power delivery input). Use this port to provide power (via USB-C) and connect peripherals like a keyboard, mouse, HDMI display, or a USB webcam/microphone.
This tutorial assumes your UNO Q has the base OS installed. If you need to flash your board, check out the [Arduino documentation](https://docs.arduino.cc/hardware/uno-q/) first.
Here's a video overview of the UNO Q and how to set it up with Edge Impulse:
If you want to explore the Zephyr side of the UNO Q, check out our [UNO Q - Zephyr Module](/tutorials/topics/zephyr/arduino-unoq-zephyr) tutorial.
## Setting up headless
Set up your UNO Q without a monitor. If you prefer to use a screen, skip to the [Setting up with a screen](/hardware/boards/arduino-uno-q#setting-up-with-a-screen) section.
Being setup. Use a USB-C cable to connect your UNO Q directly to your local machine (do not use the USB hub for now).
Wait for boot. After powering on your UNO Q, wait about 30 seconds for the board to finish booting.
### Use the Arduino App Lab
Install the [Arduino® App Lab](https://docs.arduino.cc/software/app-lab/) on your local computer.
The Arduino App Lab will take care of connecting to the WiFi your UNO Q, as well as configuring the SSH.
### Use the Terminal
Find the device. Check for the device's connection by opening a terminal and typing:
```
ls /dev/tty.*
```
You should see the device listed there. Remember that the board can take about 30 seconds to boot.
Now install the Android Debug Bridge (`adb`). This command-line tool is part of the Android SDK and lets you communicate with your UNO Q via serial for headless setup.
If you don't have `adb`, use the following link to [download SDK Platform-Tools for Windows, Mac, or Linux](https://developer.android.com/tools/releases/platform-tools#downloads).
Once installed, confirm your UNO Q is connected by running:
```
adb devices
```
If the device appears in the list, you can log in directly:
```
adb shell
```
Now you can connect your UNO Q to your WiFi network right from the terminal. Be sure to replace `` and `` with your actual network details:
```
sudo nmcli dev wifi connect password
```
Finally, get the local IP address with the `nmcli` command or `hostname -I`. Then use that IP to access your UNO Q via [SSH from your computer](/hardware/boards/arduino-uno-q#starting-the-ssh-server).
## Setting up with a screen
The UNO Q is a small device, and as such only has a single multi-function USB-C port. To use a screen, you'll need a USB hub with a power delivery input (via USB-C). Plug your hub in to provide power, and then connect your keyboard, mouse, and HDMI display.
If you don't have a USB hub with power delivery, use the headless setup instructions to connect via SSH from your computer.
If you have the USB hub, follow these steps to set up your UNO Q with a screen, keyboard, and mouse:
* Flash your board with the latest OS.
* Connect to screen using HDMI and login username password: `arduino` / `arduino`
* Connect your board to WiFi or Ethernet following the Linux graphical interface instructions or by running in the Terminal:
```
sudo nmcli dev wifi connect password
```
After connecting, run `nmcli` or `hostname -I` to find the local IP address if you want to access the board via SSH later. Otherwise, you can continue working directly in the terminal.
Usually your IP address is defined as `inet4` on `wlan0` or similar and in general it starts with 192.168.x.x but this may change. Alternatively, to access to the UNO Q you can use through the hostname `arduino@.local`.
## Starting the SSH server
Once you have the board's local IP address, install and start the SSH server to enable remote access. You can run these commands from your screen's terminal or by using the adb shell from the headless setup:
```
sudo apt install openssh-server -y
sudo systemctl enable ssh
sudo systemctl stop sshd
sudo ssh-keygen -A
sudo systemctl start sshd
```
Now you're ready to connect from your local machine using the terminal:
```
ssh arduino@
```
The default password of the UNO Q is `arduino`.
You can also use the VS Code Remote - SSH Extension to connect to the UNO Q as a host. If you choose this method, go to the Extensions view in VS Code and disable any installed extensions such as GitHub Copilot to avoid potential memory issues on the board that these extensions generate.
## Installing Edge Impulse dependencies
To set this device up in Edge Impulse, run the following commands from the UNO Q Terminal or via adb:
```
sudo apt update
curl -sL https://deb.nodesource.com/setup_20.x | sudo bash -
sudo apt install -y gcc g++ make build-essential nodejs sox gstreamer1.0-tools gstreamer1.0-plugins-good gstreamer1.0-plugins-base gstreamer1.0-plugins-base-apps
sudo npm install edge-impulse-linux -g --unsafe-perm
```
## Connecting to Edge Impulse
With all software set up, connect the USB camera or microphone to your UNO Q and run:
```
edge-impulse-linux
```
This will start a wizard which will ask you to log in, and choose an Edge Impulse project. If you want to switch projects, run the command with `--clean`.
### Verifying that your device is connected
That’s all! Your device is now connected to Edge Impulse. To verify this, go to your Edge Impulse project, and click Devices. The device will be listed here.
 ## Deploying back to the device
To run your impulse locally, just connect to your UNO Q and run:
```
edge-impulse-linux-runner
```
This will automatically compile your model with full hardware acceleration, download the model to your UNO Q, and then start classifying. Our [Linux SDK](https://docs.edgeimpulse.com/tools/libraries/sdks/inference/linux) has examples on how to integrate the model with your favourite programming language. If you want to switch projects, run the command with `--clean`.
## Troubleshooting
One way to remotely access the UNO Q desktop is to install a VNC server.
Here is an example using TigerVNC:
```
sudo apt install tigervnc-standalone-server tigervnc-xorg-extension tigervnc-viewer
```
And then run:
```
vncserver -localhost no -geometry 800x600 -depth 32
```
Now you will be able to access the desktop via a VNC client on your computer with the IP address.
If you don’t see the board connected to your computer, confirm that the UNO Q is connected directly to your computer via the USB-C cable. Then wait until the board boots (between 30-60 seconds), and check again if you see the board.
In Linux or Mac you should be able to see it here:
```
ls /dev/tty.*
/dev/tty.debug-console
/dev/tty.Bluetooth-Incoming-Port /dev/tty.usbmodem281096....
```
This is the board `/dev/tty.usbmodem281096....`.
If you can’t SSH into your UNO Q, that means that the SSH service is not running properly or it’s not installed (depending on the versions).
```
ssh arduino@192.168.1.8
ssh: connect to host 192.168.1.8 port 22: Connection refused
```
Go to the [Starting the SSH server](/hardware/boards/arduino-uno-q#starting-the-ssh-server) section and try to install and start the SSH service again.
If you can’t start the SSH service due this error:
```
# sudo systemctl start ssh
Job for ssh.service failed because the control process exited with error code.
See "systemctl status ssh.service" and "journalctl -xeu ssh.service" for details.
```
Try this:
```
sudo systemctl stop sshd
sudo ssh-keygen -A
sudo systemctl start sshd
```
Then you should be able to SSH your device from your computer.
In the case that you SSH into the UNO Q and the default password `arduino` is not working, such as shown here:
```
ssh arduino@192.168.1.8
The authenticity of host '192.168.1.8 (192.168.1.8)' can't be established.
ED25519 key fingerprint is SHA256:fFv4PBxtcgg/wvz3OJqWZ3fdj9lWieihs0e1fHe8GpE.
This key is not known by any other names.
Are you sure you want to continue connecting (yes/no/[fingerprint])? yes
Warning: Permanently added '192.168.1.8' (ED25519) to the list of known hosts.
arduino@192.168.1.8's password:
Permission denied, please try again.
```
Try to run this from the `adb` tool with the new password that you want to use:
```
adb shell
# sudo passwd arduino
New password:
Retype new password:
passwd: password updated successfully
```
Then try again to SSH the UNO Q with the new password.
If you see the following error when trying to deploy an `.eim` model to your UNO Q:
```
Failed to run impulse Error: Unsupported architecture “aarch64”
```
It likely means you are attempting to deploy an `.eim` Edge Impulse model file to a 32-bit operating system running on a 64-bit CPU.
## Deploying back to the device
To run your impulse locally, just connect to your UNO Q and run:
```
edge-impulse-linux-runner
```
This will automatically compile your model with full hardware acceleration, download the model to your UNO Q, and then start classifying. Our [Linux SDK](https://docs.edgeimpulse.com/tools/libraries/sdks/inference/linux) has examples on how to integrate the model with your favourite programming language. If you want to switch projects, run the command with `--clean`.
## Troubleshooting
One way to remotely access the UNO Q desktop is to install a VNC server.
Here is an example using TigerVNC:
```
sudo apt install tigervnc-standalone-server tigervnc-xorg-extension tigervnc-viewer
```
And then run:
```
vncserver -localhost no -geometry 800x600 -depth 32
```
Now you will be able to access the desktop via a VNC client on your computer with the IP address.
If you don’t see the board connected to your computer, confirm that the UNO Q is connected directly to your computer via the USB-C cable. Then wait until the board boots (between 30-60 seconds), and check again if you see the board.
In Linux or Mac you should be able to see it here:
```
ls /dev/tty.*
/dev/tty.debug-console
/dev/tty.Bluetooth-Incoming-Port /dev/tty.usbmodem281096....
```
This is the board `/dev/tty.usbmodem281096....`.
If you can’t SSH into your UNO Q, that means that the SSH service is not running properly or it’s not installed (depending on the versions).
```
ssh arduino@192.168.1.8
ssh: connect to host 192.168.1.8 port 22: Connection refused
```
Go to the [Starting the SSH server](/hardware/boards/arduino-uno-q#starting-the-ssh-server) section and try to install and start the SSH service again.
If you can’t start the SSH service due this error:
```
# sudo systemctl start ssh
Job for ssh.service failed because the control process exited with error code.
See "systemctl status ssh.service" and "journalctl -xeu ssh.service" for details.
```
Try this:
```
sudo systemctl stop sshd
sudo ssh-keygen -A
sudo systemctl start sshd
```
Then you should be able to SSH your device from your computer.
In the case that you SSH into the UNO Q and the default password `arduino` is not working, such as shown here:
```
ssh arduino@192.168.1.8
The authenticity of host '192.168.1.8 (192.168.1.8)' can't be established.
ED25519 key fingerprint is SHA256:fFv4PBxtcgg/wvz3OJqWZ3fdj9lWieihs0e1fHe8GpE.
This key is not known by any other names.
Are you sure you want to continue connecting (yes/no/[fingerprint])? yes
Warning: Permanently added '192.168.1.8' (ED25519) to the list of known hosts.
arduino@192.168.1.8's password:
Permission denied, please try again.
```
Try to run this from the `adb` tool with the new password that you want to use:
```
adb shell
# sudo passwd arduino
New password:
Retype new password:
passwd: password updated successfully
```
Then try again to SSH the UNO Q with the new password.
If you see the following error when trying to deploy an `.eim` model to your UNO Q:
```
Failed to run impulse Error: Unsupported architecture “aarch64”
```
It likely means you are attempting to deploy an `.eim` Edge Impulse model file to a 32-bit operating system running on a 64-bit CPU.